
Video editing with Adobe Premiere Pro CC - basics & practice (tutorial)

- Video editing with Adobe Premiere Pro CC: basics and advanced techniques
- The basics: Get to know the user interface, tools and workspaces
- Getting started: Create texts, animate elements with keyframes, make color edits
- The practice: Create a gripping Insta reel and a high-impact YouTube intro
- And much more: create your own presets, stabilize videos, edit voice recordings
- Almost 6-hour tutorial by Peter Lakenbrink, including practice material and handout with shortcuts
Whether for TV, social media or YouTube, whether for short clips, detailed image films or private videos with a wow effect: start the tutorial and learn how to edit videos with Premiere Pro!
45 Videos, 352 minutes
Preliminary information about the tutorial
Video editing with Adobe Premiere Pro CC: 0 | Intro to the video tutorial
Welcome to this training course on video editing with Adobe Premiere Pro. Your trainer will explain what you can expect in the course in this intro.
Video editing with Adobe Premiere Pro CC: 1.1 | Welcome to the course
In this video, I welcome the participants and briefly explain the structure and content of the course.
Video editing with Adobe Premiere Pro CC: 1.2 | This is me & therefore my expertise
In this video, I introduce myself, go into my initial touchpoints with video editing and explain how I built my expertise in Adobe Premiere Pro.
Video editing with Adobe Premiere Pro CC: 1.3 | What to expect in the course - Structure
In this video, I describe the central theme of the course and explain what I will cover and where in the course.
Video editing with Adobe Premiere Pro CC: 1.4 | Video material & handout
Here we will briefly discuss the materials that you can use to accompany the course in order to understand the content of the training yourself.
Video editing with Adobe Premiere Pro CC: 1.2 | This is me & therefore my expertise
2 min OpenVideo editing with Adobe Premiere Pro CC: 1.3 | What to expect in the course - Structure
1 min OpenIntroduction to Adobe Premiere Pro CC
Video editing with Adobe Premiere Pro CC: 2.1 | Download, Pricing & Installation
In this video, I describe the procurement process of Premiere Pro as a single product and via the Creative Cloud.
Video editing with Adobe Premiere Pro CC: 2.2 | Initial opening & presets
In this video, I talk about the first opening of Premiere Pro and the view that the user will find by default. I then discuss the default settings in terms of appearance, audio devices and storage.
Video editing with Adobe Premiere Pro CC: 2.3 | Getting started tutorial
In this video, we want to break up the introduction to Premiere Pro with a practical example. To do this, we will use a video from the course materials, which contains initial instructions that we will then implement: Key the green screen, integrate a text and move the image.
Video editing with Adobe Premiere Pro CC: 2.4 | Project media, tabs & workflow
In this video, I introduce the project media area and explain how you can create a clear folder structure here. I also discuss the various tabs and tabs in the header area.
Video editing with Adobe Premiere Pro CC: 2.5 | Pre-editing area
In this video, I introduce the pre-editing area where you can edit your videos before importing them into the sequence.
Video editing with Adobe Premiere Pro CC: 2.6 | Timeline, source patching, targeting, etc.
This video is about the buttons directly to the left of the timeline and their functions in Premiere Pro.
Video Editing with Adobe Premiere Pro CC: 2.7 | Nesting, Alignment & Linked Selection
This video is about the five buttons in the header area of the timeline: Nesting, Magnet, Marker and more.
Video editing with Adobe Premiere Pro CC: 2.8 | Tools
In this video, I explain the tools provided to the left of the timeline. Here I mention the respective shortcuts and go into detail about the editing options.
Video editing with Adobe Premiere Pro CC: 2.1 | Download, Pricing & Installation
3 min OpenVideo editing with Adobe Premiere Pro CC: 2.6 | Timeline, source patching, targeting, etc.
11 min OpenVideo Editing with Adobe Premiere Pro CC: 2.7 | Nesting, Alignment & Linked Selection
5 min OpenEverything about video editing
Video editing with Adobe Premiere Pro CC: 3.1 | Alignment with music/audio track
In this video, I explain how you can align video clips with the swings of an audio file.
Video editing with Adobe Premiere Pro CC: 3.2 | Video transitions
In this video, I introduce the use of video transitions. I discuss where the transitions are located, what categories there are and how to add and customize transitions.
Video editing with Adobe Premiere Pro CC: 3.3 | Basic color editing and adjustment layer
In this video, I explain how adjustment layers work and use them to add the first general color corrections.
Video editing with Adobe Premiere Pro CC: 3.4 | Supplement to adjustment layers
In this video, I explain other useful use cases of adjustment layers besides the general color adjustment added earlier.
Video editing with Adobe Premiere Pro CC: 3.5 | Text and shape options
In this video, I dive into the Essential Graphics area and explain the options there and how to create keyframes.
Video editing with Adobe Premiere Pro CC: 3.6 | Advanced text animation
In this video, I create an animated text banner based on the text options introduced. Masking is also used for this.
Video editing with Adobe Premiere Pro CC: 3.7 | Create and export animation template
This video is about saving the previously created text animation as a preset for permanent use.
Video editing with Adobe Premiere Pro CC: 3.9 | Export image file
This video begins the series on the subject of export and deals with the saving of a single image via snapshot.
Video editing with Adobe Premiere Pro CC: 3.10 | Export video file: MP4
In this video, I discuss exporting as an MP4 file as the optimal output file in terms of quality and file size.
Video editing with Adobe Premiere Pro CC: 3.11 | Export video file: MOV
In this video, I also address the export via MOV file if the output of a so-called alpha layer is required.
Video editing with Adobe Premiere Pro CC: 3.12 | Export video file: Adobe Media Encoder
This video is about an additional Adobe product in the Creative Cloud, namely the Adobe Media Encoder. This can be used to outsource render processes.
Video editing with Adobe Premiere Pro CC: 3.1 | Alignment with music/audio track
10 min OpenVideo editing with Adobe Premiere Pro CC: 3.3 | Basic color editing and adjustment layer
9 min OpenVideo editing with Adobe Premiere Pro CC: 3.7 | Create and export animation template
3 min OpenVideo editing with Adobe Premiere Pro CC: 3.12 | Export video file: Adobe Media Encoder
3 min OpenAdvanced techniques, methods, and effects using the example of an Instagram Reels
Video editing with Adobe Premiere Pro CC: 4.1 | What we're up to: Instagram Travel Reel
This video provides an overview and preview of what will be created in the coming sections.
Video editing with Adobe Premiere Pro CC: 4.2 | Excursus: Synchronizing Instagram Reels with licensed music in Premiere Pro
This video is about how you can create reels with music without copyright problems and then publish them on Instagram.
Video editing with Adobe Premiere Pro CC: 4.3 | Turn your own voice into trailer voice and save your own audio presets
In this video, I show you how to record your own voice and turn it into a cinematic trailer voice using effects in Premiere Pro. We use the reverb and pitch effect for this.
Video editing with Adobe Premiere Pro CC: 4.4 | Custom layout - Save workspace for upright videos
In this video, I discuss how to optimize the user interface for creating edgy videos like Instagram Reels or Stories.
Video editing with Adobe Premiere Pro CC: 4.5 | General preparatory work with scaling and color corrections for the Instagram Reel
In this video, we start with the creation of the Instagram travel reel and convert the imported media into a suitable format. We delete the associated audio tracks, adjust the scaling and make color corrections.
Video editing with Adobe Premiere Pro CC: 4.6 | Arrange clips part 1: Mask & Track Matte effect
In this video, we add a Mexican flag to the beginning of the sequence. We also want to adapt the following clip to this flag. We will use masks and the track matte effect for this.
Video editing with Adobe Premiere Pro CC: 4.7 | Time Remapping/Speed Ramping explained
In this video, I explain how time remapping works using the example of a rally car.
Video editing with Adobe Premiere Pro CC: 4.8 | Arranging clips part 2: Time remapping transition
In this video, I transfer the previously mentioned concept of time remapping to clips from the Instagram reel. To do this, I will play with the playback speed in the transition area of two videos.
Video editing with Adobe Premiere Pro CC: 4.9 | Arrangement of clips Part 3: Advanced color editing of sections
In this video, we will use a clip as an example to carry out additional color editing in a section of the video. To do this, we only edit the colors of the sky and leave the lower part of the image untouched.
Video editing with Adobe Premiere Pro CC: 4.10 | Arranging clips Part 4: Final edits
In this video, we complete the Instagram Reel and add another effect by integrating cuts and jumps into the video.
Video editing with Adobe Premiere Pro CC: 4.11 | EXTRA: Filing clips
In this video, I discuss additional options for storing your own video clips in a clearly organized way before they are transferred to the final sequence.
Video editing with Adobe Premiere Pro CC: 4.12 | EXTRA: Fast synchronization to music
In this video, I show you how to synchronize video clips to a music track very quickly. To do this, we use markers and the automatic alignment option.
Video editing with Adobe Premiere Pro CC: 4.1 | What we're up to: Instagram Travel Reel
3 min OpenVideo editing with Adobe Premiere Pro CC: 4.2 | Excursus: Synchronizing Instagram Reels with licensed music in Premiere Pro
9 min OpenVideo editing with Adobe Premiere Pro CC: 4.3 | Turn your own voice into trailer voice and save your own audio presets
14 min OpenVideo editing with Adobe Premiere Pro CC: 4.4 | Custom layout - Save workspace for upright videos
4 min OpenVideo editing with Adobe Premiere Pro CC: 4.5 | General preparatory work with scaling and color corrections for the Instagram Reel
13 min OpenVideo editing with Adobe Premiere Pro CC: 4.6 | Arrange clips part 1: Mask & Track Matte effect
13 min OpenVideo editing with Adobe Premiere Pro CC: 4.7 | Time Remapping/Speed Ramping explained
11 min OpenVideo editing with Adobe Premiere Pro CC: 4.8 | Arranging clips part 2: Time remapping transition
9 min OpenVideo editing with Adobe Premiere Pro CC: 4.9 | Arrangement of clips Part 3: Advanced color editing of sections
12 min OpenVideo editing with Adobe Premiere Pro CC: 4.10 | Arranging clips Part 4: Final edits
10 min OpenVideo editing with Adobe Premiere Pro CC: 4.12 | EXTRA: Fast synchronization to music
6 min OpenImage stabilization & Motion Tracking
Video editing with Adobe Premiere Pro CC: 5.1 | Image stabilization for shaky footage
In this video, we import a shaky video and stabilize it using an effect within Premiere Pro.
Video editing with Adobe Premiere Pro CC: 5.2 | Object tracking
In this video I show how you can simulate object tracking in Premiere Pro and use it for yourself.
Even more Premiere Pro CC using the example of a YouTube intro
Video editing with Adobe Premiere Pro CC: 6.1 | What we're up to: YouTube sports intro
In this video I show a preview of what we will create in the following sections: a custom YouTube channel intro for a sports channel.
Video editing with Adobe Premiere Pro CC: 6.2 | Nesting as a superordinate arrangement of clips
In this video, I explain how nesting works and the advantages of working with this structure.
Video editing with Adobe Premiere Pro CC: 6.3 | Individual coloring and new effects
In this video, we spice up the channel intro with additional dynamic effects such as repeats and reflections.
Video editing with Adobe Premiere Pro CC: 6.4 | Overlays for even more dynamics
In this video, we also individualize our intro by using abstract videos as an overlay.
Video editing with Adobe Premiere Pro CC: 6.5 | Connect to After Effects with Dynamic Link
In this video I show you how to link Adobe Premiere Pro and Adobe After Effects. The concept is called Dynamic Link. I discuss several possible ways of integration in this part.
Video editing with Adobe Premiere Pro CC: 6.6 | Create your own text effect, offset and echo
In this video, we add an exciting text animation to our intro. To do this, we combine a variety of effects such as offset, echo and turbulent displacement.
Video editing with Adobe Premiere Pro CC: 6.1 | What we're up to: YouTube sports intro
2 min OpenVideo editing with Adobe Premiere Pro CC: 6.2 | Nesting as a superordinate arrangement of clips
12 min OpenVideo editing with Adobe Premiere Pro CC: 6.3 | Individual coloring and new effects
10 min OpenVideo editing with Adobe Premiere Pro CC: 6.5 | Connect to After Effects with Dynamic Link
14 min OpenVideo editing with Adobe Premiere Pro CC: 6.6 | Create your own text effect, offset and echo
19 min OpenExamples of use
-
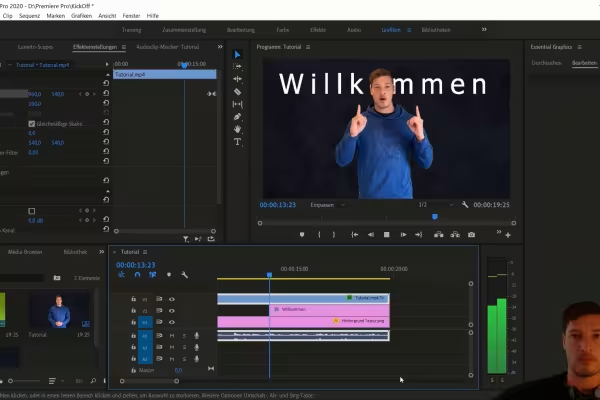 New to Adobe Premiere Pro CC? Then this course is a great way to get started!
 -
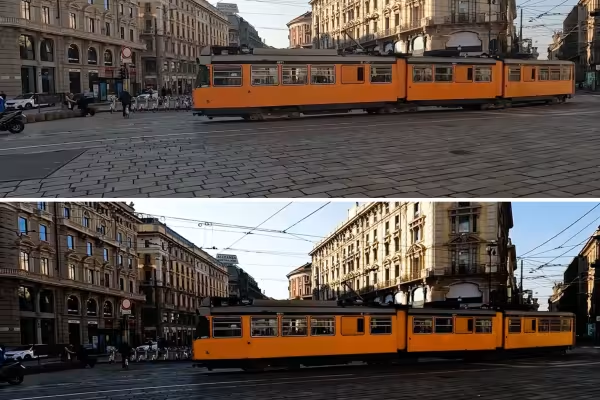 The basics: How to optimize your video material and incorporate text animations, for example.
 -
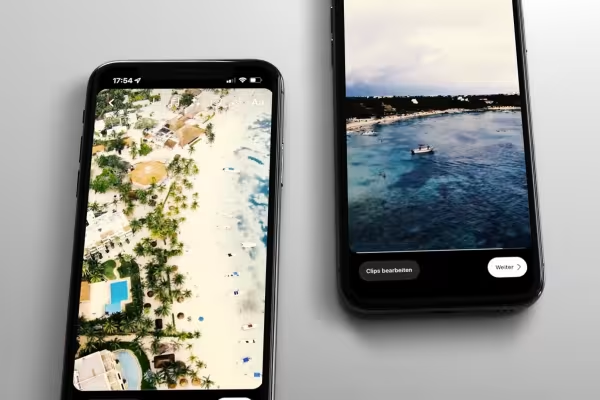 Practice: Learn how to create an Instagram reel to the beat of the music.
 -
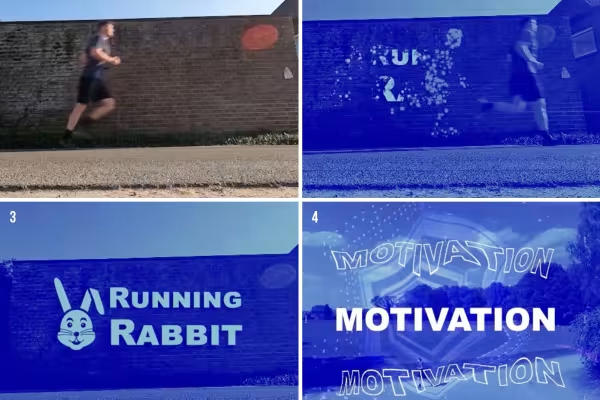 Example: Take your videos and create effective movies in Adobe Premiere Pro!
You might also like
Practical applications for companies
Produce high-quality videos
How it works. What options exist.

Edit films, transitions, animations, and more
Comment now „Video editing with Adobe Premiere Pro CC - basics & practice (tutorial)“