
Your composite looks almost finished, but the light still doesn't match the ground. The desert is beautifully lit, the road is not, and there is too much light on the steppe whose source remains unclear. In this lesson, you solve the problem with a light gradient mask. You will learn how to reduce light evenly and without visible brush marks, how to protect light accents you have already placed, and how to make the headlight beams so believable that they appear to come from the vehicles.
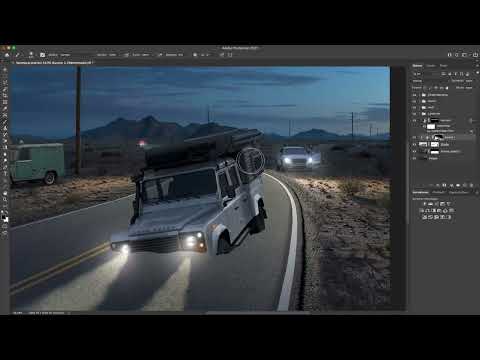
The video is only loaded from YouTube when you play it – data (including your IP address) is then transmitted to YouTube/Google. More in the privacy policy
Key Takeaways
A linear gradient on a mask is more precise and more even than freely painted shadows, especially on large areas such as the road.
You must protect lights you have already painted with a selection before applying the gradient, otherwise they will be lost.
An active selection remains in effect even when you can no longer see it. Be sure to deselect it before painting.
With a soft brush tip you work on the scattered light, with a hard tip directly at the headlight.
The brush opacity allows fine, gradual corrections instead of removing the light completely with a single stroke.
Step-by-Step Guide
Analyzing the Problem
Before you touch any tools, look at where the light looks unwanted. In the example, the desert is lit consistently, while the road is too bright or not lit appropriately. On the steppe, too much light from the flash of the lower shot arrives, and the light source is not comprehensible to the viewer. Make a note of these areas, because that is exactly where you will start later.

Preparing the Audi's Headlight Beam
The Audi's headlight beam is best corrected via the mask of the curves layer. These curves ensure that the road gets the desired blue-gray tone that matches the landscape. So you want to keep this look and only partially reduce it.
Why Painting Is Tedious Here
You could paint the light into the mask by hand with black and let it get weaker and weaker toward the front. In theory this works, but it requires a large, soft brush tip and a lot of patience. Blotches or stepped transitions that are clearly visible quickly appear. That is why you choose a gradient, which works more reliably and cleanly.
Protecting Existing Lights with a Selection
A gradient from top to bottom would also remove the light accents that you have already painstakingly drawn. That's why you protect them beforehand. Hold down the Command key (Mac) or the Control key (Windows) and click directly in the mask. Photoshop creates a selection from it.
Hiding the Selection
The selection is now active, and the marching ants around the image indicate it. Hide the extras so that you can see the view undisturbed. On a Mac, press Command + H for this, on Windows Control + H. If Photoshop displays a prompt about hiding, confirm it via the Extras. The marching ants should run around the entire edge of the image. If they are only visible in individual places, invert the selection: Shift + Command + I (Mac) or Shift + Control + I (Windows).
Setting Up the Gradient
Select the Gradient tool. The foreground color should be black, the background color white. Use the linear gradient, that is, the leftmost type in the options bar. Black on the mask hides the light, white lets it remain.
Dragging the Gradient
Now drag the gradient from the vehicle, that is, roughly from the Audi, diagonally downward to the point where the light should disappear. You don't have to hit it perfectly, as the gradient can still be adjusted later. What matters is that the light intensity decreases continuously toward the front.
Checking the Result
Take a look at the result. The light stays bright near the vehicle and becomes softly darker toward the front. The brightness of the road and steppe now matches, and the shadows look dark blue. However, there is still too much light behind the vehicle, which you need to contain in the next step.

Deselecting Before Painting
Before you continue working with the brush, be sure to deselect. Press Command + D (Mac) or Control + D (Windows). The selection is invisible, but it is still active. If you forget it, your brush won't respond as expected, and you'll spend a long time looking for the error.

Reducing Excess Light with the Brush
Choose a soft brush and make it a little smaller. Paint on the mask with white so the light stays visible in those areas, or with black to remove it. Make sure the light doesn't shine all the way to the back but stays more in the front area. In the area of the headlight, use a hard brush tip, because the light may be clearly outlined there. Toward the bottom left, the tip becomes larger and softer so the transition looks natural.

Undoing the Correction if Necessary
Sometimes you intervene too strongly. You notice this because the light looks crooked or unnatural. In that case, invert the mask or retouch with white paint until the edge of the light looks coherent.

Darkening the Side Behind the Vehicle
On the other side, you need a larger brush tip and white paint at about 30 percent opacity. With this, you darken the area behind the vehicle. The opacity allows fine dosing, so you can work in several short strokes. The light then looks significantly less intense here.

Containing the Flash on the Steppe Layer
The light you analyzed earlier is on the layer "Steppig geblitzt". The layer mask already exists, so you paint into it with black. Set the opacity to about 30 percent and remove the light step by step. A little stray light from the Audi may remain, because it looks natural on the steppe. Toward the front, you reduce the light more strongly.

Making the Light Cone Believable
When you reduce the light on the steppe, a light cone emanating from the headlight automatically emerges. This cone is reminiscent of the light of the Austin. Behind the car, you still need to remove a little so that the impression arises that the light cone actually comes from the headlights. This makes the composite look self-contained.

Final Assessment of the Result
In the end, the lighting situation looks coherent overall. A small residual doubt remains because the shadow of the Land Rover is missing. However, the light distribution is adapted to the surroundings in such a way that this impression is hardly noticeable in the overall picture. Compare the before and after versions before you continue working.

Summary ??? Light Gradient Mask in Photoshop: Containing Headlight Light with Precision
With a light gradient mask, you adapt the light of a composite specifically to the ground. First, you analyze where light looks unwanted. Then you protect lights that have already been set using a selection, create a linear gradient, and deselect before the fine-tuning. With soft and hard brush tips as well as reduced opacity, you refine the transitions until headlights, flash light, and surroundings match.
FAQ
Question: Why should I protect existing lights before the gradient?Answer: A gradient across the entire mask would also remove the light accents you have already painted. With a selection that you create by Command or Control-clicking in the mask, these areas remain untouched.
Question: What do I do if I can't see the selection but still can't paint?Answer: The selection is probably still active. Deselect it with Command + D or Control + D before you continue working.
Question: Which colors do I need for the Gradient tool?Answer: The foreground color should be black and the background color white. Black hides the light, white leaves it.
Question: When do I use a hard and when a soft brush tip?Answer: At the headlight, where the light should be clearly outlined, you use a hard tip. In the stray light farther away, you use a large, soft tip.
Question: Why do I work with 30 percent opacity?Answer: The reduced opacity allows you to remove the light in several fine steps. This way you avoid hard edges and stepped transitions.
Question: What do I do if the correction turned out too strong?Answer: Invert the mask or paint over it with white until the edge of the light looks natural.
Question: Do I have to remove the light completely?Answer: No. A little stray light may remain, because it looks believable and fits the scene.

