
A driver behind the steering wheel determines whether an image of a vehicle looks alive or just stands there empty. Especially in a nighttime scene, the work is worthwhile, because the viewer immediately wonders how the person in the car is reacting. This guide shows you how to cleanly separate a driver from the background, place them in your image, and bring them believably into the cockpit using position, mask, and steering wheel.
The video is only loaded from YouTube when you play it – data (including your IP address) is then transmitted to YouTube/Google. More in the privacy policy
Key Takeaways
- A driver usually looks more convincing in the image than footprints or other hints of an abandoned vehicle.
- The Color Range command with a suitable tolerance provides the base mask. You should choose the tolerance so that the background becomes almost black without the driver looking transparent.
- The "Soft Light" mode of the brush helps you paint at edges without destroying the mask.
- A smart object allows you to change size and position later without loss of quality.
- The steering wheel serves as a reference for the position of the hands and upper body.
Step 1: Open the driver photo and check the starting point
First, open the driver file from your project files. The photo was taken with a replica of the cockpit lighting. The light is therefore cool and turquoise and fits the drama of the scene. Before you start working, look at the image closely: the greenish background is the reason you can cut out the subject at all. The color looks more turquoise in the JPEG because the development from the RAW file brings a cool blue cast. That doesn't matter here, because you want to remove the background anyway.

Step 2: Select a white layer mask and Color Range
Create a white layer mask so that you can edit the image non-destructively. Then go to the Properties and click "Color Range". Alternatively, you can find the command at the top under "Select", where it is also called "Color Range". Both ways lead to the same result, so you can use whichever is more comfortable for you. In the dialog you can immediately see which areas are being marked, and you can already roughly approach the driver with it.

Step 3: Set the tolerance for the selection
The tolerance controls how many similar color tones fall into the selection. The dialog remembers the last value, so you should always check it. For a clean start, set the tolerance to 200. Afterwards you will see that too many areas are marked. This is intentional, because you will specifically reduce the selection in the next step.

Step 4: Select green tones while holding the Shift key
Now click in the green background, not on the driver. The green tones are the lower-contrast variant, and these are exactly what you want to capture. To do this, hold down the Shift key so that you add further areas to the selection. Feel free to move the mouse pointer through all zones of the background until you have captured the green completely. This way you avoid accidentally letting the bright tones of the driver get into the mask.

Step 5: Find the compromise between hard edges and transparency
Now it's about fine-tuning. If you lower the tolerance too much, you get hard edges. If you stay too high, the driver becomes transparent. The solution is a compromise: reduce the tolerance until the background is almost completely black. In this example, the sensible range was between 80 and 85. Your value may differ; what matters is the result in the preview image.

Step 6: Invert the mask and touch up flaws
Confirm the selection and then invert the mask. After all, you want to keep the driver and not the background. Afterwards you will notice that the mask is not yet perfect. Hold the Alt key and click on the mask so that you see it in isolation. With a large brush in white, paint over the areas that are still missing. This is quick and is a simple trick that saves a lot of work.

Step 7: Refine edges with the "Overlay" mode
You need more precision at the edges. You have two options for this: the Dodge tool or the brush in "Overlay" mode. The mode is set on the tool, not on the layer. With it, you can paint over the boundaries without black turning gray or white. Black stays black, light gray becomes white. Make sure to switch back to "Normal" after painting, otherwise the brush will behave unexpectedly later. If you then want to remove individual white specks, use black as the foreground color and paint them away.

Step 8: Insert the driver into the scene as a Smart Object
Convert the cut-out driver into a Smart Object before you drag him into your main image. This way you can scale him as much as you like later without losing sharpness. Drag the Smart Object into the image and place it not below the horizon, but in the layer group "Land Rover". Then give the layer a clear name, for example "Driver Land Rover". This prevents mix-ups when several figures are in the project later.

Step 9: Set scale and position with Ctrl+T or Cmd+T
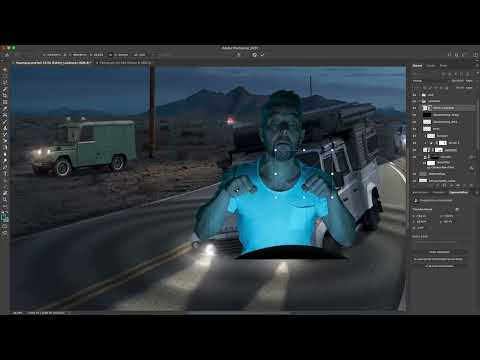
Activate Free Transform with Ctrl+T on Windows or Cmd+T on Mac. First reduce the size of the driver roughly and try out different sizes until he fits the scene. Then place him in the area behind the steering wheel. Zoom in close and check the proportions. A helpful trick is to imagine the driver is about to get out and stand next to the car. From this perspective, he often seems almost too small, which usually creates a natural impression.

Step 10: Use the steering wheel as a reference for hands and upper body
The driver has to actually grip the steering wheel. You don't have to redraw the steering wheel perfectly; a dark shape in the right place is enough. Make the driver's layer briefly transparent and get closer, then you can see exactly where the steering wheel is. Move the driver to the right until he grips the steering wheel with both hands. Only then is the position convincing.

Step 11: Perform fine masking at the steering wheel
First reduce the opacity of the layer so that you can see the outline better. Choose the brush with 100% hardness and adjust its size to the thickness of the steering wheel. Smoothing should be at 100%. Paint with black over the areas that don't belong to the driver, and with white over the parts you need to bring back. You also remove the elbow and visible bits of hair with black. Make sure that you overlap the steering wheel correctly where the driver actually touches it.

Step 12: Work out the rubber seal and windshield
The driver is only visible behind the windshield and not in front of the entire vehicle. Therefore, you have to trace the rubber seal along the window with a dark color. You can do this work at your leisure, because it determines whether the figure sits cleanly in the car. The windshield wiper also has to be masked out. With a larger brush tip, this goes quickly.

Step 13: Outlook on the lighting adjustment
At this point, the driver is not yet adapted to the light of the scene. A piece of the elbow is still visible, and in one spot you accidentally painted across the figure. You should fix these errors immediately before you work on light and shadow. The next step then follows, in which you match brightness, color, and shadows to the surroundings. The main thing is already done, though: the driver is in the right place.

Summary ??? Cutting out the driver in Photoshop and compositing him into the car
You have learned how to cut out the driver with a layer mask and the Color Range command. You set the tolerance so that the background turns black without making the driver transparent. With the "Overlay" mode, you painted clean edges, then placed him in the car as a Smart Object, scaled him, and aligned him with the steering wheel. The fine masking at the steering wheel, rubber seal, and windshield wiper makes the driver believable. The next step is about adapting to light and shadow.
FAQ
Why shouldn't I simply copy the driver out of the image?A cutout without a mask is rigid and cannot be fitted cleanly into the scene. The mask gives you control over the edges and allows corrections without changing the original.
What do I do if the driver looks transparent after being isolated?The tolerance was probably too low. Increase it gradually until the driver is opaque again, and check the result in the preview image.
How do I remove white dots in the mask?Switch the foreground color to black and paint the dots away. Make sure to set the brush back to normal mode afterwards.
Why does the driver have to be a smart object?A smart object retains its quality even when strongly scaled down or up. You can readjust the size at any time without losing details.
How can I tell that the driver is positioned correctly?Check whether he is actually gripping the steering wheel with both hands and whether the upper body is behind the windshield. Imagine the driver just getting out in order to judge the size.

