An app idea becomes tangible as soon as someone can click on it. That is exactly what a mockup is for: a designed draft of the interface that you show to investors, developers, or customers before the actual development begins. Claude Design can generate such interfaces from a text description. You define the screens, navigation, components, and visual style, and the tool implements them.
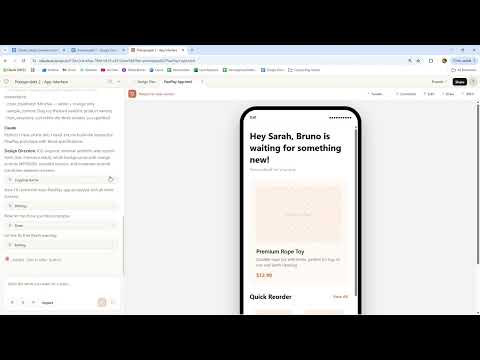
The video is only loaded from YouTube when you play it – data (including your IP address) is then transmitted to YouTube/Google. More in the privacy policy
In this tutorial, I guide you through the example of a mobile app for a dog shop, the so-called "PuPlay" shop. You will learn how to build the prompt, respond to follow-up questions, improve missing parts, and then export your result.
Key Takeaways
- Claude Design creates app mockups from descriptions. You determine screens, features, and content through your prompt.
- The more specifically you describe style, colors, corner shape, and presentation (for example, as a mobile frame), the closer the result comes to your vision.
- A first draft is rarely perfect. Targeted follow-up prompting and adjusting are part of the workflow.
- The language of your prompt determines the language of the app.
- For presentations, it is best to export screenshots or import the screens into Canva or PowerPoint, because the PDF loses quality.
Step-by-Step Guide
Step 1: Define the Goal and Example Project
Before you write the first prompt, clarify what the mockup is meant to be used for. In the example, dog owners use the app to manage their orders, receive toy recommendations, and create a profile for their dog. The mockup is meant to help with presentations, investor meetings, and visualizing your idea. The clearer the goal is, the more precisely you can describe the content.

Step 2: Describe Screens, Features, and Content
First, determine which screens the app needs. In the example, there are three: the home screen, the dog profile, and the product details. Then describe what should happen on each screen. This includes buttons with a clear function, a personalized greeting, an avatar for the dog, a name field, and preferences.
If you only need a single screen, ask specifically for that screen. This saves time and keeps the result clear.

Step 3: Define the Visual Style
The style decides whether your mockup looks high-quality or cheap. In the example, a style along the lines of "iOS Inspired" was chosen: clean, minimalist, and suitable for Apple devices. The main color is orange, the background white. Shadows should be soft and not too strong, and corners are rounded. With the instruction for a mobile frame with a phone outline, Claude displays the screens directly in the device.
If you also want a dark variant, simply add the sentence that the same screens should be created in dark mode.

Step 4: Create the Prototype and Insert the Prompt
Start a new prototype and assign a unique project name, in the video for example "Praxis Projekt 2 App Interface". Choose "High Fidelity" as the level of detail so that the interface turns out as detailed as possible. Then insert your prepared prompt.
If available, you can upload logos and a style guide at this point. Claude then incorporates colors, fonts, and brand elements directly into the design.
Step 5: Answer Follow-Up Questions and Refine Details
Claude often asks follow-up questions before it finalizes the interface. Answer them as precisely as possible. In the example, the following decisions were made, among others: texts and fonts should be clean and minimalist, products are displayed as cards rather than plain lists, and the tab bar gets icons with labels. In addition, the featured product should use the full width, a rating system should be built in, and smooth transitions between the elements ensure fluid operation. Gray was chosen as the secondary color.
The more precise your answers are, the less rework is needed later.

Step 6: Add a Fourth Screen and Review the Result
Once the three main screens are in place, you can add another screen with an additional prompt. In the example, the instruction was roughly: Add a fourth screen, the shopping cart, with two items, price, and checkout button. Claude then generates the new screen.
Afterwards, check each screen critically. The video revealed three typical problems. First, the shop section didn't work yet because no separate screen had been generated for it. Second, the product section was missing and had to be added with a follow-up prompt. Third, the X button was positioned over the title. You can correct such spacing issues either directly in the editor or with a precise rewording of the prompt.
An important note on language: In the video, Claude occasionally had problems with umlauts. That's why the prompt was written in English. However, the language of the interface depends on the language of the prompt. If you want English welcome texts like "Hey Sarah, Bruno is waiting for something new", you need to prompt in English accordingly. For purely German texts, you can write in German.
Step 7: Export the mockup and make it ready for presentation
Finally, it's about sharing. In the menu you will find the "Share" option. There you can download the mockup as a ZIP file or as a PDF, or import it directly into Canva. For a PDF export, you should make sure beforehand that all screens have fully loaded, otherwise elements will be missing.
The PDF looks relatively weak in the video because text and graphics lose sharpness. For convincing presentations, the route via screenshots is therefore worthwhile. Zoom out the view, take a screenshot of each screen, and insert the images into Canva or PowerPoint. This way the quality is preserved, and you can also add texts and notes.

Summary – Creating modern app interfaces with Claude Design
With Claude Design, you can create an app mockup in a short time that is easy to present. A clear goal, precisely described screens, and a distinct style are crucial. You should take the tool's follow-up questions seriously and fix errors with targeted follow-up prompts. For the presentation, it's best to export screenshots and edit them in Canva or PowerPoint. This gives you a mockup that illustrates your idea vividly to investors and developers.
FAQ
Can I also have just a single screen created?Yes, ask Claude specifically for the desired screen, for example only the profile.
How do I get a dark mode version of my mockup?Add a note to the prompt that the same screens should be created in dark mode.
Can I freely choose the language of the app?Yes, the language of the prompt determines the language of the interface. For English texts, you therefore need to prompt in English.
Why do some buttons in the mockup not work?A mockup initially only shows interfaces. Functional areas such as a shop must be described and generated separately.
Why does the exported PDF look less sharp?The PDF loses quality. It's better to export screenshots and import them into Canva or PowerPoint.


