For larger design projects, the tool is rarely the problem; more often it's the lack of a process. If you use Claude Design without a fixed sequence, you quickly end up with individual results that don't fit together. In this guide, you'll learn how to break a website project down into clearly separated phases, from the project goal to the final review. You can open the process as an interactive HTML document in your browser. The usage limit mentioned in the short description is not a topic in this section of the video. The guide therefore focuses on the structure of your workflow.
The video is only loaded from YouTube when you play it – data (including your IP address) is then transmitted to YouTube/Google. More in the privacy policy
Key Takeaways
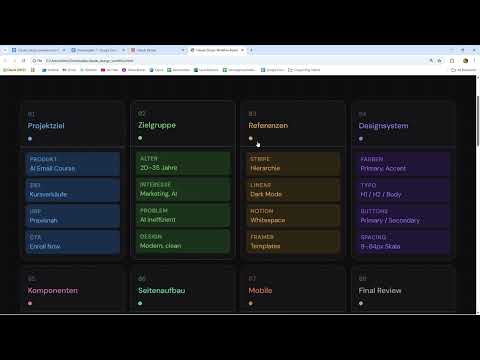
- A larger project needs a fixed sequence: project goal, target audience, references, design system, components, page structure, mobile view, and final review.
- The more precisely you describe the goal and target audience, the better the result will fit.
- References serve as a style template and not as a template to copy.
- You build the design system once and use it for all further work on the same brand.
- Every draft goes through the loop of prompt, review, optimization, and final saving.
- The mobile view is important for websites and landing pages, but usually not relevant for social media graphics.
Step-by-Step Guide
Step 1: Open the workflow in the browser
Open the HTML file of the Claude Design workflow in Chrome or another browser. The document is interactive. When you click on a phase, additional information is displayed. This way you understand the structure of a project before you write the first prompt.

Step 2: Define the project goal
Start with the question of what the website should achieve. Clarify which product or service you offer and which main goal you are pursuing. Is it about sales, newsletter sign-ups, social media links, leads, or simply information? Also note down your USP, that is, what you do especially well and why people should choose you. The call to action is part of this as well. It is more than just the button, because the text above it counts too.

Step 3: Work through the project goal with an example
Imagine you are selling a one-week course on AI email marketing. The goal is course sales. As a USP, you can state that the course is practical, works with real examples, and allows live questions in the chat. The call to action is then "Enroll now". In the workflow, you will find an example prompt for this step that you can adopt directly or adapt to your own product. It is deliberately kept simple so that you can understand and modify it quickly.

Step 4: Describe the target audience
In the next step, you define who the design is being created for. This is important because Claude builds texts, colors, and layouts differently depending on the target audience. Describe demographic characteristics such as age and gender as well as occupation, wishes, problems, and design preferences. An example would be a person between 20 and 35 years old, interested in marketing, self-employed, and interested in using AI efficiently. Their problem is the sheer volume of AI topics, and they prefer a modern, clean design. You don't need to go into detail. Specifying "modern" and "clean" is usually enough.

Step 5: Collect references
References show Claude the direction your design should take. You can upload screenshots, UI patterns, layouts, or links to websites you like, for example from Stripe, Notion, or Framer. Links can be pasted in directly. You can also attach Google Docs. Give files meaningful names, for example "Design suggestions for landing page", instead of leaving them as "Untitled Document". You provide color ideas as an image or as a color code.
The difference between inspiration and copying is important. Don't demand that an existing app be recreated one-to-one. Instead, describe the style you want and communicate this clearly in the prompt.

Step 6: Define the design system
Next, you define the design system. This includes colors, font types, font sizes, typefaces, and spacing. You also determine shadows, the icon style, the look of cards, that is, the blocks for text and images, as well as the design of buttons and testimonials. There is a suitable prompt for each of these areas. If you continue working on the same brand, you don't have to create the design system again, since it already exists.
Step 7: Choose the Components
Now you decide which building blocks the website should contain. Typical ones are a hero section, featured cards, testimonials, an FAQ section, a call-to-action section, a footer, possibly a newsletter section, and a pricing table for subscriptions. For social media posts or presentations, this selection will of course look completely different. Use the example project you already know as a guide.

Step 8: Apply the Iteration Loop
A design is rarely perfect on the first attempt. The proven process is: send the prompt, review the design, optimize it, and then save it as final. If you notice that an element should be larger, needs a different animation, or contains too much text, you can adjust it via Tweaks or reformulate the prompt. So the first draft doesn't have to be perfect right away.

Step 9: Define the Page Structure
Determine the order of the components. One possible structure begins with the hero section, followed by social proof, testimonials, and pricing. You can specify the order yourself. Pay attention to the hierarchy, because if you merely list all the components to Claude, it will arrange them the way it considers best. That doesn't have to match your taste. You can place the call to action in several spots. Which spots you choose is up to you.

Step 10: Optimize the Mobile View
For websites and everything that runs online, the mobile view is crucial. Check the font size, the button size, the spacing, and the image scaling. Opt for a single-column layout instead of several sections side by side. Keep texts short and make sure the most important button is placed as high up as possible so that visitors don't have to scroll for long. A sensible approach is to create the desktop version first, copy the project, and adapt the copy with a prompt for mobile devices, for example with the instruction "Optimize the design for mobile while preserving the overall visual style".
Step 11: Conduct the Final Review
Finally, you check the result using a checklist. Is the design consistent, and do all the colors go together? Is the call to action clearly visible? Does the mobile view work? Are the texts understandable? How about the loading time, and is the whole thing geared toward conversion? This review decides whether the project is finished.

Step 12: Clarify Hosting and Implementation
A finished design only gets you further if you put it online. Therefore, clarify questions such as hosting, loading time, and technical implementation with your hosting provider or your development team. Claude Design is also well suited for templates and mockups that you can pass on to a design team. With this workflow, entire projects can also be implemented if you work through the steps consistently.

Summary – Claude Design Workflow: Implementing Larger Projects in a Structured Way
A larger project with Claude Design succeeds when you divide it into fixed phases. Start with the project goal, target audience, and references, then define the design system and the components, and determine the page structure. After that, you optimize the mobile view, conduct a final review, and clarify the technical implementation. Each draft goes through the loop of prompt, review, optimization, and saving. In this way, individual results become a coherent overall project.
FAQ
How many steps does the workflow for a website project include?The workflow includes twelve steps, from opening the interactive document through project goal, target audience, references, and design system to components, page structure, mobile view, final review, and hosting.
Do I have to create the design system anew for every new project?No. If you continue working for the same brand, the design system already exists and can be reused.
May I have an existing website rebuilt one-to-one as a template?The video advises against this. References should serve as inspiration. Describe the desired style instead of demanding a copy.
Is the mobile view important for every project?Not always. For websites and landing pages, it is central. For social media posts, on the other hand, it usually doesn't play a major role.
Does the first draft have to be perfect already?No. The design is improved over several passes by reviewing it, optimizing it, and prompting again if necessary.


