
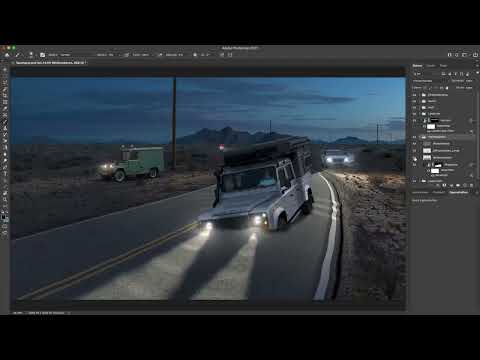
Sometimes the decisive flaw in your image is not in the detail, but in your perception. If you work on the same subject for hours, you often completely overlook shadows, edges, and distortions. The next morning, they stand out immediately. In this tutorial, the instructor shows you how he checks a nearly finished image with some distance, tidies up his layers, and then specifically corrects shadows and edges with layer masks. The technique is not difficult, but the critical look beforehand is the real key.
The video is only loaded from YouTube when you play it – data (including your IP address) is then transmitted to YouTube/Google. More in the privacy policy
Key Takeaways
- A critical look from some distance reveals mistakes that you can no longer see after working for a long time.
- Grouped layers create an overview and make it easy to access individual areas in a targeted way.
- You should not delete disruptive shadows or edges hastily, but hide them softly and in a controlled manner using layer masks.
- With a soft brush tip, transitions can be edited cleanly without leaving visible edges.
- Paint over mistakes with white or black until the image looks coherent again.
Step-by-Step Guide
Step 1: View the image from a distance
Before you begin with the corrections, take a break and look at your image from a bit of a distance. Ask yourself whether everything looks the way you intend. After hours of work, your eye gets used to mistakes, and you consider them normal. A short break, a walk, or a night's sleep helps you to clearly recognize inconsistencies again. Note down the spots that catch your eye before you get started.

Step 2: Tidy up the chaos in the Layers panel
The next step is to bring order to the Layers panel. Hide layers that you don't need right now, such as individual vehicle elements that are not currently being edited. This way you can quickly see which layers at the top of the stack have a clean structure and which areas at the bottom are still confusing. This separation between finished and open areas will save you a lot of time later.
Step 3: Combine layers into thematic groups
In the lower area of the image, several layers are responsible for the steppe and the road with its curves. Select these four layers and combine them into a group using the keyboard shortcut Command+G on a Mac or Ctrl+G on Windows. Then give the group a clear name, for example "Landscape". Make sure the names are immediately understandable to you, because you will often have to find them again later.

Step 4: Bundle shadow and wave layers
The ring layer with the waves and the shadows of the vehicle's feet also belong together. Combine these layers in a group called "Wave Layers". This way you can open or hide the entire wave area with one click. The result is a structure in which you can see at a glance which elements belong to which area.

Step 5: Check the order and narrow down problems
Once the groups are in place, expand them selectively when you want to work on a specific area. The image already looks much tidier as a result. Now it comes down to technique: look out for the dark edge running across the image, a double stripe, and a shadow that cannot be explained at first glance. Trace the road with your eyes to find such inconsistencies.
Step 6: Isolate sources of error by hiding the group
If you hide the entire group, you can quickly see which layer the problem lies in. In this example, it is in the wave layer. The wave shadow has been distorted or transformed beyond the roadway. Don't just delete it with the eraser, because that destroys information and can hardly be undone. Instead, work with a layer mask that you add to the affected layer.

Step 7: Paint away the edge with the layer mask
Select the layer mask, pick a brush with a soft edge, and paint over the disruptive spot with black. Black hides the layer in the mask, so that the layer underneath becomes visible. Work with a soft tip and adjust the opacity so that the transition does not look harsh. Keep painting until the dark edge is no longer visible. Check your result again and again from a distance.

Step 8: Correcting the Road Marking and Displacements
On the ring layer, another problem shows up with the road marking. The associated layer mask was painted over with black at some point, which makes the road that was processed with the Displace filter visible all the way to the edge of the image. The solution is to paint over the mask with white. This returns the layer to the desired position, and the road looks coherent again. You can find the Displace filter in Photoshop under "Filter", "Distort", "Displace", in case you need to adjust it.

Step 9: Hiding the Shadow Around the Road
On the other side of the road, a wave shadow appears again. Click on the layer mask of the wave shadow layer and paint over it with black until the shadow disappears. This error is not dramatic and is barely noticeable in the finished image. Nevertheless, the shadow does not belong in this spot, and that is exactly why the correction is worthwhile. Small details often decide whether an image looks clean in the end.
Step 10: Evaluating the Result from a Distance
Finally, you look at the image again from a distance. Ask yourself whether it looks calm and harmonious overall and whether the visual guidance works. If you notice anything else, repeat the process: hiding, narrowing down, masking. Only when the overall picture is convincing is the correction round complete.
Summary – Photoshop Image Balance: Organizing Layers and Correcting Shadows
In this tutorial, you have seen how to examine your image with a critical eye in the final phase. You organize your layers into groups such as "Landscape" and "Wave layers", narrow down errors by selectively hiding layers, and correct shadows, edges, and road markings with layer masks. Always make sure to work non-destructively, and take time to step away before you consider an image finished.
FAQ
Why should I look at my image from a distance?After working for a long time, your eye gets used to errors. Taking a break of a few hours or overnight helps you clearly recognize inconsistencies again.
Why should I group layers?Groups create an overview in the Layers panel. You find the right layer faster and can show or hide entire areas at once.
Can I simply delete a distracting shadow?That is possible, but not recommended. With a layer mask, you can softly hide the shadow and undo the change at any time.
Why do I paint with black or white on the layer mask?Black hides the layer so that the area underneath becomes visible. White restores the layer. This way you control exactly where the correction takes effect.
Which brush tip should I use?A soft brush tip creates smooth transitions. Hard edges would create new visible borders that make the image look unnatural.
What do I do if I can't find a problem right away?Hide the entire group and then show the layers again one by one. This way you quickly see which layer contains the error.

