
CINEMA 4D Video Training - Tips & Tricks

- Creative workshop using the example of the cover image
- Numerous tips & tricks for working with CINEMA 4D
- Bonus Speakers Wall: 3 hours of video training on the interaction between CINEMA 4D and Adobe Photoshop
Experience creative practice without gray theory - pure power for 3D users and learners!
38 Videos, 396 minutes
Tips & Tricks
Frequently Applied Dusseligkeiten
There are mistakes that you tend to make more often: This short video training is perfect for beginners who are tearing their hair out over these quick-to-solve problems! Just memorize the five tips and save your nerves!
Ring or loop selection?
At first glance, it seems to make no difference whether you use loop or ring selection. However, the difference becomes clear when you switch from surface mode to edge mode. You will also learn how to use the shortcuts of the U, M and N groups.
Set up layout and shortcuts
The layout of CINEMA 4D is variable. Take a look at how you can switch between the ready-made layouts and how you can find your way back to the original. You will also learn how to set up and use your own shortcuts.
Editor and floor shadows
When lighting a scene, you often want to know what the shadow caused by this or that light source will look like before rendering. And: You learn how to map a photographed background material onto a ground object in such a way that it can naturally capture and reproduce a shadow.
Render your own shadow channel
To be able to continue editing a scene in Photoshop after rendering, it makes sense to assign shadows and ambient occlusion their own channel before rendering. These two channels are then output as separate layers in Photoshop.
Render natural shadows
If a shadow does not fall on a flat floor, but also on a wall, for example, the geometry must be recreated in CINEMA 4D. This guarantees a realistic shadow. The opposite can be achieved with the render tag if the "Background compositing" option is clicked: This will hide all shadows that are not directly related to the scene and the scene will be pure white!
Save rendering time!
You save a lot of render time here: If you don't need Ambient Occlusion for the entire scene, but only for individual materials, it's quicker. Are you using global illumination? Then lower the entry density for test rendering, which saves a lot of time. And finally: The aperture setting of the physical renderer only works correctly if you bring your scene to a realistic size.
Save correctly
If you want to save your scene on another volume, you should save all the components with it. If you would like to see how an object was created bit by bit, it is best to save incrementally; if you want to continue editing the 3D scene in Photoshop's 3D module, use the melange save option.
Engage the blade
You can work very precisely with the knife tool. To do this, however, you have to engage it before cutting and maneuver it into the right position. Very nice tip if you don't know it yet!
Correct the direction of the sun
The settings of the "Physical sky" are varied. However, to avoid having to control the sun using the tool itself, which is somewhat cumbersome, simply use the rotation tool and rotate the entire sky.
Finding lost objects
There are a number of different ways to find objects in the editor that you simply can't find anymore. You often lose them faster than you think, so it would be useful to know how to get them back.
Nice tips for working with splines!
The simplest method of rounding a spline is to chamfer its corner points. You can find out what else you can create by moving the object axis here!
Quick and easy bridge tool
The bridge tool can not only connect polygons with each other, it can also delete selected polygons in polygon editing mode! In doing so, it simultaneously connects the resulting gaps with new polygons, which saves a lot of work.
World and object coordinate system
It is not essential to know the difference, but switching between the two systems often makes work much easier. Nice tip!
Use Xrefs
Xrefs are reference objects that are loaded into a complex scene. This allows them to be edited elsewhere without having to constantly deal with the millions of polygons in the overall scene. Also very interesting for large projects: You can improve the individual objects or characters bit by bit, while the overall scene is edited independently.
Creative Workshop
Creative workshop: Preparing the basic object
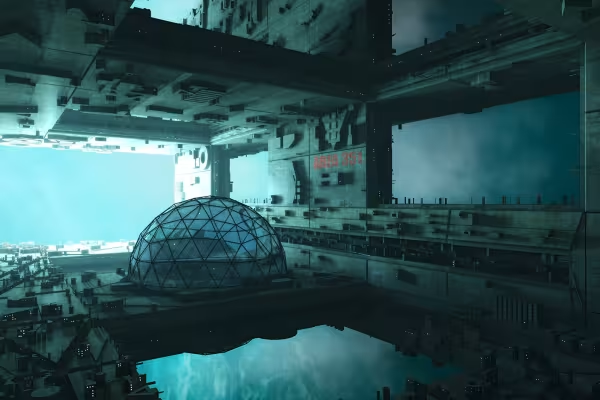
We use a basic cube object as the starting object for the station. This is subdivided, then holes are cut into it using the bridge tool, the cut edges of which are further subdivided using a loop cut.
The result of the creative workshop is the cover motif of the
Creative workshop: Triangulating
After the inner cut edges of the holes have been finely subdivided and extruded, it is now time to triangulate the rectangular polygons on the top. This is possible because the cube is not subordinate to a Hyper NURBS object; otherwise the triangles created during triangulation would be problematic.
The result of the creative workshop is the cover motif of the
Creative workshop: Greebler basic settings
The "Greebler" plug-in is a powerful tool for quickly creating a wealth of detail on an object. Nevertheless, it is not complicated to use. Here you can find out the most important basics about this great plug-in, i.e. where you can get it and how to use it.
The result of the creative workshop is the cover motif of the
Creative workshop: Create your own shapes with Greebler
The "Greebler" plug-in not only allows you to use existing shapes, but also enables you to work with new, custom shapes. This means that the variety of details created by the plug-in can be customized.
The result of the creative workshop is the cover motif of the
Creative workshop: Setting up the camera
The 3D camera should be brought into the scene when most of the shapes and objects are in place. This allows you to test in advance whether the scene develops the dynamics you had in mind. In this case, the camera looks flat across the scene with a short focal length.
The result of the creative workshop is the cover motif of the
Creative workshop: Arranging the elements
The now completed element is duplicated, creating a gigantic-looking space. To prevent the individual shapes from appearing too angular and monotonous, a dome comes into play as a central element and eye-catcher, which is reinforced by a kind of outer skeleton.
The result of the creative workshop is the cover motif of the
Creative workshop: Creating materials
The material allocation is not particularly complicated. A photo file serves as the basic material for the concrete walls, but you are also welcome to use another file that you have photographed yourself. The transparent material requires a high proportion of reflection to make it look realistic.
The result of the creative workshop is the cover motif of the
Creative workshop: Installing a light source
Surprisingly, a single light source is sufficient for the scene. What this light source cannot illuminate as a backlight with surface shadows and fall-off is later illuminated by the global illumination.
The result of the creative workshop is the cover motif of the
Creative workshop: Multipass rendering
To ensure post-processing in Photoshop, the entire scene is multipass rendered. The shadow is output as an independent layer in Photoshop and can be changed as required using layer masks.
The result of the creative workshop is the cover motif of the
Creative workshop: Finishing the scene
After saving the scene, it is opened and edited in Photoshop. The main aim is to lighten the shadows, which are a little too dark in places, and to paint windows on the buildings to suggest an illuminated settlement.
The result of the creative workshop is the cover motif of the
Bonus
SpeakersWall - Part 01 - Introduction
Here I give a basic introduction to this workflow training, what you can expect and what it's all about.
SpeakersWall - Part 02 - Modeling the loudspeaker Part 1
The modeling begins. We look for a reference and start to shape a loudspeaker from a basic object and a loft object.
SpeakersWall - Part 03 - Modeling the loudspeaker Part 2
We finish the loudspeaker ourselves and install it in the loudspeaker box using the Boole object.
SpeakersWall - Part 04 - Setting up the speaker wall
Using two methods, we now stack a lot of speakers on top of each other, just like the cinema version, to build our speaker wall.
SpeakersWall - Part 05 - Materials and camera
Everything is still gray, but soon it will begin to shine and glow in all its glory. By what? Through materials.
SpeakersWall - Part 06 - Light setup, HDRIs and global illumination
Nothing works here without light. And we go one better: we create our own HDR image to illuminate our scene with Global Illumination!
SpeakersWall - Part 07 - Rendering
Polygons become pixels: We render a multi-pass from C4D in order to have as much freedom as possible when editing. How do we do it? Watch the video training.
SpeakersWall - Part 08 - Preparation of the flyer & preparation of the rendering
We use the additional information from the multi-pass to take another close look at our render and adapt our document to the print dimensions of our flyer.
SpeakersWall - Part 09 - Creating and perfecting 3D titles in Photoshop
Photoshop itself can also do 3D. This video training shows what this looks like and that you can also achieve great results with it.
SpeakersWall - Part 10 - Cut, insert and adjust model
A Schick model comes into our flyer. Although it only has a very subtle role in the end, we still deal with the release and incorporation of the whole thing here.
SpeakersWall - Part 11 - The light
Let there be light: the key element of our flyer is installed! The bright spotlights, their cone of light and what surrounds them. Slowly the flyer starts to rock!
SpeakersWall - Part 12 - Text extension & lighting effects
The second line of text comes into play and we give our flyer a little more pep. In this case, this allows us to create beautiful lighting effects on the light sources.
SpeakersWall - Part 13 - The conclusion
The final touch is usually decisive for a good piece of work. So here I'll tell you about my approach to the end of a project and bring our flyer to a final close.
SpeakersWall - Part 08 - Preparation of the flyer & preparation of the rendering
11 min OpenExamples of use
-
 The first part of this training explains how to implement the compositing shown here yourself from A to Z
 -
 Bonus: Speakers Wall - the creation of a flyer using CINEMA 4D and Adobe Photoshop
You might also like

More style, more power, more templates!

Save time with artificial intelligence

Full power, more inspirations, maximum WOW effect!

Edit films, transitions, animations, and more
Comment now „CINEMA 4D Video Training - Tips & Tricks“