
Adobe Photoshop tutorial "Penne Rigate": How to set products in scene

- Explained by example: How to showcase products in dynamic image compositions
- Project files included: learn even more intensively by getting hands-on experience
- Everything at a glance: Take a look at the complete workflow, from cropping to fine-tuning
- Image editing to the point in one hour, by Photoshop expert Uli Staiger
Looking for a creative recipe for lively image compositions? Here are the ingredients: Open Photoshop. Start the training. And apply the techniques to your future Photoshop works.
17 Videos, 78 minutes
Hob & work surface
Photoshop tutorial "Penne Rigate": 1.1 Intro
This introduction shows you what this training is about and what techniques are taught. This will give you an impression of it and help you to assess whether it is suitable for you.
Photoshop tutorial "Penne Rigate": 1.2 Inserting the stove
Installing the stove is not difficult. First, it is cut out using the path tool and moved to a newly created work surface. As the horizon is inclined in our installation, the stove must also be tilted a few degrees counterclockwise.
Photoshop tutorial "Penne Rigate": 1.3 Transforming the workspace
We mount a worktop to the left of the stove. This should, of course, fit in perspective, which is why we use Photoshop's Transform dialog to adapt it to the perspective specification of the stove.
Photoshop tutorial "Penne Rigate": 1.4 Vanishing point workspace
A worktop is also fitted on the right-hand side. In principle, this would be possible using the same technique that we used on the left. However, the vanishing point filter also provides a solid technical basis for the perspective distortion. Above all, this distortion is physically correct.
Box, sky & shadow
Photoshop tutorial "Penne Rigate": 2.1 Box
This is about the pasta box. First, you'll see the studio set and learn how the box was photographed. You'll be given a series of tips on cropping, then we'll transform the layer into a Smart Object and scale it to match the stove and work surfaces.
Photoshop tutorial "Penne Rigate": 2.2 Sky
Fitting the sky is a fairly straightforward process. As the background of our montage does not need to be cropped, you can simply place the sky in the picture and adjust it to the inclination of the horizon. You only need to do a little knitting on the bottom right-hand corner.
Photoshop tutorial "Penne Rigate": 2.3 Horizon
In order to prevent the lower part of the sky from looking like an approaching thunderstorm and at the same time to bring width into the picture, we create a gray layer above the sky. This is then partially lightened so that the sky appears less heavy.
Photoshop tutorial "Penne Rigate": 2.4 Shadows (1)
The box appears to float above the work surface. In order for it to form a unit with the background, we need to give it a shadow. This consists of two parts: the contact shadow and the diffuse shadow. Both are painted in using the brush tool.
Photoshop tutorial "Penne Rigate": 2.5 Shadows (2)
Logically, the stove also needs a shadow. Like the shadow of the box, it is painted with medium gray in its own layer. The layer is then calculated in Multiply mode.
Photoshop tutorial "Penne Rigate": 2.6 Blurring
The real "star" of the shot is the noodles. To make them stand out, we use different methods to soften the background elements. We start with the worktops, which are simply processed using the motion blur filter.
Pasta, oil & picture look
Photoshop tutorial "Penne Rigate": 3.1 Pasta
The individual noodles were photographed against a black background. You can assemble the flying bow yourself from individual noodles, or use the so-called "pasta groups", in which several have already been combined into a group.
Photoshop tutorial "Penne Rigate": 3.2 Blurring pasta
Now it's time to add movement and dynamics to the arc. We use two quite different tools for this: the radial blur, which is one of the oldest Photoshop filters, and the circular blur, which is relatively new.
Photoshop tutorial "Penne Rigate": 3.3 Oil bottle
After we have tidied up the layers panel a little, we place the oil bottle in the image. It is made transparent using the Hard Light blend mode, then the transparency is partially removed again using a layer copy. Exciting!
Photoshop tutorial "Penne Rigate": 3.4 Path deviation drawing
The bottle also needs a comprehensible dynamic movement. To bring this into the picture, we use path blurring. This makes it look as if the bottle is falling - which comes across as very dynamic.
Photoshop tutorial "Penne Rigate": 3.5 drops of oil
The oil drop is built entirely in Photoshop. After the drop has been given shape and color, we take the layer style and create a volume with a flattened edge and relief and shadow inwards, which looks very realistic.
Photoshop tutorial "Penne Rigate": 3.6 Final correction
The stove is equally bright on the front and top and therefore appears flat. We give it a tone value correction to darken it. A layer mask ensures that the darkening is only visible on the front.
Photoshop tutorial "Penne Rigate": 3.7 Image look
The image look gives the subject even more depth. Using the Camera Raw filter, which is almost a 1:1 version of the Raw converter but can be used as a filter, we darken the image minimally, create a vignette and emphasize individual color values at the very end. Done!
Examples of use
-
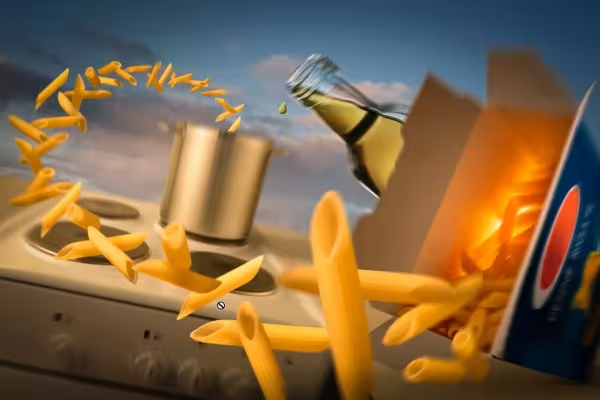 Follow the complete Photoshop workflow to create this image composition
You might also like

Full power, more inspirations, maximum WOW effect!

More style, more power, more templates!

Photo editing & image composition

Save time with artificial intelligence
Comment now „Adobe Photoshop tutorial "Penne Rigate": How to set products in scene“