
BodyPaint 3D in Cinema 4D (Tutorial): Painting and texturing 3D objects

- BodyPaint in Cinema 4D: UV Edit and 3D Paint in practical use
- Learn how to paint and add textures to your 3D objects
- Create realistic-looking dirt effects, wear marks and paint damage
- Explained step by step: creating UV maps, applying textures and painting with brushes
- Including project files for reproducing the contents
- A practical tutorial (1.5 hours) by 3D expert Uli Staiger for realistic-looking 3D scenes
Gray just a moment ago - but shortly afterwards excellent down to the smallest detail: Treat the surfaces of your 3D scenes with texture and painting! How to do it? Start the training and let us know!
14 Videos, 86 minutes
Unwrapping UV maps
BodyPaint 3D tutorial: 1.1 Intro
The intro gives you an overview of the scope, working method and aim of this workshop: We will work on a simple object, wrap the UVs cleanly with UV Edit and paint them in 3D Paint. Both parts of the program are layouts from BodyPaint and are therefore native to Cinema 4D.
BodyPaint 3D-Tutorial: 1.2 UV-Map
In this video you will learn what UVs are and why you have to break them down into a kind of pattern. We use the UV Edit layout for this. You will recognize the problem that almost all 3D objects are subject to, namely that UVs, which we need for painting, are firstly often distorted and secondly lie on top of each other.
BodyPaint 3D tutorial: 1.3 Unwrap cylinder
This simple example with a cylinder shows you how such an unwinding of the UVs can look. By selecting the correct edges and then unwinding them, the surface of the cylinder (i.e. its UVs) can be spread out flat.
BodyPaint 3D-Tutorial: 1.4 Unwrap Lampshade 01
What works with a cylinder should also be possible with a more complex object. We make several selections at different points. In the video, it will then become clear which aspects are used to set these selections.
BodyPaint 3D-Tutorial: 1.5 Unwrap Lampshade 02
You have to make compromises when unwinding. The aim is to transfer the UVs into 2D space with as few cuts as possible, but also with as little distortion as possible. The distribution of the UV islands on the texture is also optimized.
Texturing
BodyPaint 3D-Tutorial: 2.1 Wizzard
To be able to paint an object, it needs an assigned material and this in turn needs a texture, e.g. in the color channel. In UV Paint, we get to know a so-called wizard, which guides us conveniently step by step through the texture creation process and also assigns the resulting material straight away. We also create the first layer in UV Paint.
BodyPaint 3D tutorial: 2.2 Dirtmap
A dirt map is a "dirt texture" and therefore a central element when creating materials. It provides a slightly worn look and more realism. In this video you will learn how to create them, but above all how to paint over them in a separate layer and adjust their visibility.
BodyPaint 3D-Tutorial: 2.3 Projection Painting
Seems, i.e. cut edges, often occur wherever the edges of the UVs meet. These edges can be easily removed by placing a temporary projection paint layer over the corresponding layer. Sounds complex, but it is simple and easy to understand.
BodyPaint 3D tutorial: 2.4 Metal material
In order to create real paint damage, we need a second material. This should be metallic and, surprisingly, is completely hidden by a black alpha texture. If you drag it onto the lampshade, it will be subject to the same UV tag as the paint material.
Painting & Finish
BodyPaint 3D tutorial: 3.1 Brush settings
Cinema 4D's brush collection is extensive, but it certainly helps if you can design your own brushes in Photoshop and then save and use them in BodyPaint. We will then use one of these brushes to paint the alpha texture and the relief texture of the metal and bring it to light.
BodyPaint 3D tutorial: 3.2 Color blob
Although the paint blob is nothing more than a brush tip that is used in a newly created layer of the color channel, it is still very helpful to see how to switch from one material to another and where you can fall on your nose in the process. Or not.
BodyPaint 3D tutorial: 3.3 Duplicate
Simple materials can be duplicated in order to assign them to other object parts in a slightly modified form. Unfortunately, this is quite tricky with materials processed with BodyPaint that are assigned via UV tag and consist of several layers. Here you can find out which information of a shader can be taken over and which should be replaced.
BodyPaint 3D tutorial: 3.4 PBR material
PBR materials represent surfaces that produce physically correct highlights and combine the color information, the diffusion channel, but also the relief and gloss properties. They are required, for example, for GLTF export or when using the prorender (not available in the R23 version). We completely convert a classically created material into a PBR material.
BodyPaint 3D-Tutorial: 3.5 Finish
In this short video you will get to know the render settings of the Physical Renderer. You will see what the final model of the lamp looks like and can compare it with your own model or adjust it if necessary. The steps that lead to the final look are no longer shown, as they are identical to the techniques presented previously.
Examples of use
-
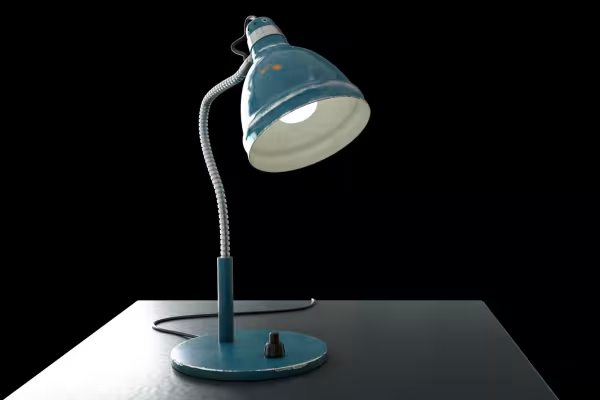 Paint splatters, paint damage and signs of wear and tear: how to create realistic details with BodyPaint 3D.
You might also like

Edit films, transitions, animations, and more
Produce high-quality videos
How it works. What options exist.
Practical applications for companies
Comment now „BodyPaint 3D in Cinema 4D (Tutorial): Painting and texturing 3D objects“