
3D design & composing: Cinema 4D meets Photoshop

- 7 hours of video training to learn effective know-how in a friendly way
- For optimal traceability incl. working materials
- Maximum creative training: reproduction of the cover motif
Get the best out of both programs - Uli Staiger and Christian Gerth will show you the way!
52 Videos, 425 minutes
Cinema 4D
Cinema 4D meets Photoshop: I - 1.1 Explaining Greebler: Ordering and installing Greebler
The "Greebler" plug-in is a central element of this video training. Here you can see what it can do in principle and where you can get it from.
Cinema 4D meets Photoshop: I - 1.2 Explain Greebler: Functional principle
In this video training you will learn how the Greebler works and, above all, why it works. The relationship between the number of segments of an object and the number of greebles is also explained.
Cinema 4D meets Photoshop: I - 1.3 Explain Greebler: Object tab
Many basic settings are controlled under the "Object" tab. This is where you set the start value and determine whether the greebles are created on the inside or outside of an object.
Cinema 4D meets Photoshop: I - 1.4 Explain Greebler: Bevels of the polygons/subdivisions
The "base" is effectively the foundation of the greebles. It contributes significantly to the complex appearance of the overall view because it extrudes the polygons of the greebled object to varying degrees. You can also learn what you can do with frozen selections here.
Cinema 4D meets Photoshop: I - 1.5 Explaining Greeblers: How Stock Greebles work
The Stock Greebles are the existing Greeble objects that you can distribute in the scene. You can use the "Stocker" tab to define the position, size, distance to the object and many other things.
Cinema 4D meets Photoshop: I - 1.6 Explaining Greeblers: Influencing the shapes of Stocker Greebles
"Shapes" are forms. These can be controlled via a probability value between 0 and 100%. You can also define the composition of the so-called "bars" here in the "Grouping" menu.
Cinema 4D meets Photoshop: I - 1.7 Explaining Greebler: Using your own objects
"Nurnies" are objects that you can add to the scene yourself. This allows you to apply your own objects as greebles to an object. As the whole thing also works with render instances, the scene can be very generously equipped.
Cinema 4D meets Photoshop: I - 1.8 Explain Greebler: Inserting several Nurnies
The library is your database into which you can add as many Nurnies, i.e. your own objects, as you like. Once they are integrated into the scene, they can be controlled in the same way as the Stocker Greebles. Here you can see how you can quickly add several objects to the scene.
Cinema 4D meets Photoshop: I - 2.01. Modeling a scene: Creating a central base
The central base is, so to speak, the foundation on which the entire city scene is built. We set up a camera right at the beginning so that the perspective is defined and the position of the individual city components can be distributed as effectively and impressively as possible.
Cinema 4D meets Photoshop: I - 2.02. Modeling a scene: Customizing the scene view
The aspect ratio plays an important role in the image effect. Panorama formats generally look more dynamic than a square. In this video training, we set the aspect ratio for the newly created 3D camera.
Cinema 4D meets Photoshop: I - 2.03. Scene modeling: Greebel central base
The base element is first edited using various extrusion tools and then placed in a Greebler object. It is easier to adjust the values by holding down the Alt key, as only tenths of a step are executed instead of whole steps.
Cinema 4D meets Photoshop: I - 2.04. Modeling a scene: Create lower base
A second component is created from the first. Some polygons are then deleted and the resulting hole is closed again with the polygon pen. Alternatively, the hole can also be closed with the bridge tool.
Cinema 4D meets Photoshop: I - 2.05. Scene modeling: More subdivision for more greebles
The side walls could hold more Greebles if their subdivision were higher. The new side walls are therefore cut with the knife in loop mode and then extruded. Increasing the angle in the extrusion dialog plays an important role here.
Cinema 4D meets Photoshop: I - 2.06. Modeling a scene: Building a basic shape for a round building
The next building will be a round building. It is created from a disk whose polygons are selected and partially deleted, then extruded. This basic shape can now be further processed and shaped.
Cinema 4D meets Photoshop: I - 2.07. Modeling a scene: Subdivide a round building
First, architectural details are added to the roof, then the façade is subdivided more finely. The plane mode of the cutter is better suited to this than the loop mode. The subsequent extrusion is carried out in the same way as for the lower base.
Cinema 4D meets Photoshop: I - 2.08. Modeling a scene: Insert Greebles
The technique is largely straightforward: the building is gegrabbed. In this video training, the main focus is on setting the size and number so that both match the building. To check this, we set a light source at the end of the video training and render the result.
Cinema 4D meets Photoshop: I - 2.09. Using Antennas as Nurnies
As there is no element in the Stocker Greebles that looks like an antenna, we have to create one and transfer it to the Greebler database. From there, we then call it up again and assign it to the building.
Cinema 4D meets Photoshop: I - 2.10. Tower - Build foreground from landscape object
We need a detailed, large object in the foreground. This gradation in size adds depth to the motif, making it appear almost three-dimensional. The object in the foreground is modeled from a landscape object.
Cinema 4D meets Photoshop: I - 2.11. Insertion in the foreground and greebeln
After greebling the tower, it is closed and loaded into the final scene. This has the great advantage that you can adjust its size and that of the greebles to the final scene.
Cinema 4D meets Photoshop: I - 2.12. Assembling a mushroom object
Organic shapes form a stark contrast to the technical character of the city. That is why the landscape tower is being further developed into a mushroom-like building. To do this, we need a flat cylinder that is shaped using various extrusions.
Cinema 4D meets Photoshop: I - 2.13. Building exoskeleton
We add a further, very small detail to the "stem" of the mushroom. Its basic shape is simply duplicated and placed in an atom array to create a kind of exoskeleton. This can be deformed very intuitively with the magnet tool and makes the building look even more organic.
Cinema 4D meets Photoshop: I - 2.14. Build more custom and stick buildings
This video training is about free modeling. You'll see how you can create an imaginative building that looks good in the scene with just a few simple steps. Let your creativity run wild and try to build other buildings along similar lines!
Cinema 4D meets Photoshop: I - 3.1 Create material
We create a new material for the exterior facades. You will learn that there are basically two ways to load photographed materials into the color channel and also what advantages and disadvantages both methods have. A light gloss completes the material.
Cinema 4D meets Photoshop: I - 3.2 Gaining more structure with Normalizer
Structure can be applied to the façades quickly and easily using the relief channel. However, if you use the normalizer channel instead of the relief channel, you can add significantly more detail to the structure. The prerequisite is to load the Normalizer into the channel.
Cinema 4D meets Photoshop: I - 3.3 Testing different types of mapping
A little mapping 101: We test different types of mapping and look at their advantages and disadvantages. Even if the material is partially painted over later in Photoshop, it still ensures that the city doesn't look too smooth and colorless. The tile value distributes the material evenly over the individual objects.
Cinema 4D meets Photoshop: I - 3.4 Adding a small spaceship
The small spaceship brings even more detail and movement to the scene, it is simply added, scaled and moved to a position where it comes into its own. You are welcome to duplicate it and place it in several places in the scene.
Cinema 4D meets Photoshop: I - 4.1 Creating a local light source
The scene lives not only from the finely modeled models, but also from the light. In this video training, we bring a local light source into the scene. To ensure that the shadows are calculated correctly, we use a soft shadow, because the surface shadow, which is better in itself, sometimes impairs the lighting effect in open rooms.
Cinema 4D meets Photoshop: I - 4.2 Inserting a light source from below
Another local light source reinforces the impression of a complex city. To make the lights look natural, you should make sure to use slightly different light colors. A light, warm yellow and a cool cyan to green are best suited.
Cinema 4D meets Photoshop: I - 4.3 Inserting a physical sky
The physical sky provides the light for the overall scene. So that you can rotate it to the right position, we add the shadows via the options menu of the editor. You will then already see these in the unrendered editor, which makes the setting much easier.
Cinema 4D meets Photoshop: I - 4.4 Fine-tuning the sky
The sky still needs to be fine-tuned. This includes adjusting the intensity of the sun, defining its time and position more precisely and minimizing the colour intensity of the shadows.
Cinema 4D meets Photoshop: I - 5.1 Create GI and AO
Global Illumination and Ambient Occlusion are the two most important render effects for photorealistic rendering. Although you could use them as they are, a few small settings will help a lot to improve the result and speed up rendering.
Cinema 4D meets Photoshop: I - 5.2 Creating separate render channels
The different material properties such as highlights and reflections should appear as separate layers in Photoshop if possible. So we create a multi-pass rendering, where the GI, the AO and the shadows are also assigned their own layers.
Cinema 4D meets Photoshop: I - 5.3 Creating all object channels
In addition to separate layers, it would also be helpful to have separate alpha channels for the different buildings. We therefore assign each building its own render tag in the Object Manager. According to the ID of the tag, separate object channels are created in the render presets, which will appear as alpha channels in Photoshop.
Cinema 4D meets Photoshop: I - 5.4 Saving the file
The rendered result is saved as a 16-bit file. Before you close Cinema 4D, open the psd file in Photoshop and check that everything is rendered correctly. If necessary, you can save the file again. Cinema 4D calculates the fill method for the highlight layer incorrectly, you will have to change this manually in Photoshop.
Cinema 4D meets Photoshop: I - 1.1 Explaining Greebler: Ordering and installing Greebler
5 min OpenCinema 4D meets Photoshop: I - 1.4 Explain Greebler: Bevels of the polygons/subdivisions
10 min OpenCinema 4D meets Photoshop: I - 1.5 Explaining Greeblers: How Stock Greebles work
9 min OpenCinema 4D meets Photoshop: I - 1.6 Explaining Greeblers: Influencing the shapes of Stocker Greebles
5 min OpenCinema 4D meets Photoshop: I - 2.02. Modeling a scene: Customizing the scene view
4 min OpenCinema 4D meets Photoshop: I - 2.05. Scene modeling: More subdivision for more greebles
4 min OpenCinema 4D meets Photoshop: I - 2.06. Modeling a scene: Building a basic shape for a round building
4 min OpenCinema 4D meets Photoshop: I - 2.07. Modeling a scene: Subdivide a round building
5 min OpenCinema 4D meets Photoshop: I - 2.10. Tower - Build foreground from landscape object
9 min OpenPhotoshop
Cinema 4D meets Photoshop: II - 1.1 Overview - Photoshop part
In this video training you will learn what the second part is all about. I will use an existing project to show you the respective work steps.
Cinema 4D meets Photoshop: II - 1.2 Mixing the different render passes
Various render passes can be used to further blend the appearance without additional elements. The resulting layer now forms the basis for the final product.
Cinema 4D meets Photoshop: II - 1.3 Working with alpha channels
The object channels created in Cinema4D can now be found in the Channels palette in Photoshop. From here, you can select individual elements very quickly and easily. I will also show you what you need to bear in mind when transforming.
Cinema 4D meets Photoshop: II - 1.4 Creating perspective guides
Despite the clean perspective of the rendering, it is necessary to draw in perspective guidelines. This can be done very easily and quickly with a free extension.
Cinema 4D meets Photoshop: II - 2.1 Inserting a background using alpha channels
To increase the reality of the image, a photorealistic sky is required. However, this is quickly done with the alpha channel and three photo textures.
Cinema 4D meets Photoshop: II - 2.2 Inserting a basic atmosphere
An atmospheric perspective is necessary to give the image depth. However, this can be easily controlled and adjusted using the tonal values.
Cinema 4D meets Photoshop: II - 2.3 Defining the light source
In addition to the atmosphere, it is also worth accentuating the main light at this stage. This can be switched on and off again and again in a separate group.
Cinema 4D meets Photoshop: II - 2.4 Depth through background elements
The depth can be increased even more by adding buildings in the background. This can be done quickly using the shape recycling method.
Cinema 4D meets Photoshop: II - 3.1 Preparation for texturing
Before texturing, it is worth putting together a set of photos for the first time. In combination with a good set of brushes, you can finally get started!
Cinema 4D meets Photoshop: II - 3.2 Inserting photo structures I
With the help of photo structures, many new details are now added to the image. Thanks to the tonal value control and the perspective guide lines, their appearance is also quickly adapted to the rest of the image.
Cinema 4D meets Photoshop: II - 3.3 Inserting photo structures II
The next step is texturing. You can also achieve great effects with other layer modes.
Cinema 4D meets Photoshop: II - 3.4 Adding shapes using custom shapes
The "Custom Shapes" tool is very often underestimated or not used at all. In this video training, I would like to show you how you can best incorporate it into your existing techniques.
Cinema 4D meets Photoshop: II - 4.1 Inserting light structures with the help of photo textures
Photos are also ideal for highlight textures. You simply need the "Color dodge" layer mode for this.
Cinema 4D meets Photoshop: II - 4.2 Creating lighting effects with the polygon lasso and custom shapes
Light edges significantly enhance the sci-fi look of an image. These are created quickly and easily using the polygon lasso tool and the "Linear dodge" mode.
Cinema 4D meets Photoshop: II - 4.3 Creating lighting effects with custom brushes
Although many things would be possible with Jonas De Ro's brush set, it is always interesting to see how easy and effective it is to create your own brush tips.
Cinema 4D meets Photoshop: II - 4.4 Smoke and atmosphere details
Adding smoke and atmosphere makes the image even more legible and makes it possible to blur unsightly areas.
Cinema 4D meets Photoshop: II - 4.5 Cloning and adding spaceships
To bring even more life into the picture, additional spaceships are needed. These can either be cloned directly or added from other files.
Cinema 4D meets Photoshop: II - 4.6 Final look using adjustment layers
With various adjustment layers and fine textures, you can create a uniform look across the entire image. Sharpen with the high-pass filter - done!
Cinema 4D meets Photoshop: II - 4.1 Inserting light structures with the help of photo textures
16 min OpenCinema 4D meets Photoshop: II - 4.2 Creating lighting effects with the polygon lasso and custom shapes
11 min OpenCinema 4D meets Photoshop: II - 4.3 Creating lighting effects with custom brushes
16 min OpenExamples of use
-
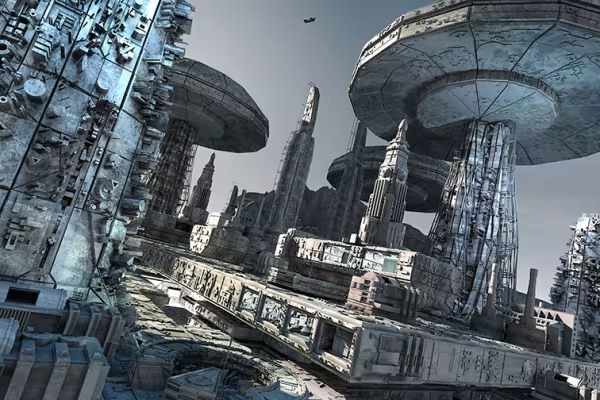 Become the creator of the "Greebler City".
 -
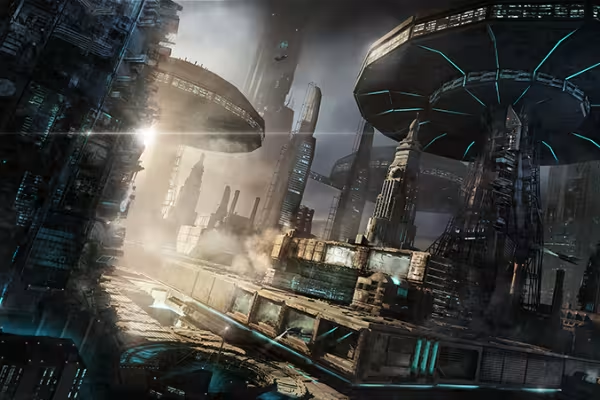 You will create this futuristic city in Cinema 4D and refine it further in Photoshop.
You might also like

More style, more power, more templates!

Full power, more inspirations, maximum WOW effect!

Save time with artificial intelligence

Edit films, transitions, animations, and more
Comment now „3D design & composing: Cinema 4D meets Photoshop“