
Double Exposure Tutorial for Photoshop: Character portrait MY PASSION

- In over 14 lessons, this training course shows how simple and uncomplicated basic portrait material can be
- In the Photoshop section, all procedures and techniques are presented using simple examples
- You then have a double exposure of two images, which releases an abstract portrait
- A well thought-out layer structure is used to show how this image style is always structured in the same way for future projects
It doesn't always have to be difficult! This training course uses many uncomplicated Photoshop techniques to teach you how to create an extremely creative character portrait in Photoshop.
12 Videos, 88 minutes
My Passion
MY PASSION - Creative character portrait in Photoshop - 01: Introduction
In this video training I would like to welcome you and give you an overview of what exactly this training is about. I will also say a few words about where you can use this image style and what you can expect in this training. All working files are included in this part only.
MY PASSION - Creative character portrait in Photoshop - 02: Photographic thoughts
It is not always necessary to work with studio flashes to create such a motif. A studio background is also not always required, as the whole thing can be created using simpler means.
MY PASSION - Creative character portrait in Photoshop - 03: First image development
Raw development is the first step before you start editing the motif. You will need a few important slider settings to start with a reasonable base material.
MY PASSION - Creative character portrait in Photoshop - 04: Smoothing the silhouette contour
To ensure that the person in the picture does not look too restless, it is necessary to smooth the contours. In this case, we are working with the liquefy tool to achieve a neat motif.
MY PASSION - Creative character portrait in Photoshop - 05: Create background
A distracting or even unruly background quickly distracts the viewer. For this reason, it will be necessary to crop the person in quick and easy ways to bring in a new and clean background.
MY PASSION - Creative character portrait in Photoshop - 06: Place scenario
In this video training, free creativity begins by placing a new scenario in the created silhouette and adapting it.
MY PASSION - Creative character portrait in Photoshop - 07: Dodge and Burn
For a more vivid and intense look, more tension is created by painting with light.
MY PASSION - Creative character portrait in Photoshop - 08: Art effect with Brush
To avoid a hard cut in the picture and to add a little more art, the motif is enhanced with the help of artistic brushes.
MY PASSION - Creative character portrait in Photoshop - 09: Positioning light spots
A light and subtle overlighting will subsequently create even more excitement in the picture. To do this, we will paint in our own lights using simple means.
MY PASSION - Creative character portrait in Photoshop - 10: Influencing the color mood
With color, you can still influence a lot afterwards to change the mood of the motif. Whether with a brush or a gradient setting, both methods ensure a quick result.
MY PASSION - Creative character portrait in Photoshop - 11: Finishing touches
The Camera Raw filter is used to add the finishing touches to the entire image. Whether exposure, white balance or clarity control, all can be beneficial for a final image.
MY PASSION - Creative character portrait in Photoshop - 12: Last words
Practice makes perfect! The more often you practice this workflow, the easier it will become and the quicker you will be able to create such motifs.
MY PASSION - Creative character portrait in Photoshop - 02: Photographic thoughts
4 min OpenMY PASSION - Creative character portrait in Photoshop - 03: First image development
8 min OpenMY PASSION - Creative character portrait in Photoshop - 04: Smoothing the silhouette contour
7 min OpenMY PASSION - Creative character portrait in Photoshop - 08: Art effect with Brush
15 min OpenMY PASSION - Creative character portrait in Photoshop - 09: Positioning light spots
5 min OpenMY PASSION - Creative character portrait in Photoshop - 10: Influencing the color mood
5 min OpenExamples of use
-
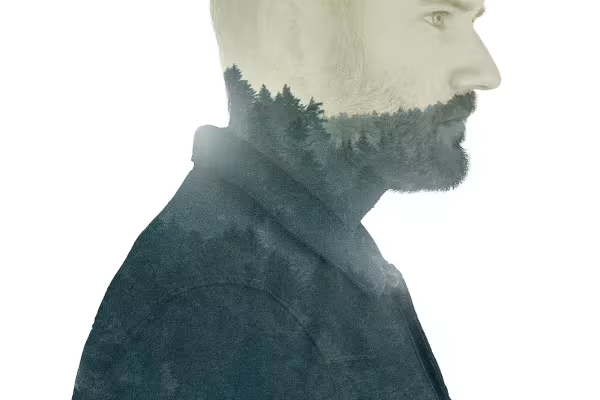 Photoshop Double Exposure: The effect for a creative character portrait as a double exposure
You might also like

Save time with artificial intelligence

More style, more power, more templates!

Full power, more inspirations, maximum WOW effect!

Photo editing & image composition
Comment now „Double Exposure Tutorial for Photoshop: Character portrait MY PASSION“