
Create posters in the style of Tomb Raider - Photography and Photoshop tutorial

- Create an action-packed poster: Shooting & image editing
- Practical learning: Including working materials - textures, backgrounds, source photo
- Photography: Use of studio lights and brighteners explained in practice
- Photo editing: raw development, dodge and burn for a more vivid appearance
- Image composition: including cropping the model, enhancing hair, incorporating reflections
- Highlight: Create your own sparkling water wave with the model standing in it
A plus for your photography and image editing know-how: how to create a suspenseful scene with your camera and Photoshop.
19 Videos, 151 minutes
Create a movie poster in the style of Tomb Raider
Creating posters in the style of Tomb Raider - Photography and Photoshop tutorial: 1 Before you start
In this video, Gabor gives you an insight into the video training and his plans. He introduces his model and explains what he wants to achieve with her.
Create posters in the style of Tomb Raider - Photography and Photoshop tutorial: 2 Light setup
With two studio lights and a brightener, Gabor gradually builds up his lighting setup. He explains the individual light sources and their function. You will also see where the brightener is used to bring out a few details that have disappeared.
Create posters in the style of Tomb Raider - Photography and Photoshop tutorial: 3 Photoshops
Once the lighting setup has been set up, it's time to get down to business. From this point on, Gabor concentrates on the pose and all the details. He works quietly as a team and uses a control monitor to correct any errors.
Create posters in the style of Tomb Raider - Photography and Photoshop tutorial: 4 Raw development
Once an image selection has been made, Gabor gets to work on the raw development in Photoshop Camera Raw. Here, attention is paid to gaining as much detail as possible and also a strong contrast in the contours.
Create posters in the style of Tomb Raider - Photography and Photoshop tutorial: 5 shapes and details
To make the clothing more flattering and also more flattering on the model's figure, the liquefy filter is used discreetly. Finally, a few fine details are added to make the scene more exciting for later.
Create posters in the style of Tomb Raider - Photography and Photoshop tutorial: 6 Dodge and Burn
In this part, light is used to paint on a gray plane. The advantage of this is that the brightness and depth of the person can be controlled very selectively. This makes the overall motif a little more three-dimensional.
Create posters in the style of Tomb Raider - Photography and Photoshop tutorial: 7 cropping
To get a proper crop of model Jessy, Gabor will set a path selection around her with the pen tool. To save himself unnecessary work on the hair, Gabor will enhance the hair with a certain procedure and an automatic function.
Create posters in the style of Tomb Raider - Photography and Photoshop tutorial: 8 background montage
With a few great landscape shots by Tobias Ackermann and a few hand movements by Gabor, the background is created using uncomplicated techniques. This creates a location in the background that will make for an exciting scene.
Create posters in the style of Tomb Raider - Photography and Photoshop tutorial: 9 Preparation for underwater scenario
In order for Jessica to stand in the water later on, a foundation is first created that ensures a certain depth of water. The viewer should later get the feeling of being able to look underwater.
Create posters in the style of Tomb Raider - Photography and Photoshop tutorial: 10 Create a water wave
A wave is created to separate the water surface from the water depth. Gabor builds this from simple picture materials that don't actually look like water waves.
Create posters in the style of Tomb Raider - Photography and Photoshop tutorial: 11 water splashes
To give the water scenario more action and dynamism, water splashes and fine water waves are added from image materials. These are mounted quite simply into the motif and wonderfully offset with a simple filling method.
Create posters in the style of Tomb Raider - Photography and Photoshop tutorial: 12 underwater finishing touches
For a more realistic depth in the motif, the underwater scene needs to be enhanced even more. This can be achieved by creating depth by painting with light, applying a fresh color adjustment and overlaying a texture.
Create posters in the style of Tomb Raider - Photography and Photoshop tutorial: 13 Water wave: finishing touches
To give the entire water wave a finishing touch, the transition to the water surface and the transition to the depth of the water are adjusted. We also play with color to blend all the elements together.
Create posters in the style of Tomb Raider - Photography and Photoshop tutorial: 14 Make pants wetter
In this video, Gabor will show how he can make dry trousers wetter in just a few simple steps. To do this, he mainly uses an adjustment layer and a brush.
Creating posters in the style of Tomb Raider - Photography and Photoshop tutorial: 15 Lighting guide
To make the focus more on the model, we need a slight brightening and a vignette. You can find out how Gabor creates these and his thoughts on them in this video.
Create posters in the style of Tomb Raider - Photography and Photoshop tutorial: 16 Red Streak Light
In the later scene, there will be a small explosion on the left-hand side. To make the montage more realistic, Gabor will paint a red, fiery reflection of light on the model.
Create posters in the style of Tomb Raider - Photography and Photoshop tutorial: 17 fire effects
In this part, various approaches are used to give the whole scene a somewhat gloomy mood. On the one hand, red light sources are added to the motif, as well as a few fire particles and self-painted ash particles.
Create posters in the style of Tomb Raider - Photography and Photoshop tutorial: 18 Long water splashes
To give the whole water scene more action, a few long splashes of water are added to the motif. However, these are not overlaid with textures, but rather painted into the motif and modified using filter techniques.
Create posters in the style of Tomb Raider - Photography and Photoshop tutorial: 19 Final touches
To give the whole motif in the last video a chic finishing touch, the scenario is enhanced with the Camera Raw filter. Finally, the poster is given a matching font to give it that final cinematic style.
Creating posters in the style of Tomb Raider - Photography and Photoshop tutorial: 1 Before you start
3 min OpenCreate posters in the style of Tomb Raider - Photography and Photoshop tutorial: 2 Light setup
9 min OpenCreate posters in the style of Tomb Raider - Photography and Photoshop tutorial: 3 Photoshops
5 min OpenCreate posters in the style of Tomb Raider - Photography and Photoshop tutorial: 4 Raw development
6 min OpenCreate posters in the style of Tomb Raider - Photography and Photoshop tutorial: 5 shapes and details
7 min OpenCreate posters in the style of Tomb Raider - Photography and Photoshop tutorial: 6 Dodge and Burn
9 min OpenCreate posters in the style of Tomb Raider - Photography and Photoshop tutorial: 7 cropping
11 min OpenCreate posters in the style of Tomb Raider - Photography and Photoshop tutorial: 8 background montage
13 min OpenCreate posters in the style of Tomb Raider - Photography and Photoshop tutorial: 9 Preparation for underwater scenario
6 min OpenCreate posters in the style of Tomb Raider - Photography and Photoshop tutorial: 10 Create a water wave
14 min OpenCreate posters in the style of Tomb Raider - Photography and Photoshop tutorial: 11 water splashes
15 min OpenCreate posters in the style of Tomb Raider - Photography and Photoshop tutorial: 12 underwater finishing touches
11 min OpenCreate posters in the style of Tomb Raider - Photography and Photoshop tutorial: 13 Water wave: finishing touches
5 min OpenCreate posters in the style of Tomb Raider - Photography and Photoshop tutorial: 14 Make pants wetter
6 min OpenCreating posters in the style of Tomb Raider - Photography and Photoshop tutorial: 15 Lighting guide
5 min OpenCreate posters in the style of Tomb Raider - Photography and Photoshop tutorial: 16 Red Streak Light
4 min OpenCreate posters in the style of Tomb Raider - Photography and Photoshop tutorial: 17 fire effects
9 min OpenCreate posters in the style of Tomb Raider - Photography and Photoshop tutorial: 18 Long water splashes
3 min OpenCreate posters in the style of Tomb Raider - Photography and Photoshop tutorial: 19 Final touches
11 min OpenExamples of use
-
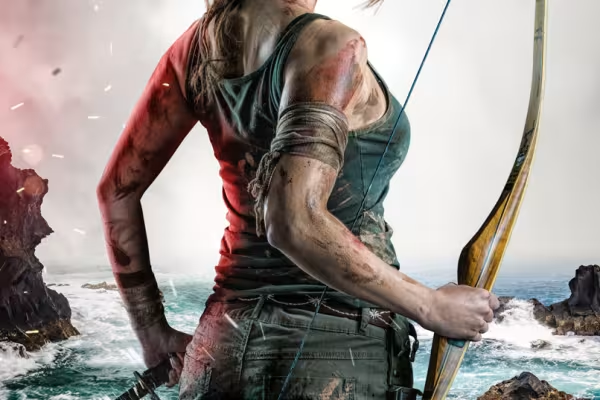 Inspired by Lara Croft: Create a Tomb Raider-style poster in Photoshop
You might also like

Save time with artificial intelligence

Full power, more inspirations, maximum WOW effect!

More style, more power, more templates!

Photo editing & image composition
Comment now „Create posters in the style of Tomb Raider - Photography and Photoshop tutorial“