
Staged sports photography - tips & tricks

- 3 hours of video training on staged sports photography; 81 photos for inspiration
- Photography in natural light, with aids such as reflectors and with artificial light
- How to create dynamic action scenes, exciting portraits and eye-catching advertising images
- These topics are presented as examples: Running, fitness, mountain biking, soccer
Trainers, models, cameras and equipment are at the start and ready when you are! Put yourself on the podium with video training in sports photography!
22 Videos, 181 minutes
Before it starts
Staged sports photography: 1.1 Intro - what training is all about
Maik introduces himself and gives an overview of what you can look forward to in this training.
Staged sports photography: 1.2 Equipment - overview
Before heading to the locations, Maik will give you an overview of the materials and equipment he will be using. Maik attaches great importance to traveling light in order to be flexible and to be able to change shooting locations quickly if necessary.
Staged sports photography: 1.3 Light - overview
The four most important light sources will play an important role in each chapter. Maik gives you a brief overview of which light sources he has prepared for.
Running with natural light
Staged sports photography: 2.1 Location check and model presentation
In staged sports photography, most of the elements that influence the image are planned in advance. Here, Maik shows you how the lines of a location influence the image and how you can incorporate them skillfully. He also shows you which tools he uses to plan the optimum time of day for his shots in advance.
Staged sports photography: 2.2 Photographing with natural light - Part 1
Here you can find out how Maik progresses from the conventional idea to the final image. From the right hand position of the model to the right choice of perspective, he shows how many little things make up a good result.
Staged sports photography: 2.3 Photographing with natural light - Part 2
In this part, Maik shows you how to get even more dynamics into your picture by choosing a different focal length and a different aperture setting. You'll also find out what little tricks you can use to make the autofocus work even more reliably.
Staged sports photography: 2.4 Portrait
In this video, Maik shows you how he guides the model to create a sporty look. He also proves that a shorter focal length is also suitable for atmospheric portraits.
Staged sports photography: 2.5 Data backup on location
You may be familiar with the problem: a quick glance at the display during the shoot - and you think the picture is perfect, but at home on the big monitor you see a lot of mistakes. Here, Maik explains his workflow to prevent this from happening.
Fitness with brightener
Staged sports photography: 3.1 Location check and model presentation
In this part, Maik guides you through a fitness park and goes into detail about the image idea he has in mind and shows disturbing image elements that he will try to avoid. He then introduces the model and tells you why he chose this model and how he finds out which pictures he can realize with him.
Staged sports photography: 3.2 Photographing with brighteners - Part 1
Here you will learn how to use a brightener to reduce disturbing shadows in sunlight. During the training, Maik shows you how to create different lighting scenarios by bending the reflector.
Staged sports photography: 3.3 Photographing with brighteners - Part 2
In the second part, Maik continues to explore the fitness park and shows you what the advantage of fixed focal lengths is and how you can make disturbing image elements disappear by changing the focal length without changing the perspective.
Staged sports photography: 3.4 Portrait shots with brightener
In this video, Maik shows you how you can completely change the look of a picture with the help of various brighteners. You'll also learn how he guides the model to create the sporty look he wants for his portrait.
Mountain bike with attachable flash
Staged sports photography: 4.1 Location check and model presentation
Maik introduces the mountain biker for this video and gives a brief overview of the model and location.
Staged sports photography: 4.2 Dynamic shots with clip-on flash
Here Maik shows you how to create a speed effect on a passing bicycle without Photoshop. All he needs is a flash, the right camera setting and a moving object.
Staged sports photography: 4.3 Unleashed flash
Next, Maik tries to take a similar picture with a telephoto lens. But this time the flash power is not enough. The solution is called "unleashed flash". You can find out what it's all about in this part of the video.
Staged sports photography: 4.4 Portrait shots with unleashed flash
Unleashed flash is not only suitable for action photography, but can also be used well in portrait photography. You can find out everything you need to know in this section.
Staged sports photography: 4.5 Portrait shots with multiple exposures
Even though the dynamic range of some cameras is now really advanced, the topic of multiple exposures is still very useful today. In this part of the video, you will find out which images are worth using this technique for.
Soccer with compact flash
Staged sports photography: 5.1 Location check and model presentation
Maik has chosen a soccer pitch for the matching soccer pictures. In this part of the training, he explains why he chose this particular pitch and model.
Staged sports photography: 5.2 Preparation with compact flash
Here, Maik shows you how you can change the mood in a picture with the help of artificial light. In this part, you will learn how pictures with available light can differ from pictures with additional artificial light. You will also learn how to influence the background from the foreground using the flash.
Staged sports photography: 5.3 Shooting with Hi-Sync
There are limitations when working in motion with artificial light. Here, Maik explains the situations in which blurring occurs when working with artificial light and how you can get to grips with it using Hi-Sync support.
Staged sports photography: 5.4 Portrait shots with artificial light
In this part, Maik shows you how he creates a portrait with the given lighting situation. Then there is a second variation in which the sunlight is used as the main light and the artificial light is used for accentuation.
Staged sports photography: 5.5 Outro/picture show
Maik says goodbye to this training. But at the end he will show you the best shots from this training in a picture show. The images were minimally enhanced with Lightroom to subtly increase the contrast and saturation. That's it.
Examples of use
-
 Running: Choose the right perspective, pay attention to the hand position and many other small details.
 -
 In the fitness park - how to eliminate distracting picture elements and shadows with photographic means.
 -
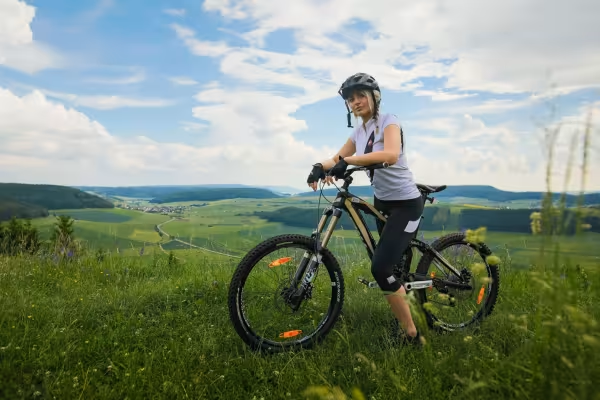 Use natural light or technical aids to stage emotionally charged scenes.
 -
 Action: Sport always involves movement. Find out how to capture it in all its dynamism.
 -
 Use brighteners to completely change the look of a picture.
 -
 Portrait: Did you know that a shorter focal length can also have an atmospheric effect?
 -
 Make the most of the sunlight and set accents with artificial light at the same time.
You might also like

More style, more power, more templates!

Photo editing & image composition

Full power, more inspirations, maximum WOW effect!

Save time with artificial intelligence
Comment now „Staged sports photography - tips & tricks“