You haven't tried Claude Design yet and are wondering where to start? Then you're in the right place. This overview walks you through the interface, shows you the most important areas, and explains which options you'll find at the start. You don't need to install anything. Everything runs in the browser.
The video is only loaded from YouTube when you play it – data (including your IP address) is then transmitted to YouTube/Google. More in the privacy policy
Key Takeaways
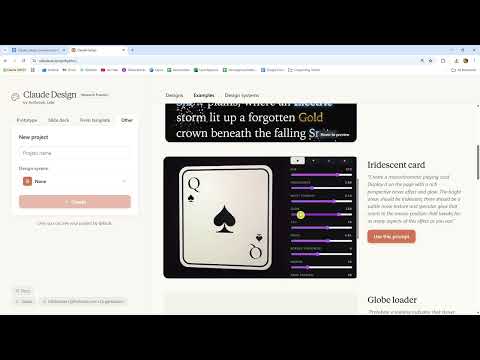
You open Claude Design via the browser application of Claude, specifically through the Design tab on the left side. The interface is divided into areas: on the left you'll find the Design panel with four categories, and on the right are Designs, Examples, and the Design System. The categories Prototype, Slide Deck, Template, and Other determine what kind of design you create. The examples in the Examples section show you what's possible before you start yourself. You can set up a Design System later; it isn't necessary to get started.

Step 1: Open Claude Design
The path into Claude Design is short. Log in to the browser version of Claude and look for the Design tab on the left side. Click on it, and you'll land directly in Claude Design. Make sure you're logged in, because without an account you can't save or further develop anything.
Step 2: Understand the left Design panel
As soon as you're in Claude Design, you'll see the Design panel on the left side. Here you choose the type of your project. There are four tabs:
Prototype is suitable for interactive drafts, for example for apps or interfaces with click behavior. Slide Deck creates a presentation, i.e. a kind of PowerPoint. Template draws on existing patterns if you already have a template or have been sent one. Other covers all remaining projects that are neither a prototype, nor a presentation, nor a template.
Prototype and Slide Deck differ mainly in the result. A prototype is an operable object, a presentation is a sequence of slides. If you're unsure which tab fits, start with Other. This tab is intended for almost any design.
Step 3: Keep language and interface in mind
Claude now also runs in German, but Claude Design still works exclusively in English. This mainly affects labels and menus within the Design area. So don't despair if you see English terms. You can still phrase your instructions in German. The guide in the video continues the steps in German, so you can follow the process even without knowing English.
Step 4: The right side – Designs, Examples, and Design System
On the right side you'll find several tabs. Under Designs you collect all the drafts you have already created. A freshly created account initially shows nothing here. Please also note that you need the Pro version of Claude for this area.
Under Examples you'll find sample projects that you can look at and use as inspiration. The Design System tab is used to record recurring design rules such as colors, fonts, and components. There you can create a new system or publish an existing one. Once a system is published, Claude suggests it by default, but you don't have to use it. Templates can also be managed in the Design System area. For your first run-through, you can ignore all of this for now.


Step 5: Use Examples as a source of inspiration
The examples in the Examples tab are more than decoration. Each example consists of a title and the prompt with which it was created. This is exactly how you can see how much precision lies in an instruction and how short it can be.
One example shows a sprite-based animation with facts about distances and sizes of celestial bodies. The underlying prompt is concisely worded, and yet a moving presentation results from it. If you look at the example, you'll see that Claude can also create animations and not just static pages.

Step 6: Explore interactive examples
Two examples from the Examples show particularly well what a prototype is capable of. The first is a playing card that reacts with a hover effect. You can change values such as the rank of the card, adjust the color, or modify the padding. The same logic can be transferred to other interfaces, such as a calculator.
The second example is a calculator kit. It looks simple at first glance, but it can be fully operated. In the past, this might have required programming work; today you describe the result in words and then refine it in small steps.
Other examples show text particle effects with fire, smoke or metal, a rotating globe, and wallpaper designs. WhatsApp-style chat histories, onboarding flows for apps, mockups and animated icons are also possible. Use this variety as a memory aid: for each new project, consider which format fits best.


Step 7: From Describing to Seeing
The core of Claude Design lies in alternating between describing and viewing. You formulate what you need, Claude creates a first draft, and you see the result right away. Then you refine it by adjusting colors, spacing or content. This cycle repeats until the design matches your vision.
The examples from the video show that you can start with simple prompts. Whether you need a landing page, an app interface or a mockup depends solely on what you want to design. The landing page and the introduction to app design are explored in more depth in the following videos.

Step 8: Start Simple with a Slide Deck
If you are trying out the process for the first time, a slide deck is a good starting point. A presentation is manageable and quickly shows you how Claude Design builds content. You can use speaker notes and incorporate existing templates if you already have them. Start with a simple topic, observe the result, and then work your way up to more complex projects.

Summary – Understanding Claude Design: Interface and First Steps
Claude Design can be explored in a few minutes once you know where the areas are located. The Design tab takes you into the application. The left panel determines the type of your project, while the right side offers designs, examples and the Design System. The Examples show you what precise prompts can look like, and alternating between describing and viewing forms the working rhythm. For getting started, choose a manageable project such as a slide deck or fall back on Other, and then expand your knowledge step by step.
FAQ
Do I need to know English to use Claude Design?Claude Design currently works mostly in English, so terms in the menus are often in English. You can still write your instructions in German.
Do I need a Pro version for Claude Design?Yes, according to the video, the Designs area requires the Pro version of Claude.
What is the difference between a prototype and a slide deck?A prototype is an interactive design that you can operate, such as an app interface. A slide deck is a presentation with multiple slides.
What happens if I cannot confidently assign my project to any of the four tabs?Choose the Other tab. It is intended for all projects that do not clearly fit into Prototype, Slide Deck or Template.
Do I have to set up a Design System before I start?No. The Design System is an option for later and is not required to get started.
What are the Examples for?The Examples show finished examples together with the prompt that generated them. This way you can see how to write your own prompts.


