A prompt with three sentences can be written quickly, but words only describe style and atmosphere imprecisely. A single screenshot, on the other hand, shows at a glance which direction you mean. This is exactly where this tutorial comes in: You will learn how to include screenshots, mockups, and role models as reference images in Claude Design and how the model interprets such visual templates.
The video is only loaded from YouTube when you play it – data (including your IP address) is then transmitted to YouTube/Google. More in the privacy policy
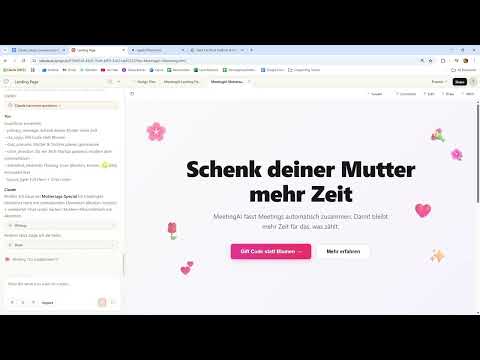
A test project with a Mother's Day landing page serves as the example. However, the approach can be applied to any other project.
Key Takeaways
Reference images complement your text; they do not replace it. The more clearly you say what you want to take from the image, the better the result will be. Also, always work through only one step per prompt so that you can trace the changes. Claude often asks follow-up questions, and it is precisely these questions that reveal gaps in your specifications.
Step-by-Step Guide
Step 1: Upload files via "attach File"
Below the input field you will find the "attach File" function. With it, you can add files of all kinds: Word documents, PDFs, images, and even videos. For design tasks, images are usually the most useful, because Claude can read colors, spacing, typography, and imagery from them.

Step 2: Create a screenshot as a template
The fastest way to a reference image is a screenshot. You open a website you like, capture a section, and paste it into the chat window. In the example, it is a page with a minimalist style that serves as a model. The screenshot provides not only the look but also hints about layout and structure.

Step 3: Combine the reference image and prompt
An image alone is not enough. You have to state in the prompt what Claude should take from the image. In the example, the instruction reads roughly: Design the page in a Mother's Day design, but as minimalist as in the reference image, and adopt the animated chat from the template. This makes it clear what the image is meant to convey and what you add yourself.

Step 4: Submit only one step per prompt
It is tempting to pack several wishes into a single prompt. However, I do not recommend that. First submit only the basic design with the reference image and wait until it is finished. Then you add a second prompt, for example for the animated chat. This way you immediately see which change had which effect. In the tutorial, both wishes were deliberately tested at the same time in order to explore the limits of the tool. As a rule, though: one step at a time.

Step 5: Answer Claude's follow-up questions
Claude often asks questions before it gets started. Take them seriously, because they show places where your specifications are incomplete. In the example, among other things, it was clarified what main message the hero section should have: "Give your mother more time". In addition, the color direction (elegant, not festive, modern and minimalist), floating icons, and a layout with a full hero and chat at the bottom were determined. The more precise your answers are, the less you have to fix later.

Step 6: Use a second reference image for specific wishes
Some wishes are hard to put into words, such as the design of the buttons or the arrangement in the header area. For these, you take another screenshot of the spot you like and upload it. You can add a note that these elements should be retained. Even if the designer does not implement the template one to one, the image shows very clearly what you want.

Step 7: Describe animations precisely
The chat on the page was initially static. In the prompt, it is therefore important to describe movement precisely: The messages should appear animated at the bottom and fly in as in a live chat. The more concretely you describe the effect, for example direction, speed, and order, the better Claude implements it.

Step 8: Update and check the result
While Claude is working, the preview is continuously updated. Therefore, wait until all content has fully loaded before you evaluate the result. If an animation only plays once on load, you can reload the page manually. In the example, the chat only flew in visibly after refreshing, and the effect repeated when scrolling.

Step 9: Revise screenshots afterwards
The workflow doesn't only work for new drafts. You can also take existing designs from screenshots, documents, or examples that you like as a basis and have them reworked. This is especially handy if you have a template from the web that you want to develop further with your own content.

Summary – Claude Design Reference Images: Using Screenshots Effectively
Reference images are a powerful tool when you want to convey the style and direction of a design. Upload screenshots or templates via "attach File" and link them in your prompt with clear instructions. Work step by step, answer Claude's follow-up questions carefully, and describe animations specifically. With this approach, you get to a result that matches your vision more quickly.
FAQ
Which file types can I upload as a reference?You can upload Word files, PDFs, images, and videos. For design tasks, images and screenshots are particularly suitable.
Why is a screenshot often better than a text description?A screenshot shows colors, spacing, layout, and style directly. This saves lengthy explanations and reduces misunderstandings.
Should I combine several requests in one prompt?No, it is advisable to handle only one step per prompt. This way you can see which change has which effect.
What should I do if Claude asks follow-up questions?Answer them as precisely as possible. The questions often uncover assumptions that you haven't stated yourself, for example the main message or the color direction.
Why isn't an animation displayed in the preview window?Often the output hasn't fully loaded yet. Wait or reload the preview if the effect only plays once.
Can I use existing designs from the web as a template?Yes, you can use screenshots of designs that you like and have them developed further with your own content.


