Imagine you have to show a client or a team member within a few minutes what a finished sales page could look like. That's exactly what you can do with Claude Design, if you know how to build the prompt, formulate the requirements cleanly, and then publish the result as HTML. In this guide, I'll walk you through a complete example project: a responsive landing page for an online shop selling premium dog toys. You'll see every step from the prompt to the live link.
The video is only loaded from YouTube when you play it – data (including your IP address) is then transmitted to YouTube/Google. More in the privacy policy
This guide builds on the previous lessons about prompts, structure, and style. If you already know the basics, you'll recognize many of the decisions. What's new is above all that you now create a cohesive project in one go instead of editing individual sections.
Key Takeaways
Key Takeaways
- A prototype needs a clear goal. The more precisely you describe who will use the page and what it should show, the better the result will be.
- You don't have to write the prompt on your own. An AI like Claude, Gemini, or ChatGPT can provide a draft based on the information you have so far.
- The structure of the page (header, hero, benefits, bestsellers, testimonials, FAQ, call to action, footer) explicitly belongs in the prompt.
- The AI asks follow-up questions. Answer them briefly, and when you're unsure, feel free to let the AI decide itself.
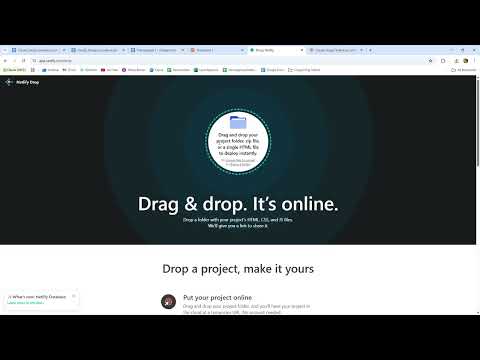
- For a quick showcase, exporting as standalone HTML is enough, which you can put online for free for one hour via Netlify Drop.
Step-by-Step Guide
Step 1: Define the Goal – a Complete Page Instead of Individual Parts
So far you have worked with individual sections, which are good for ideas but don't yet make a page. For this project, you want a complete page that you can put online or send off to show. Before you get started, briefly note down the goal: Who should see the page, and what action should it trigger? The example is about an online shop for premium dog toys.

Step 2: Have an AI Create a Prompt
You don't have to start from scratch. Let Claude, Gemini, or ChatGPT write a prompt for your landing page based on all the information so far. Make sure the draft includes the target audience, the mood, and the desired sections. You then save this prompt as a text file so you can upload it in the next step.

Step 3: Create a New Project in Prototype Mode
Switch to the Prototype area and assign a unique project name, for example "Test Project 1". Choose the High Fidelity option so that the result is as detailed and visually polished as possible. Then upload your prompt and send it off. Claude then begins creating the page.

Step 4: Capture the Page Structure in the Prompt
The prompt should describe the structure of the page section by section. Specify that the page should be fully responsive. Define a header with a logo placeholder and navigation links. This is followed by the hero area, a trust area with social proof and customer logos, benefits, bestsellers, testimonials, FAQ, call to action, and a footer with links and copyright. The more complete this list is, the less you'll have to improve later.

Step 5: Define Style, Mood, and Colors
For the look, you describe the mood and design. In the example, the page should feel warm, modern, and family-friendly, with a playful, cheerful character. Also carry over the colors you already used in earlier tests so that the result fits your previous style. With animations and fonts, you can be generous in a prototype, because this is about the first impression and not a final design.

Step 6: Answer the AI's Follow-up Questions
After you submit, Claude often asks follow-up questions before it generates the page. In the example, "Playful and Fun" was confirmed as the style. For the hero area, a happy dog with a toy was chosen. The call-to-action buttons are called "Shop Now" and "Show More". For the benefits, product quality and the dog experience take center stage, and the testimonials should contain funny quotes. You don't have to spell out every answer in detail. For a prototype, clear keywords are enough.
Step 7: Give Equal Consideration to Mobile and Desktop
An important follow-up question concerns how the devices are weighted. In the example, the choice was made for an optimization that covers both mobile and desktop equally well. However, if you know that the majority of your visitors use the shop via smartphone, you should give more weight to the mobile view. This information helps the AI prioritize the layouts correctly.

Step 8: Deliberately Leave Out Additional Content
Claude often asks about further content, such as a blog. Consider whether it is really necessary for your goal. For a landing page at the prototype stage, what you have defined is enough. Confirm the selection and continue. Every unnecessary section prolongs the generation and distracts from the core.

Step 9: Click Through and Review the Result
Once the page is finished, a playful preview opens with a headline, two buttons, and a dog as a placeholder. Below that you will find award-winning notices, the benefits, and bestsellers with prices and reviews. The shopping cart at the top right is already functional. Click through the entire page once and make a note of what you like and what you want to adjust later. In the example, the page seems somewhat overloaded and too playful, which can be corrected in a later revision.

Step 10: Export the Page as Standalone HTML
Click Share at the top right and select the option Export as standalone HTML. This file contains all the content in a single file and can be opened without any additional tool. Alternatively, you can hand the project over to Claude Code if you want to develop it further, or send it to Canva if a designer is to adjust the layout. For a quick presentation, the HTML export is the simplest way.
Step 11: Upload the HTML File to Netlify Drop
Download the file and then open the page netlify.com/drop in your browser. In the file dialog, select the downloaded HTML file from your downloads. Netlify Drop accepts it and automatically creates an online version. You do not need to sign up for this, and the file can safely be renamed beforehand.
Step 12: Share the Link and Know the Limits
After the upload, you receive a link that is live for one hour and protected with a password. You pass this password on together with the link to customers or team members. If you want to keep the page available for longer, you have to sign up with Netlify. Note that this link is intended for presentations only. A real website requires professional hosting, a domain, and further technical steps.

Summary – Building a Complete Landing Page with Claude Design
You have seen how a well-structured prompt can produce a complete, responsive landing page in just a few minutes. What was decisive were the clear objective, the complete list of page sections, and the precise description of the style. You answered the AI's follow-up questions with brief answers, and with the export as standalone HTML and Netlify Drop, you made the result directly shareable. The next step is about revising texts, colors, and spacing in a targeted way.
FAQ
How long does it take for Claude Design to create the complete landing page?Depending on the scope, the generation takes a few minutes, and during this time you can answer the follow-up questions the AI asks.
Do I have to write the prompt myself?No, you can have a draft created by Claude, Gemini, or ChatGPT and then add your own requirements to it.
Can I make changes to the page afterwards?Yes, you can adjust call-to-action buttons, white space, social proof, and the color scheme in the project before you export.
What is the difference between the HTML export and the link for sharing?The HTML export is a standalone file that you can process further or upload. The link via Share is a direct release for team members or partners within Claude.
Is the Netlify Drop link online permanently?No, without signing up it is active for one hour and protected by a password. For a longer runtime, you have to sign up with Netlify.
Can I publish the page directly as a real website?For a production website, you generally need hosting, your own domain, and further technical setup. The Netlify Drop link serves only for presentation.


