Imagine your brochure reaches its recipients not in the mailbox, but in the inbox, on the website, or in the chat. For that, you don't need a second design, but a dedicated export version. A print file is intended for the print shop, whereas a digital PDF is intended for screens, email attachments, and downloads.
The video is only loaded from YouTube when you play it – data (including your IP address) is then transmitted to YouTube/Google. More in the privacy policy
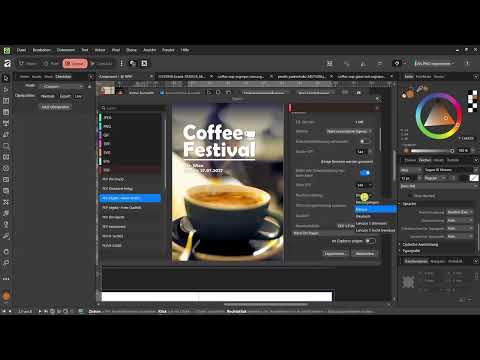
In this tutorial, I will guide you through exporting a digital PDF in Affinity Layout. You will learn how to set file size, resolution, and color space sensibly, and why you should omit bleed and crop marks for the online version. Finally, I will show you how to add clickable hyperlinks and tables of contents so that your brochure becomes truly interactive on screen.
Key Takeaways
For digital use, you export a separate PDF, distinct from the print file. Choose the "smaller size" option for digital applications, keep the file size under about 1 MB, and set at least 144 DPI. Use the RGB color space, as it is intended for screens. Omit bleed and crop marks if nothing is being trimmed. Hyperlinks and clickable tables of contents turn the PDF into a true digital document.
Step-by-Step Guide
Step 1: Think of the digital version as a standalone file
Before you export, you should be clear about what the brochure is intended for. A digital PDF differs from the print version in several respects, especially in resolution, color, and file size. If you keep this in mind from the start, you'll save yourself many corrections later.

Step 2: Open the export dialog for the template
Open the export dialog and select the PDF format. Make sure you don't accidentally select a different output. The dialog offers various presets, and the digital variant is one of them. This is where the actual difference from the print file begins.

Step 3: Choose the "smaller size" option
For digital use, choose the preset with the label "digital" and "smaller size". The advantage is clearly visible: the file shrinks from about 8 MB to around 300 KB. However, you should keep in mind that the photo quality becomes weaker. Images can then easily look slightly blurry on screen, which you should check in the preview.

Step 4: Consider high quality as an alternative
You can also use the "high quality" preset for digital purposes. It works with 300 DPI, and the images look noticeably better. The downside is that the processing takes longer and the file becomes correspondingly larger. For sending by email, this is often too heavy, but for websites with high demands on image quality, it can be worthwhile.

Step 5: Fine-tune DPI and quality for sending
I'm sticking with the small variant and setting the resolution to at least 144 DPI. This value is sufficient for a decent display on screen. You can raise the quality to around 90 so that the images become a bit more vivid. The file stays under 1 MB, which is perfectly adequate for sending by email. If you increase the DPI even further, the file size quickly grows into a range that is too large for sending.

Step 6: Set the RGB color space
For digital documents, you choose RGB as the color space. This is because screens work with red, green, and blue components. As a result, colors appear luminous and vivid. If, on the other hand, you use CMYK for print, this color space is less suitable for screens. That is why it makes sense to determine the purpose of the brochure before you start designing.

Step 7: Keep an eye on the effects of the color space
If you change the color space afterward, the appearance may change. The colors then often look paler than they did in the draft. This is not an error, but a consequence of the conversion. Therefore, check the preview carefully after exporting and decide whether the resulting look is acceptable to you. A higher DPI value, by the way, only improves the image to a limited extent and at the same time increases the file size, which is why you should stick with the smaller option.

Step 8: Omit bleed and printer's marks
For a digital file, you generally don't need a bleed area. It serves to compensate for small inaccuracies when trimming at the print shop. Since nothing is cut off on screen, there is also no need for printer's marks. You can therefore safely disable these settings if you had enabled them in the print version.

Step 9: Set the export purpose to "online"
In the export dialog, you specify that the file is intended not for a print shop but for online use. After that, you can start the export. Depending on the size of the brochure and the selected settings, the processing may take a while, especially with high image quality.

Step 10: Add hyperlinks and clickable tables of contents
A major advantage of the online file is the ability to add hyperlinks. You can insert links into the text that lead directly to websites. In addition, tables of contents can be set up so that clicking an entry jumps to the corresponding page. Even topics that are only mentioned in passing in the print version can be specifically linked this way. These features only matter in the digital version, because a printed brochure doesn't allow clicks.

Step 11: Compare the print and online versions
Open both PDFs side by side and check whether everything is correct. In the print version, colors and details stand out above all, such as pixels when zooming. In the online version, you check that the links are clickable, that the images are legible, and the file size. If numbers, quotes, and images are fully visible, you have managed the most important points.

Summary – Affinity Layout: Exporting a digital PDF for web and sending
You have learned that a digital PDF differs from the print file in several respects. With the "smaller size" option, at least 144 DPI, and a quality of around 90, the file stays email-friendly at under 1 MB. The RGB color space ensures an appropriate display on screen, while bleed and printer's marks can be omitted. With hyperlinks and clickable tables of contents, you turn your brochure into a document that can really be used online. At the end, compare both versions before you share them.
FAQ
Why should I export a separate digital PDF?Because the print file is intended for print shops and is usually too large and unsuitable for a website or email.
What DPI value is sufficient for digital sending?At least 144 DPI is sufficient for a good display on screen; higher values greatly increase the file size.
Why do the colors become paler after switching to RGB?Because CMYK colors are not always displayed identically when converted to RGB, so you should check the preview.
Do I need printer's marks for an online brochure?No, printer's marks are only needed if the file is to be trimmed and printed.
Can I add links in the digital PDF?Yes, you can create hyperlinks and clickable tables of contents, which don't work in the print version.
How large can the file be for sending by email?A size under about 1 MB is usually unproblematic for sending.

