A poster, a flyer, or the cover of a brochure only goes to print once the file has been properly prepared. That is exactly what the PDF/X export is for. In this tutorial, you will see step by step how to create a print-ready PDF with a CMYK color space and bleed in Affinity Layout, just as print shops expect it. The guide only takes a few minutes, but it saves you many follow-up questions and correction loops.
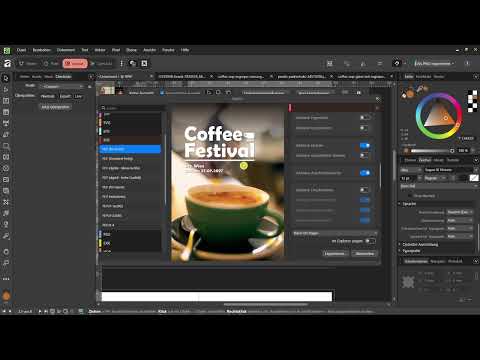
The video is only loaded from YouTube when you play it – data (including your IP address) is then transmitted to YouTube/Google. More in the privacy policy
Key Takeaways
- Saving the Affinity project is not enough for printing. You also need to export it as a PDF.
- Choose a print preset in the PDF/X standard, for example PDF/X-1a, X-3, or X-4.
- Set the raster resolution to 300 DPI.
- Be sure to activate the bleed area (3 mm) so that no white edge appears at the trim edges.
- Only use crop marks if the print shop explicitly requires them.
- Before exporting, check that the document is set up in the CMYK color space.
Step-by-Step Guide
Step 1: Save the project and prepare the export
First, save your project as usual via File and Save. Keep in mind that this only creates the Affinity project file. It is intended for further editing, but not for the print shop. You create the print-ready file in a second step via File and Export.

Step 2: Select PDF as the export format
In the File menu, open the Export command. In the dialog, select PDF as the format. As soon as you highlight it, several PDF presets appear to choose from. For printing, you don't need the web variant, but a print preset.

Step 3: Set the print preset in the PDF/X standard
In the preset list, choose the option for printing. It works in the PDF/X standard, which was developed specifically for handing files over to print shops. The video uses PDF/X-1a:2003. The PDF/X-3 and PDF/X-4 variants have the same basic settings and are also suitable for printing. Still, to be safe, ask your print shop which standard it prefers. Many providers state this on their website or in their order terms.

Step 4: Check the resolution and file size
In the right-hand area of the dialog, you will see the raster resolution. Make sure 300 DPI is entered here, as this resolution is considered the standard for printed images and graphics. In addition, the preview already shows the expected file size. In the example, it is about 8 MB, which is completely normal for a print-ready PDF. If the file seems significantly larger, it is worth taking a look at the image resolutions in your document.
Step 5: Activate the bleed areas
The bleed, also called trim allowance or Bleed, is an additional margin of usually 3 mm beyond the later trim edge. In the export dialog, you will find the option for bleed areas. Be sure to check the box here. Without it, the print shop lacks the overhang, and backgrounds or images could end with a white strip after trimming.

Step 6: Check the bleed in the preview
After you have activated the bleed, you should briefly check whether it has been applied correctly. If you have not included the bleed, a white frame often appears in the preview because the background does not reach the edge. After including the bleed, the preview updates after a few seconds. Only then can you be sure that backgrounds are filled all the way to the edge. Therefore, always extend backgrounds and cover elements beyond the actual page edge before you export.
Step 7: Activate crop marks only when needed
Crop marks are small lines in the corners of the sheet that show where to cut. Some print shops require them in addition. In the program, they sometimes appear under the name printer marks. Activate them only if the print shop explicitly requests them. They appear only in the export, not in your working view. If the print shop wants them, you immediately get an impression in the preview of what the finished sheet looks like with the marks.
Step 8: Export without crop marks
If your print shop doesn't need crop marks, leave the option deactivated. The file then corresponds exactly to the final print result, that is, the finished format without any additional markings. Make sure this option is chosen deliberately and doesn't stay activated by mistake.
Step 9: Check that the color space is CMYK
Print shops work with CMYK in four-color printing. That's why your document should be set up in this color space from the start. In the video this was the case because the setting was already defined when the document was created. Even so, it's worth checking in the export dialog. If something else is set there, switch the color space to CMYK. Especially for print projects, this step makes a noticeable difference to the colors.

Step 10: Name and save the file
Give the file a meaningful name that indicates the project and the recipient, for example Festival Brochure for Print Shop ABC. Then choose a storage location, such as the downloads folder, and confirm the export. Afterwards, briefly open the finished file in a PDF viewer to check the pages, trim edges, and images. By the way, you create a web version for publishing online with a different preset, since the two variants differ significantly in their settings.

Summary – Exporting a print PDF in Affinity Layout: PDF/X with bleed
You have seen that a print-ready PDF in Affinity Layout is more than a simple export. You save the project separately, then export in PDF/X format at 300 DPI with bleed activated. You only add crop marks if the print shop requires them. A look at the CMYK color space rounds off the preparation. With these settings, you can send your file to the print shop with confidence.
FAQ
Is it enough to save the Affinity project to send it to the print shop?No. The project file is only intended for editing in Affinity. For printing, you need a separate export as a PDF.
Which PDF/X version should I choose?PDF/X-1a, X-3 and X-4 are suitable for printing. It's best to ask your print shop which standard it prefers.
How large does the bleed need to be?3 mm beyond the trim edge is common. You can ask the print shop for the exact requirements, as some providers require different dimensions.
When do I need crop marks?Only if the print shop explicitly requests them. Without a request, leave the option deactivated.
What happens if my document is not set up in CMYK?The colors may look different in print than on screen. Therefore, switch the color space to CMYK in the export before you hand over the file.
Why does a white border appear after export?Most likely the bleed is not activated or your background doesn't extend beyond the trim edge. Activate the bleed and extend backgrounds to the edge.


