A photo in your brochure looks fitting at first glance, until a stain on the tablecloth or a corner that is too dark catches your eye. Normally you would open the image in a photo program, correct it, export it and place it again. With Affinity you can save yourself this detour, because the Pixel Persona is available to you directly in the layout. In this tutorial I will show you step by step how to select an image, remove disturbing spots with the Healing Brush, adjust the tonal values and then get back to working in the layout.
The video is only loaded from YouTube when you play it – data (including your IP address) is then transmitted to YouTube/Google. More in the privacy policy
Key Takeaways
- You can edit images in Affinity directly in the layout without opening a separate photo program.
- Via the Studio menu, you switch with the selected image to the Pixel Persona, which provides all the photo tools.
- With the Healing Brush (key J) and the Alt key, you copy healthy image areas and use them to cover up stains or disturbances.
- You create tonal corrections and other adjustments as adjustment layers, so that you can revise them at any time.
- After editing, you return to the layout with one click or via the F4 key, and the changes are immediately visible.
- The changes remain saved in the project. An export is not necessary for this.
Step 1: Select the image and switch to the Pixel Persona
First click on the image you want to edit. You can select it with the Move Tool or via the Layers panel; both work equally well. Then, at the top of the Layout Persona, you switch to the Pixel Persona via the Studio menu. Affinity has three areas for this: The Vector Persona is intended for vector graphics, the Pixel Persona for photos and images, and the Layout Persona for brochures and similar documents. By switching to the Pixel Persona, you have all the tools for image editing right at hand.

Step 2: Use the Healing Brush correctly
In the Pixel Persona, you choose the Healing Brush, which you call up with the J key. The principle is simple: First you determine where the image information comes from. To do this, hold down the Alt key and click on a point you want to copy, that is, a healthy, suitable spot. Then release the Alt key and paint with the left mouse button over the stain you want to remove. Affinity takes over the structure and color of the starting point and adapts it to the surroundings.
If you have several disturbances, simply repeat the process. Each time you have to set a new source point again with Alt. For small spots, a single click is often enough; for larger areas, you run the brush over the area several times.

Step 3: Remove disturbing stains and objects
Now it's time for the actual correction. In the example, a flaw in the tablecloth, a coffee bean lying too far at the edge, a chocolate stain and a few other coffee beans are disturbing. Set a source point each time on an even area nearby and paint over it until the stain has disappeared. It is important that you do not choose the source point too far from the disturbance, so that pattern and light remain consistent.
In this way, you remove the chocolate and the coffee beans in a few minutes. A clean empty area often results already on the first pass. For high-quality results, a second pass with smaller brush sizes is worthwhile.

Step 4: Check the result and refine it
When zooming in, the correction often doesn't look perfect yet. In a brochure, however, you will usually view the image section in normal view, and there imperfections are hardly noticeable. Nevertheless, you should check the spots where you worked multiple times. Don't overdo it. An area painted over too often quickly looks artificial. With another Alt-click and a brief shift of the point, you correct individual spots, for example the small dots at the edge of the image.

Step 5: Correct brightness and contrast with an adjustment layer
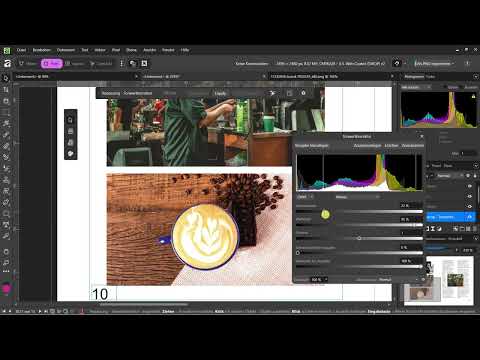
The image still looks a bit dark. This is where adjustment layers come into play. You recognize them by the half-circle icon in the Layers panel. The advantage: The correction sits as its own layer above the image, and you can adjust it at any time later without changing the original.
In the example, choose the Levels adjustment. Drag the white levels down slightly so the bright areas no longer blow out, and move the black levels up so the dark areas become lighter. The result is a more balanced image in which details in the shadows remain visible. Keep an eye on the preview and only drag the sliders as far as it takes until you like the effect.

Step 6: Match the White Balance and Color Effect to the Other Images
An image in your layout should not look isolated, but should match the other photos. Therefore, select the middle image and switch back to the Pixel Persona. There you can use an adjustment such as White Balance or Levels. In the example, the image looks somewhat gray. With the white levels, you remove the light tint so that the image becomes darker and higher in contrast and fits better with the other subjects.
Always compare the images side by side in the layout, because on the screen in the Pixel Persona the correction sometimes looks different than in the page view.

Step 7: Back to the Layout and Check the Result
As soon as you have finished editing, you return to the layout. To do this, click on the Layout Persona at the top or press the F4 key. By the way, the Personas in Affinity can also be switched using other keyboard shortcuts such as F2 and F3. In the layout you immediately see the result of your work. Some corrections are barely noticeable anymore in the page view, which is exactly the goal.
The decisive advantage: you never left the app, exported nothing separately, and yet all changes are saved directly in the project. By the way, this applies not only to the Pixel Persona, but to the entire Affinity program. So you can retouch all photos and images that you have inserted anywhere in this way.

Step 8: Comparing the Alternative
You could also open an image in a separate window, edit it there, copy it, and paste it back into the layout. That works, but it is considerably more laborious. You have to realign the pasted image, possibly build a frame, and adjust the size, and every change costs additional time. That is why the direct route via the Pixel Persona is almost always the better choice. Simply place the image in the layout, click on it, and retouch it in the Pixel Persona.

Summary – Retouching Images Directly in the Layout with Affinity
With the Pixel Persona in Affinity, you no longer have to move your images out to another program. You select the image, switch to the Pixel Persona, and remove blemishes with the Healing Brush. You correct brightness and color using adjustment layers, which you can change at any time. Afterwards, you return to the layout with a click or F4, and the changes are saved in the project. This way you save yourself exports, re-placements, and unnecessary detours.
FAQ
Can I also use other tools besides the Healing Brush in the Pixel Persona?Yes, all photo tools are available to you in the Pixel Persona, including adjustment layers such as Levels or White Balance.
Do I have to export the image after editing?No, the changes are saved directly in the project. A separate export is not necessary.
How do I set the source point for the Healing Brush?Hold down the Alt key, click on a healthy area in the image, and then release Alt. Then paint over the blemish with the left mouse button.
Why should I use adjustment layers instead of direct changes?Adjustment layers sit as a separate layer above the image. You can change them at any time later without damaging the original image.
How do I get back to the layout?You click on the Layout Persona at the top or press the F4 key.


