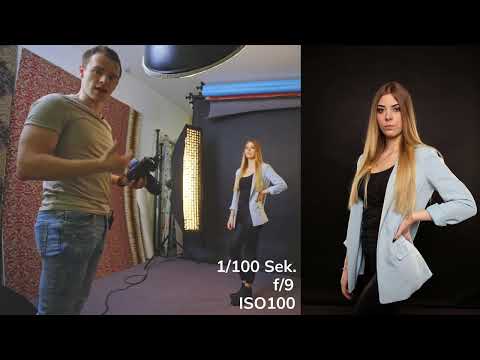
A cleanly isolated subject often determines how convincing a composite looks in the end. If you create a clear rim of light on the subject while shooting, you save yourself a lot of detailed work on hair, shoulders, and contours in post-processing. That is exactly what this setup is designed for. Two side rim lights from behind clearly separate the subject from the background, while a main light from the front provides even illumination. In this tutorial, you will build the setup step by step, adjust the power of the lights, and learn which typical mistakes you should avoid.
The video is only loaded from YouTube when you play it – data (including your IP address) is then transmitted to YouTube/Google. More in the privacy policy
Key Takeaways
- Two rim lights from behind, slightly offset to the sides, create the light edges along which you will later isolate the subject.
- The main light from the front handles the basic illumination and should not overpower the rim lights.
- A dark background only stays black if you dose the rim lights subtly and match the exposure to them.
- A beauty dish coming directly from the front and above also illuminates the background. A lateral offset helps counter this.
- You should avoid hard shadow edges on the face so that the subject can later blend into different environments.
Step 1: Define the Background
The background comes first. A gray paper background had been planned, but it was no longer available in sufficient length. That is why the setup is built in front of black. Black has an advantage for composites: the light edges of the subject stand out especially clearly against it. Since the background does not reach the floor, the setup stays with a half-body shot. A full-body picture would theoretically be possible, but in front of black it quickly looks messy.

Step 2: Set Up the Three Light Sources
You need three light sources: two strip lights (strips) at the back and a beauty dish at the front. You aim the two strips at the model, but place them somewhat further back. That way, no additional light from the front falls on them. The beauty dish is added at the front as the main light. The hair light you use in addition should not shine frontally from behind, but only slightly from the side.

Step 3: Align the Rim Lights
The position of the rim lights determines the quality of the edges. Align them so that they hit the shoulder, hair, and contour not directly from behind, but slightly from the side. In the viewfinder or on the display, the exact direction is not always clear. So do not rely on your eye alone, but test the position with a test shot. If the strip of light looks too wide or too strong, move the light a bit further back.

Step 4: Set the Power of the Rim Lights
In the video, two flashes with 400 watt-seconds each are used. To start, you first set both lights to a low power, in the example to 1/8. Then you take a test photo. With only the rim lights, the model is barely recognizable, and that is exactly what is intended. You only see a narrow, subtle rim of light on the sides. That is enough as a foundation, because the main light is added later.

Step 5: Adjust the Exposure Instead of the Flashes
If the rim lights look too weak, you do not have to constantly run around to the flashes. You can shorten the exposure time, and open the aperture a bit wider. This lets more light reach the sensor without you having to rebuild the lighting setups. Keep an eye on the background while doing this. It should stay black and must not brighten because of the adjusted exposure. Check this regularly on the display until the subject and edge are right.

Step 6: Switch On the Main Light from the Front
Now you switch on the beauty dish from the front. It takes over the main illumination and provides a completely normal base brightness on the face. In doing so, the rim lights lose some of their effect, because the front light overpowers them. That is why you increase their power, in the example from 1/8 to 1/4. Make sure both rim lights are set evenly, otherwise a one-sided edge results. If you are recording audio, also note that the fan of some lighting units can be audible. When in doubt, place the devices further away or test the recording beforehand.

Step 7: Check the result
Take a new test photo and examine it critically. Are the light edges visible, is the face evenly lit, and are the shadows not too harsh? Also make sure that neither light stands nor strip lights extend into the frame. With lights placed to the side, this happens easily, especially if you choose a tighter framing. If everything fits, you have a solid foundation for the later cutout.

Step 8: Compare with and without strip lights
A comparison makes the effect clear. Switch the strip lights off once and photograph the subject again. Without them, the image looks flatter and the subject blends more with the background. With the strip lights, on the other hand, there is more dimensionality, and the contour remains clearly recognizable. The setup with a main light and strip lights is therefore not only technically sensible, but also improves the visual impact of the image.

Step 9: Avoid light spill on the background
One point that is easily overlooked is the light on the background. If the beauty dish comes directly from the front and above, light also falls on the background. This is normal, but can be disruptive if you want to light the background separately later. On a gray background, the distribution shows up much better than on a black one. Therefore, move the beauty dish slightly to the left or right. That way it no longer stands exactly in front of the tripod, and you avoid problems with the tripod appearing in the image.

There is a limit to the sideways offset. If you go too far to the side, a shadow edge appears on the face, which you actually want to avoid. The goal of the setup is a light direction that does not clearly tilt to the right or left. If you have already defined a fixed light direction in the composing, you can take it into account right away when shooting.
Summary – Composing setup: strip lights for a clean cutout in the studio
The composing setup combines two strip lights from behind with a main light from the front. The strip lights create the edges at which you can later cut out the subject. The main light ensures even illumination of the face. Make sure to dose the strip lights subtly, keep the background dark, and avoid hard shadow edges. With a test photo and a comparison without strip lights, you can quickly see whether the setup suits your composing.
FAQ
Why is the setup built in front of a black background?Black makes the light edges of the subject especially clear and thus makes the later cutout easier.
Can I also use the setup for full-body shots?In theory yes, but with a background that doesn't reach the floor, the result quickly looks unclean.
How strong should the strip lights be set?Start low, for example at 1/8, and only increase the power when the main light is added. In the example, it was increased to 1/4.
What do I do if the background becomes too bright due to the exposure adjustment?Shorten the shutter speed or adjust the aperture so that the background stays black and only the strip lights have an additional effect.
Why shouldn't the beauty dish stand exactly in front of the tripod?Then more light falls on the background, and the tripod may end up in the image. A slight sideways offset solves both.
How far to the side may I place the beauty dish?Only so far that no distinct shadow edge appears on the face. The goal is a neutral light direction.


