A plain background quickly looks lifeless, especially when the subject is cleanly lit and nothing in the surroundings is distracting. Instead of lightening or darkening the background afterwards on the computer, you can shape it while you are shooting. With a second flash behind the subject, a circular gradient of light is created, a so-called vignette. It draws the viewer's eye to the center of the image, to your subject, and gives the picture spatial depth.
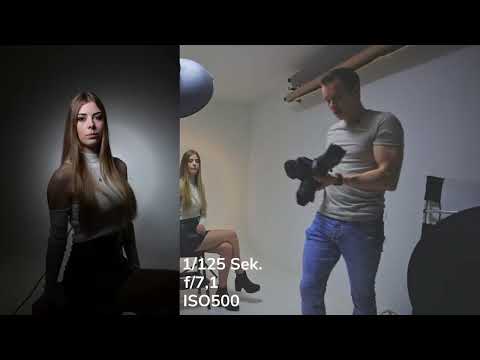
The video is only loaded from YouTube when you play it – data (including your IP address) is then transmitted to YouTube/Google. More in the privacy policy
In this tutorial, you will learn how to set up the main light, position the background flash, shape the light source, and then fine-tune the gradient. The technique works with standing portraits as well as with other subjects, as long as you keep the distance and the power under control.
Key Takeaways
The background flash is placed behind the subject and aimed at the background. It creates the brightness gradient, while the main light in front shapes the subject.
A hard, as focused as possible light source on the background produces a clear gradient from the inside to the outside. The distance to the background determines how large and how soft the light source appears.
Fine-tuning is done via the power of the background flash or via the aperture. The goal is a background that stays slightly darker than the subject and lets the vignette look subtle.
Step-by-Step Guide
Step 1: Set up the main light in front
Start with the light that illuminates your subject. In the tutorial, a beauty dish is used for this, aimed at the subject from the front. First check whether the subject is well exposed and what the background looks like without additional light. At this point it usually looks rather boring or evenly gray. That is exactly your starting point.

Step 2: Position the flash behind the subject
Set up the second flash behind the subject, in such a way that it is not visible to the viewer. The image should later show only the lighting effect on the background, not the light source itself. Make sure that the flash does not shine directly into the camera and does not cause reflections or stray light in the lens. Then switch the flash on and take a test shot.

Step 3: Align and limit the light cone
The reflector on the flash determines how hard and how directed the light is. In the tutorial, the flash head is tilted downward so that the light hits only part of the background. This area later forms the bright center of the vignette. If the flash head cannot be tilted far enough, you can alternatively regulate the angle via the position of the flash or by shading it with an object. Take a control shot each time so you can see how the light spot changes.

Step 4: Adjust the distance to the background
The distance between the flash and the background determines the shape of the light spot. If you stand close to the background, the light source becomes smaller and the gradient is more pronounced. If you increase the distance, the light source becomes larger and softer, and the transition between light and dark is spread over a larger area. Try two or three distances and decide which gradient suits your subject.

Step 5: Aim the background flash at the background
Now it is a matter of aiming the flash precisely at the background. Check in the image whether the bright area is centered and whether the gradient falls off evenly toward the outside. If the center is too far to the left or right, shift the flash slightly. Keep the camera steady and stay in the same position so that you can compare the changes easily.

Step 6: Recognize the vignette in the result
In the finished shot, the background should be brighter in the center and become darker toward the edges. As a result, the subject stands out more, because the bright area behind it provides contrast. Make sure that the outer areas do not become completely black, unless you want that deliberately. A slight residual tone at the edges looks more natural in most cases.

Step 7: Fine-tuning via power and aperture
If the gradient is still too strong or too weak, you have two adjustment options. The first is the power of the background flash. The second is the aperture: a smaller opening, such as f/16 or f/32, reduces the light overall and changes the exposure of the subject. The tutorial makes clear that the power can only be lowered to a limited extent. In this case, it is worth readjusting via the aperture. Always keep in mind that the main light also affects the subject. Therefore, take a new shot after every change and compare it on the camera display.

Step 8: Composing a standing portrait
The technique can also be applied to standing portraits. A particularly hard main light source from the front helps here, causing the background to turn black. The flash behind the subject is now turned up just far enough that it does not brighten the background too much. A background that stays slightly darker than in the test image often makes the vignette look especially high-quality. Take your time with this final fine-tuning, because this is exactly where it is decided whether the image looks elegant or overexposed.

Summary – Background light: Creating a vignette with the flash in the studio
With a second flash behind the subject, you design the background directly during the shot. You first set up the main light, align the background flash so that a bright circle forms in the center, and adjust distance, light cone, and power or aperture. The result is a vignette that draws the eye to the subject and gives the image depth. The background should remain slightly darker than the subject so that the effect looks natural.
FAQ
Do I need to be able to see the background flash?No, the flash should be positioned behind the subject and should not be visible in the image. Only its light on the background is visible in the photo.
Can I also create the vignette in image editing?That is possible, for example with Photoshop or Lightroom. However, the technique using light delivers a more natural gradient that is already created in the shot.
What should I do if the background becomes too bright?Reduce the power of the background flash or close the aperture a bit further, for example to f/16 or f/32. Afterwards, also check the exposure of the subject.
What distance is ideal?There is no fixed value. A small distance results in a more striking gradient, a larger distance in a softer and larger light source. Try out several positions.


