
As soon as you photograph with flash at night, the background often turns black while the person in the foreground is overexposed. With an off-camera flash that you position away from the camera, you solve this problem and can create portraits with a setting and atmospheric light.
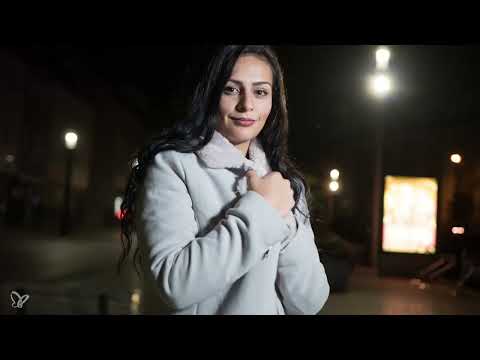
The video is only loaded from YouTube when you play it – data (including your IP address) is then transmitted to YouTube/Google. More in the privacy policy
Key Takeaways
- First set the background via the exposure before you switch on the flash.
- A flash positioned far from the camera can be finely adjusted via its distance and power.
- Flashes placed to the side create modeling and shadows that give a portrait depth.
- You can deliberately emphasize existing light sources such as lamps in the background with the flash.
- A rim light from behind separates the subject from the background and looks especially natural if you don't use it too harshly.
Step-by-Step Guide
Step 1: Set the Background Before the Flash
Before you even touch the flash, switch it off and take care of the scenery. Capture the ambient light the way you want it in the final image. This is the most important principle of off-camera flash: the background is created by your camera settings, the subject by the flash. So set the exposure so that the surroundings look atmospheric, even if the subject remains too dark at that moment.

Step 2: Deliberately Darken the Background
If the background is still too bright with your first setting, you can darken it. To do so, open the aperture wide, for example to f/1.8, and lower the ISO. You then determine the shutter speed. In the video, a shutter speed of about 1/100 second is used. Make sure you don't exceed the sync speed of your camera. The manufacturer of your flash and your camera provides this value. With the setup in the video, the maximum speed is 1/125 second. A shorter time is often possible with radio triggers or special flash systems; check the documentation of your system for this.

Step 3: Check the Basis with a Test Shot
Now take a test shot without flash. Check whether the subject already gets some light and the background looks the way you want it. This is not about perfection, but about a solid foundation for using the flash. The flash should later complement the subject and not take over the entire image composition.

Step 4: Position the Flash
Now set up the flash at about head height or above and to the side of the subject. A slight side position ensures that shadows appear on the face, which give the portrait structure. Then switch on the flash and connect it to the camera via the radio trigger. This step is easily forgotten, but without an activated trigger the flash stays dark. Then take another test shot.


Step 5: Adjust the Flash Power and Distance
With the first test shot with the flash on, the image often looks far too bright. You then have essentially two options to reduce the light. The first: you lower the manual flash power. In the video, the power has already reached 1/128, the smallest adjustable value. The second option: you increase the distance between the flash and the subject. Light decreases with the square of the distance, so at double the distance, significantly. In the example, the flash is moved to about two meters away. A smaller aperture would also help, but it would make the background darker again. That is why distance is the better lever in this case.


Step 6: Vary the Position of the Subject and the Flash
Now the creative part begins. Ask your model to look in different directions, and move around yourself with the camera. Try out how the light changes when the subject stands closer to or farther from the flash. If the model moves closer to the flash, the flash will automatically hit the face more from the side. It is helpful to check after each shot how much the light changes. This phase takes some patience, but it gives you a feel for which arrangement suits your subject.

Step 7: Fine-tuning the direction of the light
As soon as the flash is positioned too far to the side, shadows quickly become harsh. Therefore, move the flash back a bit and adjust its height and angle until the face is evenly modeled. Make sure the model looks in the direction of the lamp when you work with directional light. The shadow on the face should not be too deep, otherwise the portrait looks unnatural.

Step 8: Reduce the power for even illumination
Once the light direction is right, check the brightness. The flash is often still too strong. Reduce the power or the distance a little until the light gives just a slight touch. The goal is an even light that blends into the existing mood instead of overpowering it.

Step 9: Use existing light as an accent
If there are already lamps or other light sources in the scene, you can emphasize them with the flash. Choose a lamp you like and first turn the flash off to check the exposure. If the ambient light is right, turn the flash back on and use it only as an accent. This way the image stays authentic, and the lamp becomes the visual focal point.

Step 10: Add a rim light from behind
An additional flash from behind creates a rim light that highlights the contours of the subject and separates it from the background. Place it so that it hits the hair or the shoulders from the side. Then take a test shot to assess the effect.

Step 11: Avoid light spill on the floor
With a flash from behind, light often falls on the floor, which makes the image look busy. You can prevent this by positioning the flash more to the side and slightly higher. A small change of angle is often enough. If the problem persists, change the perspective: lower the camera slightly so that less floor is visible in the image.


Step 12: Work with direct light instead of a softbox
As a third variation, you can remove the softbox. This makes the light more direct and harder. Set up the flash at an angle of about 45 degrees to the subject and test the result. The video shows that a soft strip of light often looks more natural than a shadow that is too harsh. Therefore, compare several variations before you decide.

Step 13: Select the final image
At the end, take a final image and compare it with the test shots. Often the version with a softer rim light is the most harmonious. However, you can adjust the lighting conditions at any time to your vision and the mood of the subject.

Summary ??? Night portraits with off-camera flash: combining background and artificial light
The off-camera flash is a flexible tool for nighttime portraits. You first set the background using the camera and then use the flash deliberately as a supplement. You control the light via power, distance, angle, and height, and with rim light as well as existing lamps you give the image depth and atmosphere. Experiment with different variations, because that is exactly where the creative appeal of this technique lies.
FAQ
Why does the background often turn black in flash shots?The flash only illuminates the nearby subject; the background stays dark with a short exposure time. With a longer exposure, you bring the surroundings back into the image.
Should I set up the flash or the camera first?Set up the camera first, that is, aperture, ISO, and exposure time for the background. Then the flash comes into play.
How do I reduce the flash brightness if the power is already at the minimum?Increase the distance between the flash and the subject. With double the distance, the light becomes significantly weaker.
Why is the exposure time limited with an external flash?The camera can only work together with the flash up to a certain sync speed. You can find this value in the documentation of your camera and your flash system.
Do I need a radio trigger?Yes, for an off-camera flash, a trigger is necessary to establish the connection between the camera and the flash.
How do I achieve softer light?Use a softbox or keep a greater distance from the subject. Both make the light softer.
What does a rim light from behind do?It highlights the contours of the subject and visually separates it from the background.
How do I avoid light on the floor?Position the flash more to the side and higher, and lower the camera perspective if necessary.
Can I emphasize existing lamps with the flash?Yes, choose a lamp as the focal point and use the flash only as an accent so that the ambient light is preserved.


