
A clip-on flash, a softbox and a plain wall are enough to shoot portraits that look like they were taken in a studio. In this guide, I'll show you step by step how to set up the flash, adjust the camera settings appropriately and then edit your shots in Photoshop. You don't need expensive equipment for this, but above all a good understanding of how light, distance and aperture work together.
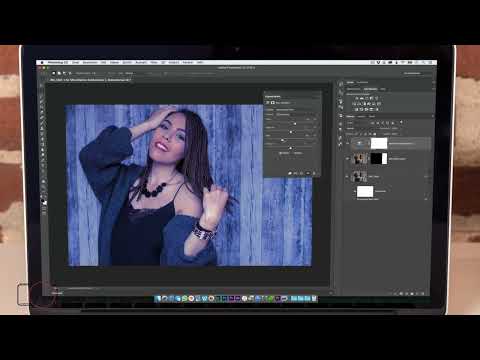
The video is only loaded from YouTube when you play it – data (including your IP address) is then transmitted to YouTube/Google. More in the privacy policy
All examples come from an apartment where we work with a model in front of a simple wall. The camera uses a kit lens, and the editing is done in Photoshop with a RAW file and non-destructive methods.
Key Takeaways
- A softbox on the clip-on flash makes the light softer and more versatile.
- With wireless triggering and a softbox held above the camera, you can direct the light precisely without needing multiple flashes.
- If the distance to the subject changes, you have to adjust the flash power.
- A greater distance to the background creates more blur, and a longer focal length reduces distortion in the face.
- In Photoshop, work non-destructively with smart objects, layer masks and adjustment layers so that you can undo any step at any time.
- Don't overdo the color style, black levels and vignette. Less is usually more.
Step-by-Step Guide
Step 1: Equip the flash with a softbox
Put a softbox on your clip-on flash. It spreads the light over a larger area and creates softer shadows than the bare flash could. You can also use other attachments, but the softbox is an inexpensive and very versatile solution. With it, you already get close to studio photography.

Step 2: Wireless triggering and the flash trick
The flash is triggered wirelessly. The small built-in flash of the camera is only used as a trigger here. It detects the flash via the photocell and triggers the external flash, but does not light up itself. So that no additional light affects the scene, you have to make sure that two flashes don't make themselves noticeable at the same time.
The trick: You hold the softbox above the camera. The built-in flash then only hits the softbox, and the light is reflected upward. This way, you can change the light source very quickly and flexibly with a single clip-on flash.

Step 3: Choose camera settings
Set the camera to aperture priority mode, i.e. AV, and choose an aperture of 3.5. A focal length of 18 mm on the kit lens is suitable to start with. The camera then automatically controls shutter speed and ISO while you control the aperture.

Step 4: Use the distance to the background
Move a little closer to your model. The greater the distance between the model and the background, the blurrier the background becomes. This effect works with any lens and any aperture if you use the distance correctly.
Step 5: Reduce distortion in the face
At 18 mm, you notice that the model's face looks distorted. This is due to the wide-angle focal length, which stretches noses and the edges of the face in particular. So zoom to about 30 mm. Pay attention to the fact that the aperture changes: With this lens, the maximum aperture shifts from 3.5 to 4.5. You should keep this in mind when calculating your exposure.

Step 6: Adjust the flash power to the distance
If you change the distance to the subject, you have to readjust the flash power. In the example, the flash was initially set to 1/128. After I took a step back, I increased the power to 1/60 to compensate for the greater distance. Then take a test shot and check the result on the display.

Step 7: Shoot from different perspectives
Once the settings are right, you can get started. Try portrait and landscape formats, sometimes move farther away and sometimes closer. Remember to check the flash power with every change in distance. This way you get a selection of different images from which you can choose the best ones later.

Step 8: Open the RAW file in Photoshop
Open your selected image in Photoshop. Since you are working with a RAW file, you can use the Camera Raw filter to access the same sliders you know from Lightroom. This is much more convenient than editing with classic adjustment layers, and you keep full control over the raw data.

Step 9: Sharpen and use a Smart Object
Apply sharpening, for example with an Amount of 70 and a Radius of 0.7. Since the image is present as a Smart Object, the changes can be hidden, shown again, or edited again at any time by double-clicking. This is exactly the kind of non-destructive workflow you should get used to.

Step 10: Define the image crop with the Crop tool
Select the Crop tool and crop the image so that the model is shifted in the desired direction. It is best to choose "Original Ratio" in the menu so that the aspect ratio is retained, no matter how you change the crop.

Step 11: Close gaps with Content-Aware Fill
After cropping, a transparent area appears on one side. The "Content-Aware" option in the Crop tool fills this area automatically. However, this does not work reliably with a Smart Object. You can work around this by duplicating the layer, rasterizing the duplicate, creating a selection of the area to be filled, and choosing "Content-Aware" with Shift+F5. Then you create a layer mask so that only the changed area remains visible.

Step 12: Alternative with the Transform tool
If you don't like content-aware filling, you can also copy part of the image and transform it with Command plus T (Ctrl+T on Windows). This way you pull the image area a bit further outward and confirm with Enter. Especially with a simple wall, the result often looks very natural. Here too: stick with a layer mask, then you remain flexible.

Step 13: Create a color style with Selective Color
Add a Selective Color adjustment and select the neutrals there. Pulling the Cyan slider to the left adds red, pulling it to the right adds cyan. A slight amount of cyan can do the image good, but it should not be too strong, as otherwise the image looks cool. The Magenta slider works similarly: to the right it becomes magenta, to the left green.
My most important tip here: don't overdo it. If the color style still looks too strong, simply reduce the opacity of the layer. The same goes for the Yellow slider: you should take small steps, because pulling several sliders in a rough direction at the same time usually achieves little.

Step 14: Adjust black levels selectively
The Black slider in the neutrals view affects the black tones, which you don't actually want to change here. Instead, go to the Black slider for the shadows (blacks), which affects only the darkest areas. In the example, the value was increased gradually until the model's top and the shadows visibly gained definition. Here too, pull only very slightly.

Step 15: Skin retouching with the Spot Healing Brush
Create a new layer, for example named "Retouch". There you can remove distracting spots with the Spot Healing Brush. Make sure that the "Sample All Layers" option is enabled and the mode is set to "Content-Aware", otherwise unattractive textures will result. Choose a soft brush tip and only work on spots that are really bothersome. In the face, a subtle retouch is usually enough so that the model looks natural.

Step 16: Create a custom vignette with an ellipse and a curves adjustment
Instead of a standardized vignette, you can use the Ellipse tool while holding the Shift key to place a circle over the face. Then create a Curves adjustment. The mask is created automatically so that only the area inside the circle is affected. Pull the curve slightly upward to brighten the area.

To keep the edge from looking harsh, click on the mask and increase the feather value in the Properties dialog. In the example, about 185 pixels was enough. However, the resolution of your image may require different values.

Step 17: Darken the background
Duplicate the mask and invert it so that the outer area is now affected. Use a tone curve or a slider for the black tones to darken the background. It is important that you keep it subtle. The effect should draw the eye to the model, not dramatically change the background.

Step 18: Direct the focus with a black-and-white layer
Load the selection of your mask, for example by Command-clicking on the mask, and create a black-and-white layer. At first this looks unusual because color remains in the background. Since the eye is drawn more strongly to colored areas, you direct the gaze to the model this way. Reduce the opacity of the layer, to about 35 percent in the example. This way a trace of background color is retained, and the focus is still on Natalie.

Step 19: Compare the result with the original
Hide all layers to see the original image. Then you can show each step again one after another. This way you can see how a simple flash photo became an appealing portrait in just a few minutes. This comparison is also a good habit for critically reviewing your work.

Summary ??? Portraits with flash: softbox, settings, and image editing
With an on-camera flash, a softbox, and a little know-how, you can shoot remarkable portraits. The decisive factors are the right combination of flash power, distance to the subject, focal length, and aperture. In Photoshop, it is best to work non-destructively so that you can correct changes at any time. Show restraint with color, black levels, and vignette, and the result will look natural and high-quality.
FAQ
Which softbox do I need to get started?A simple, inexpensive softbox for the on-camera flash is perfectly sufficient for shooting your first portraits with soft light.
Why do I have to change the flash power when I move away from the model?As the distance increases, the light intensity at the subject decreases. That is why you have to increase the flash power so that the subject is exposed correctly.
Why does the face look distorted at 18 mm?Wide-angle lenses stretch facial features such as the nose when you shoot close to the subject. A focal length of about 30 mm is usually more flattering.
What does non-destructive mean in Photoshop?Non-destructive means that you can undo or adjust changes at any time using smart objects, adjustment layers, or masks without losing the original image.
Why does content-aware fill not work with smart objects?Smart objects cannot be filled directly with this function. You can work around this by duplicating the layer and rasterizing it before applying the fill.
How do I know if I'm overdoing the color editing?If the color style looks conspicuous or the skin tones appear unnatural, it is too much. Reduce the opacity of the layer until the image looks harmonious again.


