
Imagine your model is standing in the shade of a tree, and the light falls on the face from only one side. In exactly this situation, this tutorial shows you how to direct the light with a simple reflector and then bring out the mood of the image in Lightroom.
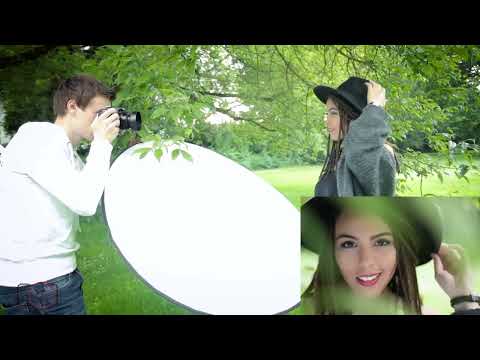
The video is only loaded from YouTube when you play it – data (including your IP address) is then transmitted to YouTube/Google. More in the privacy policy
Introduction
In this guide, you accompany a shoot with the model Natalie. You will learn how to design the foreground with branches, how to use a reflector to add missing light, and how to weigh the silver side against the white side. In the second part, we look at the editing in Lightroom. There, exposure, colors, and toning are adjusted step by step.
Key Takeaways
- An image can be divided into foreground, middle ground, and background. Natural elements such as branches can add depth to the foreground.
- A wide-open aperture (f/2.0 in the example) in aperture priority mode (Av) separates the subject from the background.
- A reflector adds missing light. The silver side looks harsh and high-contrast, the white side softer and more natural.
- You control the intensity of the reflected light via the distance of the reflector from the face.
- In Lightroom, the HSL panel lets you change individual hues in a targeted way, such as green for a subtle vignette.
- Restraint pays off: with split toning and saturation, less is often more.
Step 1: Designing the Foreground with Branches
Start with the composition. You stand under a tree and shoot through the leaves. This creates a blurred foreground that frames the subject and gives the image depth. For this, choose a wide-open aperture, f/2.0 in the example, and work in aperture priority mode (Av). Pay particular attention that no leaves cover the face, especially not the eyes. You can best control this by carefully moving the branches aside with your hand or by having your model shift slightly.

Step 2: Checking the Initial Situation
Before you use the reflector, take a test shot and assess the light. In this example, the light comes from above through the canopy of leaves, and it falls on the face only from the right. The left half of the face is in shadow. This is exactly the gap the reflector is meant to close. With every test image, look at the face: Where is light missing, and how strong are the shadows? This analysis determines how you position the reflector.

Step 3: Reflecting Light with the Silver Side
Now the reflector comes into play. The silver side reflects the light particularly strongly. Aim it at your model so that the light falls from the side where the shadows are. In the example, it quickly becomes apparent that the silver side almost does too much. The face looks glaring, almost as if someone had held a flashlight directly in front of it. This makes the silver side better suited to high-contrast, dramatic looks or to situations with little light. For a natural portrait, it is usually too harsh.

Step 4: Using the White Side for a Softer Result
So turn the reflector to the white side. It scatters the light more softly and evenly. The shadows are gently brightened without the face looking overly contrasty. This variant is the better choice for most portraits, especially if you want to preserve natural skin tones. Compare both sides side by side in your test images before you decide.

Step 5: Holding the Reflector Correctly and Controlling the Intensity
A reflector is only helpful if it is held steadily and in the right position. You can ask the model to hold the reflector herself. Since the hands are then not in the frame, this often works well. Alternatively, a third person can assist. You regulate the strength of the effect via the distance: the closer the reflector is to the face, the more intense the light appears. With a bit more distance, the effect becomes more subtle. Try out different positions and decide according to your taste how strongly you want to use the light.

Step 6: Basic Editing in Lightroom
After the shoot, you move to your computer and open the images in Lightroom. Choose your favorite image and first set the white balance. In the example, you work with 5500 Kelvin. Then you adjust the exposure: you pull the highlights down slightly, raise the shadows, and bring the whites back a little. This creates more dynamic range in the image. With the black slider, you bring back the contrast that is still missing. Finally, you can raise the contrast slightly. Make sure to change the sliders in small steps so the image doesn't look artificial.

Step 7: Adjusting Colors Precisely with the HSL Panel
The HSL panel (hue, saturation, luminance) is a powerful tool because you can edit each color channel individually. You can use the sliders directly or work with the tool right in the image via the small dot icon. If you click on an area of the image, Lightroom detects the color and adjusts only that hue. In the example, you shift the green tones slightly toward yellow to create a subtle autumn look. Since there is a lot of green in the image, you reduce the saturation of the green tones by about minus 25. This draws more attention to the model. Additionally, you lower the luminance of the green tones slightly. This creates a soft vignette that darkens the edge of the image. Don't overdo it, because otherwise the image quickly looks artificial.

Step 8: Fine-Tuning Split Toning and Details
In the Details panel, you increase the sharpness to about 70 and adjust the value until the face looks clear but not oversharpened. Then you work on the split toning. Since the face in the image is very bright, you give the highlights a slight orange tone. This makes it look as if the skin were slightly tanned. For the shadows, you choose a minimal green tint. Here too, the rule applies: better too little than too much. Even a few points make a noticeable difference, and a color cast that is too strong stands out immediately.

Step 9: Comparing Before and After
Finally, you check the result by undoing the editing steps and using the "Before/After" view. This way you can see which changes actually make a difference. In the example, the editing increases the saturation, brings more contrast into the image, and gives the background some color so that it no longer appears just blown-out white. You can also use the comparison to check whether you have overdone it. By the way, the raw files for this shoot are available for download. Try the editing yourself and compare your result with mine.

Summary – Portrait with Reflector: Shaping Light Precisely and Editing in Lightroom
A reflector is one of the cheapest and most effective tools for portraits. In this guide, you learn how to use layers for depth, bounce missing light back in a targeted way, and choose between the silver and white sides. With the editing in Lightroom, you then get the most out of your shots. It is important that you work with restraint in every step and always check your decisions against the image.
FAQ
Which side of the reflector is best suited for portraits?For natural portraits, the white side is usually the better choice, as it diffuses the light more softly. The silver side looks more intense and is better suited for high-contrast looks.
How can I strengthen or weaken the effect of the reflector?Through the distance to the face. The closer the reflector is, the stronger the reflected light appears.
Who holds the reflector when I'm shooting alone?Your model can hold the reflector, since the hands are then not in the picture. Alternatively, a third person can help.
Why should I shoot through branches with an open aperture?The branches become blurred and form a foreground that gives the image depth. Make sure that no leaves cover the face or the eyes.
What does the HSL panel do in Lightroom?It makes it possible to change the hue, saturation, and luminance of individual color channels separately. This way, for example, green tones can be subtly darkened without affecting other colors.
How much split toning makes sense?Only a little. Even small values have a strong effect, and a color cast that is too intense quickly stands out negatively.


