
A forum thrives on activity. Anyone who sees new posts immediately when opening the home page is more likely to stick around. This is exactly the problem I had with TutKit.com: the news section was only updated now and then, although a regular frequency of several posts per week would be ideal. The solution lies in a combination of the automation platform make.com and the AI assistant Claude Cowork. Claude not only takes care of the texts, but also builds the entire scenario in make.com itself.
The video is only loaded from YouTube when you play it – data (including your IP address) is then transmitted to YouTube/Google. More in the privacy policy
In this guide, I will show you step by step how to set up this system, which modules you need, and what to pay attention to regarding costs and quality. You do not need any prior knowledge of make.com, because Claude takes care of exactly that for you.
Key Takeaways
- make.com is excellently suited for chaining together processes such as research, image creation, and publishing.
- Claude Cowork can build a complete automation scenario if you describe your goal clearly and ask it to ask follow-up questions beforehand.
- Image creation with OpenAI causes the biggest costs. A low image quality noticeably saves tokens.
- The automatically created posts should be checked before publication. An additional proofreading loop by Claude is worthwhile if errors occur frequently.
Step-by-Step Guide
Step 1: Clearly Define the Goal
Before you even open a tool, you should think about what exactly is to be automated. My goal was simple: every day, one to two news items should appear in the news section of the forum that fit my subject area, such as Photoshop, web design, or photography. This clarity is crucial later on, because you pass it directly on to Claude.

Step 2: Create a Free Account at make.com
To get started, you only need an account at make.com. The offer is free as long as you stay within the free plan. There, you have about 1,000 tokens available per month. How quickly these are used up depends on how intensively you use the platform. Personally, I only started using make.com shortly before the recording and still already created several scenarios.

Step 3: Create a New Scenario
In make.com, you work with so-called scenarios. A scenario is basically a chain of modules that are executed one after another. Simply create a new scenario for this. I recommend that you back up scenarios regularly before making larger changes. That way, you keep control in case the AI takes an unexpected step.

Step 4: Give Claude Cowork the Assignment
Here comes the real clou. You do not have to master make.com yourself, because Claude Cowork knows it very well. Open the scenario and describe precisely to your assistant what you want. For example, I told it that I need a workflow that automatically creates news, and which platform I use. An important tip: explicitly ask Claude to ask follow-up questions before starting. That way, it clarifies in advance which information it needs, and you avoid false starts.

Step 5: Answer the Follow-Up Questions
Claude will now ask you questions, for example which news it should look for, in which area of the forum the posts should appear, and which image source it may use. Answer as concretely as possible. In my case, these were the topics Photoshop, web design, and photography, searching the open internet, and the news section of the forum. The more precise your answers are, the fewer corrections you will have to make later.

Step 6: Set Up the Trigger and the Research
Claude now adds the individual modules. The process begins with a trigger, that is, a starter that launches the scenario. A research module follows. In my case, Claude used the integrated web search module of make.com, which works without its own API key and operates with the platform's free tokens. Alternatively, an RSS feed is also possible if a source offers one. In my scenario, Claude integrated exactly such a feed from a blog.

Step 7: Integrating Image Generation with OpenAI
So that every post gets a fitting cover image, another module creates an image based on the text. Claude used OpenAI's image module here. You can also use Gemini instead. For the connection, you need an API key from the respective provider. The advantage: once you have stored the key in one scenario, make.com recognizes it in other scenarios, so you don't have to enter it again.

Step 8: Keeping an Eye on Image Quality and Costs
Images are usually the most expensive part of the process. In the module, you can set the model, the format, and the quality. I chose the newest model but set the quality to "low". This significantly reduces costs, and for a news preview this quality is completely sufficient in most cases. Depending on the settings, an image costs roughly ten cents, and with low quality sometimes only a few cents.

Step 9: Uploading the Image and Creating the Post
In the next module, the generated image is uploaded as an attachment to the forum section. Afterwards, another module creates the actual post. For this, you need to enter the forum section ID. You can find it in the management of the forum elements. For me, it was the news section with the ID 245. You also enter your user ID so that the post is assigned to your account.

Step 10: Approving the Plan and Starting Execution
Once all modules are in place, Claude shows you the plan. Review it carefully and then confirm it. Claude then takes over operating the interface itself. You can watch as it selects modules, sets settings, and checks connections. Depending on the scenario, this can easily take half an hour, so plan for some patience.
Step 11: Understanding the Finished Scenario's Workflow
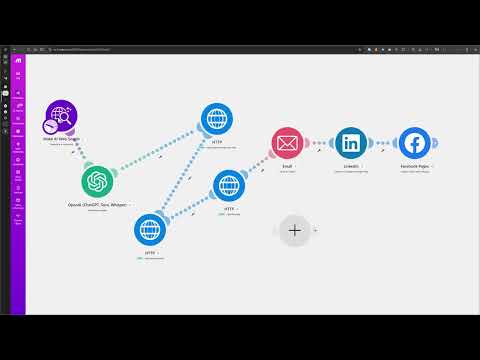
A finished scenario now runs through all the steps automatically. First it searches for current topics, then it creates a post text and a matching image, and afterwards the post is published in the forum. Additionally, you can have an email with a summary sent to you, and the scenario can even share posts on LinkedIn and Facebook. In my test run, the image generation took about ten to twelve seconds.

Step 12: Checking and Correcting the Results
Even though the text usually sounds good, you should proofread every post, especially at the start. In my test, I noticed a small error that I was able to quickly correct myself. The missing link on a term could also have been added directly in the text. Make a note of such patterns. If they occur more frequently, you can ask Claude to build in an intermediate check that automatically checks and corrects texts for errors. This does cost some tokens, but it saves you a lot of rework in the long run.

Step 13: Adding an Intermediate Check
An intermediate check is an additional step in the scenario before the post is published. Claude reads the text once more, looks for spelling and wording errors, and adjusts it. You can add this step at any time if needed by simply asking Claude to do so. At a few cents per run, this is often a worthwhile investment.
Step 14: Exploring Further Use Cases
The principle can be transferred to many other areas. For example, you could have contact form requests evaluated automatically, check an appointment in the calendar, or analyze websites. Designers can even have a first draft created for them. The limits are essentially set by your own creativity. You also don't need deep technical knowledge, because Claude also helps you with obtaining API keys.

Summary ??? Claude Cowork and make.com: Automatically Publish News on TutKit.com
With make.com and Claude Cowork, you can build an automation in a manageable amount of time that regularly brings fresh news to your forum. You define your goal, answer Claude's follow-up questions, review the plan, and keep an eye on the costs of image generation. With a correction loop, you additionally ensure clean texts. The biggest advantage is that you don't need automation expertise, but only have to formulate your ideas clearly.
FAQ
How much does it cost to use make.com?To get started, make.com is free to use. The free plan includes about 1,000 tokens per month. How far you get with it depends on how often you work and which modules you use.
Do I need to know how to program to build the scenario?No. Claude Cowork builds the scenario for you. You only need to describe your goal clearly and answer the follow-up questions.
Where do I get an API key for OpenAI?You get an API key directly from the provider, i.e. from OpenAI or Google for Gemini. Claude Cowork can also help you with this step by step.
Why should I set the image quality to "low"?High-quality images use significantly more tokens and cost more money. For preview images in a forum, low quality is usually sufficient.
Do I still have to check the automatically created posts?Yes, absolutely. Even though the texts are usually good, errors or inaccuracies can occur. An intermediate check by Claude significantly reduces the effort.
Can I also have the posts shared on other platforms?Yes. In my scenario, the posts are additionally shared on LinkedIn and Facebook. Which channels you use is something you define in the scenario itself.

