
When you open Affinity for the first time, the interface quickly seems confusing. Tools, palettes and menus seem to change arbitrarily. The reason for this is the three studios: Vector, Pixel and Layout. Once you understand what each studio does, the entire app makes sense. This guide takes you through the three areas, shows you the most important keyboard shortcuts for switching, and helps you choose the right studio for each task.
The video is only loaded from YouTube when you play it – data (including your IP address) is then transmitted to YouTube/Google. More in the privacy policy
Key Takeaways
Affinity consists of three studios: Vector, Pixel and Layout. Each studio has its own tools and its own interface. You can switch quickly between them with keyboard shortcuts, and with a little practice you will immediately recognize which studio you need for a task.
Step-by-Step Guide
The Heart of It All: Three Studios, Three Tasks
Before you work with individual tools, you should know the basic structure. Affinity deliberately separates workflow steps. The studios are the heart of the app, and each of them is tailored to a specific type of project.

Step 1: The Vector Studio for Logos and Illustrations
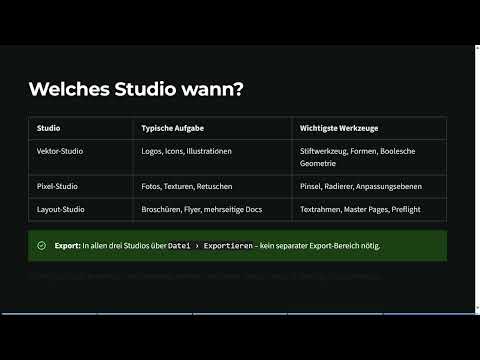
The Vector Studio is your main workspace when you create shapes, paths and lines. With the Pen tool you place anchor points and build curves, and with the shape tools you draw rectangles, circles and stars. Everything that needs to be scalable, such as a logo, an icon or an illustration, is created here. Vector graphics do not lose sharpness when enlarged, which is why they are ideal for branding and social media graphics.
In the Vector Studio you will also find the tools for fills, strokes and appearance. These settings determine the look of your shapes and can be adjusted at any time afterwards.
Step 2: The Pixel Studio for Photos and Textures
The Pixel Studio works with raster graphics. Here you have brushes, erasers and tools for pixel editing at your disposal. If you retouch photos, remove blemishes, paint textures or work with adjustment layers, you are in the right place here. You can also use the Clone tool to copy image areas selectively.

For pure vector projects, you rarely need the Pixel Studio. However, as soon as you want to incorporate a texture into a logo or edit a photo directly in Affinity, it is indispensable.
Step 3: The Layout Studio for Brochures and Magazines
The Layout Studio is designed for multi-page documents, such as brochures, flyers and magazines. It contains all the vector and pixel tools and supplements them with functions for page design. These include master pages, text frames and picture frames. This studio provides the necessary structure, especially for print products.

Step 4: Switching Between Studios with Keyboard Shortcuts
To work fluidly, you need to be able to switch studios quickly. At the top left of the interface you will see the selection Vector, Pixel and Layout. On Windows, you can reach the studios directly via the function keys. Hold the mouse pointer over the respective entry, and Affinity will suggest the matching keyboard shortcut. F2 takes you to the Vector Studio, F3 to the Pixel Studio and F4 to the Layout Studio. On a Mac the shortcuts are different, so it is worth taking a look at the menu or the keyboard shortcut overview.

After switching, check whether the interface has changed. That is exactly what happens: the toolbar, the side palettes and the panels displayed on the right change depending on the studio.
Step 5: Comparing the Interface of the Studios
Each studio shows you different palettes. In the Vector Studio you work with the Pen tool and shapes, and on the right you will find fills, strokes and appearance options. In the Pixel Studio the toolbar changes in favor of brushes, clone and retouching tools. On the right, the histogram and color palette appear, which help you with image editing. In the Layout Studio, the pages take center stage. The tool selection is smaller, but it is mainly about picture frames, page structure and colors.


Step 6: Choose the right Studio for the task
You don't have to use every Studio equally often. For icons, you hardly need the Pixel Studio, because vector tools do the work. For layouts, you usually need little vector work, but all the more page management. With a bit of practice, you develop a feel for which Studio you need and when. You can also switch back and forth between the Studios at any time if your project changes while you work.
Step 7: Continue working with the Vector Studio
In the next step, you will focus on the Vector Studio, because most of the graphics in this course are created there. Keep F2 in mind to return there at any time.
Summary – Affinity Studios explained: Vector, Pixel and Layout at a glance
The three Studios in Affinity are clearly separated from one another. In the Vector Studio, you create logos, icons and illustrations with shapes and the Pen tool. You use the Pixel Studio for photo retouching, brushwork and textures. In the Layout Studio, you design multi-page documents such as brochures and magazines. With F2, F3 and F4 on Windows, you switch quickly between them. If you remember which Studio handles which task, you will work much more smoothly.
FAQ
Which Studio do I need for a logo?For a logo, you use the Vector Studio, because vector graphics are scalable without loss.
Can I switch between the Studios while I work?Yes, you can switch between Vector, Pixel and Layout at any time, even within a project.
Which keyboard shortcuts are there for switching?On Windows, you switch to the Vector Studio with F2, to the Pixel Studio with F3 and to the Layout Studio with F4.
What do I use the Pixel Studio for?You use the Pixel Studio for photo retouching, brushwork, stamp tools and adjustment layers.
When is the Layout Studio the right choice?The Layout Studio is suitable for multi-page documents such as brochures, flyers and magazines.
Do I need the Pixel Studio for pure vector projects?No, for pure vector projects you rarely need the Pixel Studio.


