
Anyone who has ever tried to get a clean icon for a project with ChatGPT or Gemini knows the problem: The results often look good, but they come as pixel graphics. For logos, icons or illustrations that you want to keep working on in Affinity, however, you need vectors. This is exactly where this guide comes in. You will learn how to create vector graphics in SVG format with the free AI tool Recraft, open them in Affinity and adjust them there bit by bit.
The video is only loaded from YouTube when you play it – data (including your IP address) is then transmitted to YouTube/Google. More in the privacy policy
Key Takeaways
Common AI image generators usually deliver PNG or JPG files, whereas Recraft delivers SVG vectors directly. With the Vector model you get clean graphics built from individual curves, which you can edit completely in Affinity. The free account is sufficient for first attempts, but comes with a tight credit allowance and limited settings. For larger quantities of vector graphics, a subscription is worthwhile.
Step-by-Step Guide
Why a Vector Tool Is the Better Choice
Most image AIs generate pixel graphics. You can have them traced, but with more complex motifs this often delivers only unusable results. Recraft is designed specifically for vectors. The result is an SVG file that can be scaled as much as you like without losing sharpness.

Create a Free Account at Recraft
You can reach the platform at recraft.ai. After registering, you have 30 credits available for free. With this allowance you can try out a few motifs without spending money. Keep an eye on your credit balance, because every generation uses up part of it.
Create a New Project and Choose the Vector Model
Create a new project via the interface. Then, in the models section, select the option for vector graphics. Recraft offers several variants here, so you should pay close attention to the name so that you don't accidentally use a pixel model.

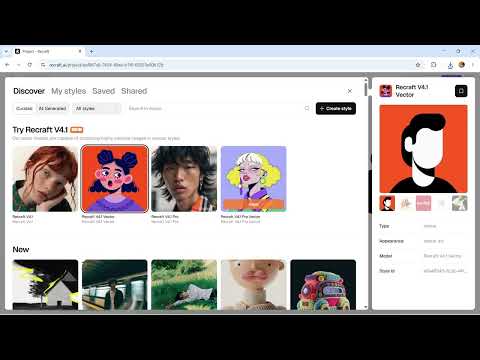
Models and Styles at a Glance
Recraft shows you a selection of models, including current versions such as Recraft V4.1. With the Vector features you specifically generate vector graphics. In addition, you can set a style. For getting started, the standard model is recommended, as it works well with your free allowance.
Formulate a Precise Prompt
The prompt largely determines the result. For a simple icon, the following wording is suitable, for example: "Minimalist Coffee Cup Icon, Flat Design, no 3D, one color, Vector Style, Clean Lines". These terms signal to the AI that you want a simple, flat graphic without gradients and shadows. The more clearly you describe style, color and level of detail, the more usable the result will be.
Start the Generation and Check the Costs
Before you start the generation, Recraft shows you the expected costs. For the simple motif, the amount was a few credits. The creation takes about half a minute. That is quite reasonable for a vector with several curves, so you don't need to be surprised if the progress takes a while.

Check the Results and Use the Settings
In the example, two variants of the coffee cup were created. However, the result doesn't always show exactly what you expected. It is often worth selecting the variant that comes closest to your ideas. In the settings you define format, aspect ratio and size. In the free plan, however, the selection is limited.

Post-Processing and Export as SVG
Via the menu for a generated image you can remove the background, have the motif regenerated or edit it. For Affinity you need the file as an SVG. To do this, choose the export and save the file on your computer. You will take this file straight into your Affinity project.

Test the Pro Model and Recognize the Credit Limit
Additionally, you can try out the Pro model. In the example, a prompt was written for a character with a coffee mug that was supposed to have only four colors. It quickly became clear that the prompt was not optimal and that the credits were not enough for the Pro model. Learn from this: plan your attempts and formulate your prompts carefully in advance so you don't waste your allowance.
Creating a four-color character with the standard model
After switching to the other model, a character in four colors was created. The coloring was roughly what you had in mind, and the motif looked coherent. For around five credits, you get a more complex illustration here that you would otherwise have to draw with considerably more effort. You also export this file as an SVG.

Opening SVG files in Affinity
Open an existing project in Affinity and insert the SVG files there. You can also simply drag the graphic from the export folder into the open document. Make sure you use a new document with a suitable size or scale the graphic afterwards.

Analyzing the structure of the vector graphic in the layers
In the Layers panel, you can see that the AI graphic consists of many individual curves. This is the decisive advantage over a pixel graphic: every shape can be selected, moved, and modified individually. Especially with characters, it is interesting to take a closer look at the structure, as it shows you how the motif was constructed.

Adjusting motifs in Affinity
Now you can modify the graphic to your liking. In the example, a character's hair was removed and then redrawn with custom curves. With Affinity's tools, you refine paths node by node, adjust colors, and remove elements that don't fit. This turns an AI draft into an independent design element.

Evaluating time savings and the subscription option
A flat icon is created in Recraft in a few seconds. Drawn by hand, the same graphic would often take two to three minutes, and considerably longer for more complex motifs. However, if you regularly need a lot of vectors, a paid subscription can be more economical than individual credits. Compare the costs with other AI services that output graphics before you decide.

Summary – Creating AI vector graphics with Recraft and integrating them into Affinity
You have seen how to create vector graphics for free with Recraft, export them as SVG, and continue editing them in Affinity. The decisive advantage lies in the cleanly constructed curves, which give you full control over the result. Plan your credit allowance carefully, formulate precise prompts, and review the results critically. For occasional icons, the free account is enough; for larger projects, a subscription may be worthwhile.
FAQ
Can I really use Recraft for free?Yes, the account offers a free entry with a limited allowance of credits, which was 30 in the example. However, advanced settings and larger models are restricted.
Why should I use an SVG file instead of a PNG?An SVG file consists of vectors and can be scaled as much as you like without loss of quality. In addition, in Affinity you can edit every single shape, which is not possible with a PNG.
How do I write a good prompt for an icon?Describe the motif, style, and coloring as precisely as possible, for example using terms like flat design, one color, or clean lines. Avoid vague details so that the AI can reliably implement the desired look.
Why does generation sometimes fail or deliver unusable results?This may be due to an imprecise prompt or because the chosen model is not suitable for the motif. Try a variant with simpler wording or a different model.
Can I still change the background color or individual elements after exporting?Yes, in Affinity, colors, shapes, and curves can be freely adjusted after import. You can also remove elements or add new ones.
Is a Recraft subscription worth it?A subscription makes the most sense if you regularly need a lot of vector graphics. For occasional use, the free credits are usually enough.


