
You need a simple plant icon for a project quickly and don't want to spend a long time fiddling with Bézier paths? Then the Shape Builder in Affinity Designer is worth a look. With it, you assemble independent objects from simple basic shapes such as rectangles and ellipses by merging, subtracting, or intersecting them.
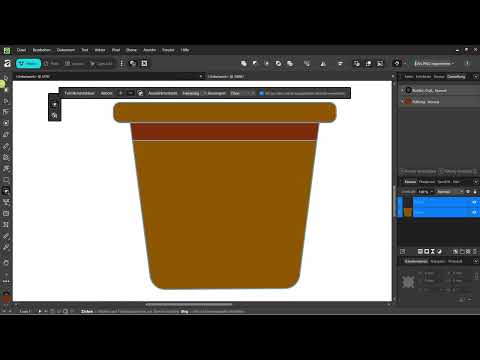
The video is only loaded from YouTube when you play it – data (including your IP address) is then transmitted to YouTube/Google. More in the privacy policy
In this tutorial, you first build a simple flower with a pot, and then a more elaborate variant with shadow effects, leaves, and a stem. Along the way, you learn how to round corners, pick up colors with the eyedropper, and duplicate, rotate, and group objects. In the end, you will have two plant icons that you can use directly in your own projects.
Key Takeaways
The Shape Builder joins, subtracts, and intersects shapes. This allows you to build complex icons from just a few basic shapes. If the original objects overlap, the operations work reliably. With the Corner tool and precise inputs in millimeters or percent, you control the rounding. Shadows are created with darker, transparent shapes that you trim along the outline using the Minus command. With the eyedropper, you pick up colors from existing objects or photos.
Step-by-Step Guide
Step 1: Create the Flowerpot as a Basic Shape
Start with a rectangle without an outline and fill it with a slightly brownish tone. Drag it to the desired position at the bottom of the document. With the Node tool, you can grab the bottom corners and pull them slightly inward. This turns the rectangle into a shape that already looks like a flowerpot. Exact precision isn't necessary here yet; you only need a rough template.


Step 2: Build the Flower Head from Overlapping Ellipses
Switch to the same color as the pot and draw a very thin rectangle shape that you can use later as a helper object. Then create an ellipse. Hold down the Shift key while doing so to get a circle. Next, duplicate the ellipse several times until you have four copies. Make sure the ellipses overlap slightly, because only then can the Shape Builder join them cleanly. Select all the ellipses and choose the Add function in the Shape Builder. While holding the left mouse button, drag across the objects to combine them into a single shape.


Step 3: Align the Blossom and Place It in the Center
The result isn't particularly pretty yet, but it already has the character of a flower. Place an additional circle in the center, which you create by copying and pasting with Ctrl and C or V respectively. You then place this circle exactly over the flower head. Rotate the entire blossom slightly until it fits the pot. A small rotation often looks more natural than a perfectly symmetrical alignment.

Step 4: Cut Out the Center with the Minus Function
Now it's about a function you don't know yet. Select the circle in the center and the flower body together, choose the Shape Builder, and click Minus. This leaves only the part that is not covered by the center circle. The yellow area in the middle is created from exactly this cut. Don't mix up the order of the selection, because the result depends on which object determines the cutout.

Step 5: Pick Up Colors from Templates with the Eyedropper
You can enter the color of the center as an RGB value in the color field. It's easier with the eyedropper. Activate it, click on the desired yellow, and then apply the color to the target object. By holding the left mouse button, you can even drag colors from photos or other objects with the eyedropper. This works especially well if you want to use a specific color palette from a reference image.

Step 6: Duplicate and Place Leaves
A single leaf quickly looks lifeless. So duplicate it and arrange the copies so that they complement the pot. You can scale them smaller or larger, rotate them, and offset them slightly. With just a few steps, this creates a pair of leaves that makes the first flower look much more lively. You will use this technique again later for the leaves of the second plant.

Step 7: A More Professional Pot Icon with Precise Corners
For the second example, you create a new document. You draw two slightly overlapping rectangles and shape them into a pot with rounded corners. The corner tool allows you to determine the rounding directly. You can choose between percent and millimeters. For the rim of the pot, three millimeters are a good choice, for example, and significantly more for the lower area. Make sure that the roundings on the different layers harmonize, otherwise the icon will look unsettled.


Step 8: Combine Shapes and Correct the Radius
If you like the corners, select the two rectangles and choose the Add function in the Shape Builder. If the result is not yet convincing, you can reset the rounding of individual corners. To do this, remove the radius at the affected spot until the shape looks coherent again. Then you combine the objects again. This gives you a solid pot body that you can continue working with.

Step 9: Create a Shadow Effect with Subtract
Now the icon becomes more three-dimensional. Create a rectangle in a darker brown tone and place it where the edge of the pot ends. Select both objects and choose the Shape Builder with the Subtract function. Remove the left and right sides of the darker rectangle. This creates an area that looks like a shadow on the side. You can enhance this effect with an even darker tone.


Step 10: Round Off the Pot with a Ground Shadow
To place the pot on a surface, you need a shadow on the ground. To do this, ungroup the group, draw a rectangle in a light gray tone, and slide it under the pot. Then you place a black shape with reduced opacity over it, about 40 percent. With the Shape Builder and the Subtract function, you remove everything that extends beyond the pot. If you overlook a line in the process, you can delete it afterwards.


Step 11: Cut the Pot Body from an Ellipse
For a rounder pot, you take a brown ellipse with full opacity. You place two rectangles over it so that you can cleanly work out the cutout. Duplicate the ellipse so that you keep only about two thirds of the object. With the Subtract function, you cut off the excess part at the top and bottom. Then you stretch the shape a little wider so that the pot looks more harmonious. An additional black shadow with low opacity on half of the pot adds depth.

Step 12: Shape Leaves with a Gradient of Two Greens
For the plant, you choose a strong green and draw an ellipse. Copy it, move the copy so that both overlap, and apply the Shape Builder with the Subtract function. This creates a leaf shape with a curved edge. You will subsequently use this leaf as the basis for further variations.


Step 13: Integrate a Shadow into the Leaf
The leaf also benefits from a shadow. Place a completely black shape over half of the leaf and reduce its opacity to around 40 percent. Then select the leaf and shadow and remove the overhanging edge with the Subtract function. Afterwards, group the light and dark green tones into a single leaf. The result can now be edited like a single object.

Step 14: Copy the leaves and arrange them in a fan shape
Duplicate the grouped leaf twice and rotate the copies by about 30 degrees in both directions. This creates a fan-shaped cluster of leaves. Make sure the middle leaf is at the very front, because then the plant looks more compact. Group all three leaves and move them over the pot. If you want to align individual leaves more centrally, briefly ungroup them and adjust them.


Step 15: Add the stem and finish the icon
Keep one of the leaves and create a very thin stem, which you fill with a light green at full opacity. Then attach the leaves to the stem. Whether the leaves are in front of or behind the stem is a matter of taste, but the arrangement in front usually looks more natural. Finally, round off the corner of the stem with the Corner tool. With that, your second plant icon is finished and you have mastered both variants.


Summary – Building a flower with a pot using the Shape Builder in Affinity Designer
With the Shape Builder, simple basic shapes can be combined into usable icons in seconds. You have seen how to assemble a blossom with Add, create shadows and cutouts with Subtract, and round precisely with the Corner tool. The Eyedropper helps you to pick up colors consistently. If you work step by step, you end up with two plant icons that you can reuse directly in your own projects.
FAQ
Do I have to let the shapes overlap before combining them?Yes, with Add and Subtract the objects should overlap, otherwise the Shape Builder cannot calculate a common shape.
Can I still adjust the corners afterwards?Yes, the radius can be changed at any time with the Corner tool. For combined shapes, however, you should set the rounding beforehand.
How do I create a shadow without a gradient?Place a darker shape under or over the object, reduce the opacity, and cut off the overhanging parts with the Subtract function.
What is the Eyedropper for?With the Eyedropper you pick up colors from existing objects or even from photos, so that your color scheme stays consistent.
Why should I group objects?Groups combine related elements such as a leaf. This way they can be moved, rotated, and copied together.


