
A good video loses impact if only viewers who happen to speak your language can understand it. With video translation in Adobe Firefly, you can bring your content into additional languages in just a few minutes, without rewriting scripts or reshooting scenes. In this guide, I'll show you the complete process, from opening the platform to the finished download. All you need is a browser, a video file, and Firefly access.
The video is only loaded from YouTube when you play it – data (including your IP address) is then transmitted to YouTube/Google. More in the privacy policy
Key Takeaways
- You start the translation via the "Generate" section and the "Translate video" function.
- You can upload both videos and audio-only files.
- The source language is detected automatically. You then choose one or more target languages.
- Each additional target language uses more credits. The display shows you the usage before you start.
- Processing took about two to three minutes in the tutorial; the upload also depends on your internet connection.
- Before you download anything, you can listen to and check each version.
Step-by-Step Guide
Step 1: Open Firefly
In your browser, go to firefly.com and sign in with your account. The home page offers you several tools, but for the translation you only need the content generation section.

Step 2: Open the "Generate" Section
Click "Generate" in the left navigation bar. From here you can reach all the AI-powered features that Firefly offers. The selection is a bit confusing at first, but over time you'll find your way around quickly.

Step 3: Select the "Video" Function
Scroll down the page until you see the available functions. Click the "Video" tile there. This opens all the tools related to moving images.

Step 4: Start "Translate video"
Among the video tools you'll find the "Translate video" entry. Click it to open the translation area. The entire workflow is controlled here, from the upload to the selection of languages.
Step 5: Upload Your Video
In the translation area, you can upload your material. To do so, click "Browse files" and select the file on your computer. Keep in mind that you can process not only videos. Audio-only files, such as a podcast episode or a voiceover, can also be translated. A video clip was used in the tutorial, so I'll stick with that example.

Step 6: Accept the Terms of Use and Wait for the Upload
After selecting the file, you have to accept the terms of use. Check the box or click the corresponding consent so the upload can start. The duration depends heavily on your internet connection. With a fast connection, the process finishes quickly; with a slower DSL connection, you should plan for more patience. Keep the browser window open in the meantime.

Step 7: Check the Source Language
Once the upload is complete, Firefly shows you the detected source language. In the tutorial, German was detected correctly. Still, check the setting, especially for videos with dialects, technical terms, or multiple speakers, because the quality of the translation depends significantly on it.

Step 8: Select the Target Languages
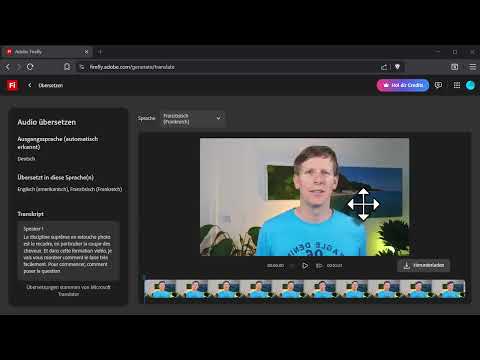
Now you decide which languages your video should be translated into. In the tutorial, English in the American variant was chosen. Then French was added as well. You can select multiple languages at the same time, so you can generate all versions in one go.
Step 9: Keep an Eye on Credit Usage
Before you start, Firefly shows you how many credits the translation will use. This value increases with each additional target language. So think in advance about which languages are really relevant for your target audience. Two target languages were enough in the tutorial to create a solid foundation for international reach.
Step 10: Start the Translation
Once the source and target languages are correct, click "Generate". The processing then runs in the background. In the tutorial, it took about two to three minutes for the result to be ready. You don't have to do anything else during this time.

Step 11: Listen to and Check the Result
After processing, you can play the versions directly in the browser. First listen to the original language so you have a point of comparison. Then check the French and the English versions. In the tutorial, a test sentence from photo editing was used, and the translations sounded very natural overall. With your own material, pay particular attention to technical terms, proper names, and the speed of speech. The video description additionally promises lip sync for more natural results. However, this aspect is not shown separately in the tutorial, so you should critically assess it yourself with your video.

Step 12: Download and Publish
When you are satisfied with a version, click "Download". You can then upload the translated video to YouTube or another platform and select the respective language. Upload a separate version for each language so that your viewers can watch the video in their native language.

Summary – Translating Video with Adobe Firefly: Step by Step to a Multilingual Clip
Video translation in Adobe Firefly follows a clear process. You open the "Generate" section, select "Video", and then "Translate video". Next, you upload your file, confirm the terms of use, and check the detected source language. Then you select your target languages, keep an eye on credit consumption, and start the translation. After listening to the results, you download the versions you want. This way, you reach a significantly larger audience with a single source video, without having to speak a foreign language yourself.
FAQ
Can I also have audio-only files translated?Yes, in addition to videos, Firefly also supports audio-only files.
How long does a translation take?In the tutorial, processing took about two to three minutes; the upload additionally depends on your internet speed.
How is the source language determined?Firefly detects the language automatically. You should still check the detection before starting.
Can I select several target languages at the same time?Yes, you can choose several target languages. However, each additional language increases credit consumption.
Where can I see how many credits the translation costs?The credit consumption display appears before you start the generation.

