
Echo in the room, noise in the background, and every word sounds as if it came out of an empty tin can. When you record with your smartphone, this happens easily. Before you delete the recording, try out what Adobe Podcast can make of it. The tool is part of Adobe Firefly and uses artificial intelligence to clean up voice recordings. In the video, a particularly bad recording from a tiled bathroom is processed. The result is astonishing.
The video is only loaded from YouTube when you play it – data (including your IP address) is then transmitted to YouTube/Google. More in the privacy policy
In this tutorial, I will guide you step by step through the entire process: from opening the website, to uploading your file, to downloading the finished recording. All you need is a browser and your audio file.
Key Takeaways
- Adobe Podcast can be used for free in the browser and requires no installation.
- The "Enhance Speech" function uses AI to reduce echo, noise, and uneven volume.
- A recording made with a normal smartphone becomes significantly better without you needing expensive equipment.
- The premium sliders with an Adobe Cloud subscription allow you to make finer adjustments, especially for background noise.
- The recording distance from the microphone remains important despite AI. The closer you are to your mouth, the better the source material.
Step-by-Step Guide
Step 1: Open the Adobe Firefly Website
Start your browser and go to the address firefly.adobe.com. The page is clearly laid out, so you don't have to click through many menus. Scroll down a bit on the home page until you see the section with the various tools.

Step 2: Find the Audio Section
In the "Generate" section, you will find the entry "Audio" under "All features". Scroll further down until the list becomes visible, and click on "Audio". All tools related to sound and speech are bundled here, so you don't have to search for long.

Step 3: Select the "Enhance Speech" Function
In the audio section, you will see the option "Enhance Speech". Click on it. The page redirects you directly to Adobe's Podcast tool. Everything else is decided there, because this is exactly where your file is processed.

Step 4: Upload Your Audio File
Now you add your recording. You can simply drag and drop the file into the field or select it in Explorer via the "Choose file" button. Make sure you use a common audio file such as MP3 or WAV. After uploading, the file appears immediately in the workspace.

Step 5: Listen to the Original
Before you let the AI do its work, listen to the original. This way you can see for yourself how strong the echo and noise actually are. This is helpful because you can only properly judge the difference after processing if you know it beforehand. In the example from the video, the room echo is so strong that individual words overlap.

Step 6: Start the Enhancement
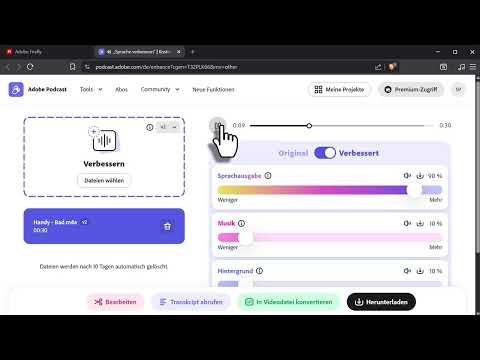
Press the "Enhance" button. The AI analyzes the recording, separates speech from background noise, and removes the echo. This process usually takes only a few seconds to about a minute, depending on the length of your file. Afterwards, you can listen to the result directly and compare it with the original.

Step 7: Use the Premium Sliders
If you have access to the premium features, meaning you have an Adobe Cloud subscription, additional sliders appear. With them, you can control the processing more precisely. Move the sliders carefully and listen to each change afterwards. If you overdo it, the voice quickly sounds artificial. You develop a feel for the right amount best through several passes.
Step 8: Adjust Background Noise
In the premium options, you will also find a slider for the volume of the background noise. If your recording has no music but some ambient noise such as a fan or a hum, you can specifically reduce this portion. If, on the other hand, you want to keep some atmosphere in the background, only turn the slider down slightly. This way the mood is preserved while distracting noises disappear.

Step 9: Compare the Result and Test the Recording Distance
The video reveals an important insight: The AI can do a lot, but it is not a magic wand. If the phone is held farther from the mouth, reverb and noise increase noticeably, and the result is weaker. The test in the video makes this clear. At a distance of ten centimeters, the voice sounds clean after processing. At thirty centimeters and more, noticeable remnants remain. So if you plan to improve recordings regularly, record with the phone as close to your mouth as possible.
Step 10: Download the Optimized File
If you are satisfied with the result, click on "Download". The improved file will then be downloaded to your computer. So you don't need to adjust or save anything else, the download starts immediately.
Step 11: Choose the Right Format and Process Further
Adobe Podcast also offers the file as an uncompressed WAV file. Use this version if you want to edit the audio further in an editing program, for example for a video or a podcast. If, on the other hand, you need a smaller file for uploading, you can then convert the WAV file to an MP3 format. Any common conversion program is sufficient for this. The quality is largely preserved as long as you choose a high bitrate.

Summary – Improving Phone Recordings: Studio Quality with Adobe Podcast
With Adobe Podcast, you transform a poor-sounding phone recording into clean, even speech audio. You open Firefly, select the audio section, and upload your file. After enhancing, you can listen to the result, fine-tune it with premium access, and keep using the WAV file. The biggest lever remains your recording distance. The closer you are to the microphone, the better the AI works. Just try the tool with one of your own recordings. The difference is usually audible immediately.
FAQ
Can I use Adobe Podcast for free?The basic speech enhancement function is available to you via the browser. Advanced sliders such as background volume require premium access with an Adobe Cloud subscription.
Which file formats are supported?Common audio formats such as MP3 and WAV can be uploaded. The output is an uncompressed WAV file.
Do I have to buy a microphone to get good results?No, even a normal smartphone delivers usable results. However, the distance to your mouth should be as small as possible.
What do I do if the result sounds too artificial?Reduce the strength of the processing using the premium sliders or record again at a shorter distance.
Can I use the improved file for YouTube?Yes, you can import the edited audio track into your editing program and then insert it into your video.

