
Do you know the feeling? You have a photo that is technically perfect, but something is missing. Maybe a desert landscape looks empty and calm, even though it could use more tension. In the past, you would have had to laboriously isolate the object, cut it out, and fit it into the image with a lot of patience. With Adobe Firefly and Generative Fill, you can do this in just a few minutes. You simply select the desired area, describe with a short text what should appear there, and the AI generates suitable suggestions that even adapt to the light and shadows of the scene.
The video is only loaded from YouTube when you play it – data (including your IP address) is then transmitted to YouTube/Google. More in the privacy policy
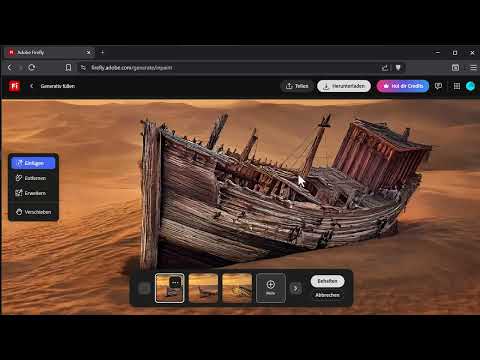
In this tutorial, I will guide you through the process step by step. Using the example of a pirate ship in a desert, I will show you how to select suggestions, refine areas, and download the finished image.
Key Takeaways
With Generative Fill in Adobe Firefly, you insert new objects directly into an existing photo without having to isolate them beforehand. You mark the area with the brush, write a prompt, and choose the best result from three suggestions. The AI often takes into account the lighting mood and the cast shadows of the surroundings. With the Subtract function, you correct selections, and with the "More" option, you get additional variations. You can then download your result directly.
Step-by-Step Guide
Step 1: Open Firefly and find the tool
First, go to the website firefly.com in your browser. Scroll down a bit on the home page until the various features are displayed. There you will find the "Image" section. Click on it and then select the "Generative Fill" option. This opens the tool you will later use to insert objects into your photo.

Step 2: Select an image
In the next window, you can either choose one of the available sample images or use your own photo. For your own files, click the upload button and find the image on your hard drive. Alternatively, simply drag and drop the file directly into the window. In the video, a previously generated desert scene is used, which looks beautiful but a bit quiet. Exactly this kind of image is perfectly suited for this method.

Step 3: Mark the area with the brush
Now comes the actual selection. Take the brush and paint over the area where the new object should appear. Make sure the selection is somewhat larger than the object will later be. The AI needs room to embed the object cleanly into the surroundings. If you want to work more precisely, hold down the Ctrl key and use the mouse wheel to zoom in on the spot. That way you also keep fine details in view.

Step 4: Adjust the selection
Often the first selection isn't quite right yet. Maybe you've covered a bit too much area. In this case, you activate the "Subtract" function and paint away the unnecessary parts. With the brush in normal mode, you can expand the selection at any time if needed. Feel free to take some time for this step, because a well-chosen area noticeably improves the final result.

Step 5: Write a meaningful prompt
Now comes the creative part. Enter in the text field exactly what should appear. The more detailed your description, the more targeted the result. An example from the video is: "Ancient pirate shipwreck made of weathered wood, half buried in the sand." This prompt names the object, its condition, and its position in the image. These three details help the AI implement the subject coherently.

Step 6: Start the generation and review the suggestions
Then click "Generate". Firefly then creates three suggestions that you can compare side by side. The calculation usually takes about ten seconds. Take your time looking at the results and zoom in again if needed. Pay particular attention to whether the object sits properly in the sand and whether the ground gives way at the contact points, as if the wood were actually pressing into it.

Step 7: Generate More Variations
If you don't like any of the three suggestions or want even more choices, click "More". You will then receive three new variations again. This way you can keep working until a result convinces you for your image. It often pays off to look more closely, especially in later rounds, because the quality of the suggestions differs from run to run.

Step 8: Check Lighting Mood and Shadows
A major advantage of this method lies in the light calculation. The AI adopts the lighting mood of the image and places shadows the way they would fall given the existing sunlight. As a result, the object doesn't look pasted on, but like part of the scene. Therefore, check carefully whether the brightness of the object matches the rest of the image. In the example, one suggestion looked too bright, while another produced shadows that matched the sun perfectly. Feel free to trust your eye for consistency when making the decision.

Step 9: Download the Result
Once you have found the right suggestion, click "Download". Afterwards, you have your edited image on your computer and can use it in further projects. The entire process, from opening the tool to the finished image, takes less than three minutes in the video.
Summary – Adobe Firefly: Inserting Objects into Photos with Generative Fill
With Adobe Firefly, you turn quiet photos into exciting scenes without having to laboriously cut out objects. You open Generative Fill, choose your image, mark the area with the brush, formulate a specific prompt, and compare the three suggestions. Pay particular attention to lighting mood and shadows, because this is exactly where the AI shows how well it understands the surroundings. With the Subtract function, you correct selections, and via "More" you get additional variations. It's best to try out the method right away with your own photos. Whether a dragon, a UFO, or an old phone booth: there are hardly any limits to your imagination.
FAQ
How long does it take to edit an image?According to the video, the entire process can be completed in less than three minutes, and a generation usually takes about ten seconds.
Do I need prior knowledge of image editing?No, you don't need any prior knowledge. A brush, a text field, and the button for generating are enough for the basic function.
Do I have to cut out the object beforehand?No, that is exactly what Generative Fill is meant for. You only mark the area where the object should appear and describe it in the prompt.
What do I do if I don't like any of the three suggestions?Click "More" to get three further variations. You can repeat this step as often as needed until a result convinces you.
How do I remove a selected area that is too large?Activate the "Subtract" function and paint away the unnecessary areas.
How well does the object match the lighting of the image?The AI often adopts the lighting mood and places shadows to match the existing sun. Still, check whether brightness and shadow casting fit your subject.
Which prompts work well?Describe the object as precisely as possible, for example with material, condition, and position in the image. A prompt like "ancient pirate shipwreck made of weathered wood, half buried in the sand" delivers significantly better results than a short term like "ship".

