
An image you're really proud of, and yet something is still missing to make it come alive? That's exactly what the "Image to Video" feature in Adobe Firefly is for. With just a few clicks, the AI brings a still image to life and turns it into a short, film-like sequence. In this guide, I'll walk you through the process step by step. Two very different subjects serve as examples: a woman on the beach and a waterfall.
The video is only loaded from YouTube when you play it – data (including your IP address) is then transmitted to YouTube/Google. More in the privacy policy
Key Takeaways
- You'll find the "Image to Video" feature on the Firefly website if you scroll down a little.
- You set the model, resolution, format, and length yourself before generating.
- The longer the video and the higher the resolution, the more credits are used.
- A short, specific prompt describes the desired movement best.
- A faster model variant saves credits and still delivers a good result.
- If you switch the model, the uploaded image often disappears and has to be inserted again.
Step-by-Step Guide
Step 1: Open Firefly and Find the Feature
Go to firefly.adobe.com in your browser. On the home page, scroll down a little until you see the "Image to Video" option. Clicking on it opens the generator, with which you can create a video from an image.

Step 2: Choose the Right Model
Next, you decide which model calculates the animation. You can use Firefly's models directly or fall back on models from Google and other third-party providers. Feel free to try out different variants, as they deliver different movement styles.

Step 3: Set the Resolution
Now choose the desired resolution. The higher it is, the sharper the finished video will be. However, plan on being a bit patient, because a high resolution noticeably increases the calculation time.
Step 4: Determine the Format
Decide what purpose the video is intended for. For short clips on platforms like YouTube Shorts or TikTok, choose portrait format. For classic presentations or screens, widescreen format is the better choice.
Step 5: Set the Length and Keep an Eye on Credits
With the length slider, you determine how long the sequence lasts. Keep in mind that the length directly determines the cost in credits. A four-second video uses only about half the credits of an eight-second video. In the example, I choose eight seconds so that the movement comes across well.
Step 6: Define the First and Last Frame
Here you can determine how the video should begin and how it should end. If that's too detailed for you, it's enough to upload just one image. Firefly then automatically takes the start of the animation from your subject.

Step 7: Upload the Source Image
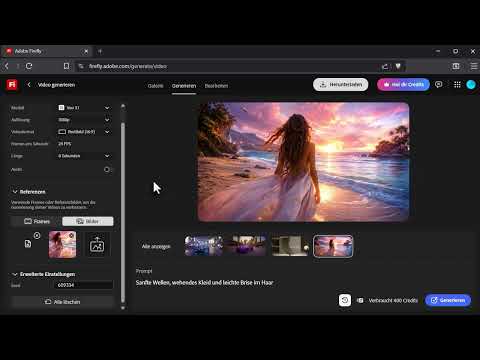
Then upload your image from your computer. In the example, I use a photo of a woman on the beach, which I select from my hard drive. Make sure the subject is clearly recognizable, because the AI calculates the movement from it.
Step 8: Write a Suitable Prompt
In the text field, you describe what should move in the image. For the beach scene, I write "gentle waves, white dress, and a light breeze in the hair". The advantage of such phrasing lies in its clarity: you name concrete movements and avoid long narratives.
Step 9: Generate and Check the Result
When all the settings are right, you click on "Generate". After a short wait, you play the video and check whether the movement is convincing. In the beach scene, the result looks surprisingly natural: the dress moves in the wind and the water rolls gently onto the sand.

Step 10: Post-processing the video
The "Modify" option gives you additional possibilities. You can upscale the video, edit it directly in the Firefly video editor, or have matching sound effects generated. Sound effects in particular quickly make a scene more believable.

Step 11: Using a second image for a different style
To show the versatility, replace the beach image with a new subject. To do this, remove the current image and upload a waterfall from your PC. Unfortunately, the preview in the editor is quite small, but you can still judge the subject well. Incidentally, this is an AI-generated image, which doesn't matter for the result, though.

Step 12: Writing a prompt that fits the subject
The prompt from the first example wouldn't fit here, because a waterfall needs different movements. Instead, phrase it like this: "The waterfall flows dynamically downward, magical mist rises, and the lights twinkle slightly." That way the AI knows exactly which elements should move.

Step 13: Generating the video
Once the subject, prompt, and settings are to your satisfaction, click "Generate" again. The calculation starts, and afterwards you can view the result at your leisure again.

Step 14: Saving credits with the Fast variant
Not every project needs the very best model. The Fast variant of the Wan model also delivers good results in the test and costs only 80 credits in the example. Note, however: when you switch the model, the image is often removed. This is not a bug, but a hint that you need to insert the subject again.
Step 15: Re-inserting the image as the first frame
Upload the waterfall image again. Make sure it serves as the first frame and thus as the starting basis for the animation, not just as a general image. The result is essentially the same, but this way the control of the animation works reliably.

Step 16: Watching the finished video
Start the generation one last time and wait until the video is finished. Play it and check whether the waterfall flows, the mist rises, and the lights twinkle. If you don't like something, adjust the prompt and generate again.

Summary – Image to Video with Adobe Firefly: Step by Step to an Animated Image
With the "Image to Video" feature in Adobe Firefly, you turn still images into short video sequences in just a few steps. The settings for model, resolution, format, and length as well as a clearly worded prompt are decisive. With the Fast variant you save credits, and through post-processing you can refine the result further. Try out the feature with your own images, because that's exactly where you'll see how much fun this technique can be.
FAQ
How long can the generated video be?You set the length yourself in the settings panel, and it directly affects credit consumption: the longer the video, the more credits it costs.
Does the resolution affect the quality of the video?Yes, a higher resolution makes the video sharper, but increases the calculation time.
Why does my image disappear when I switch the model?When switching the model, the image is often reset, so you have to upload it again, ideally as the first frame.
Can I edit a video afterwards?Yes, via "Modify" you can upscale the video, edit it in the Firefly video editor, or have sound effects generated.
