
Many creators now pay for a whole stack of AI services, for image generators, video tools and image editing. Dreamina, CapCut's AI tool, covers a large part of that and can be used for free in its basic function. In this guide, I walk you through the interface step by step. You will learn how to create four image variants from a single description, turn one of them into a short video, and download the results without spending any money.
The video is only loaded from YouTube when you play it – data (including your IP address) is then transmitted to YouTube/Google. More in the privacy policy
Key Takeaways
- Dreamina is freely accessible for image and video creation, but certain models and features are only available in paid mode.
- A well-formulated prompt with a subject and style specification largely determines the result.
- With just a few clicks, you can create an AI video with sound from a generated image.
- In free mode, downloads contain a watermark, which you can get around via the clipboard.
Step-by-Step Guide
Step 1: Open Dreamina and use the start page
Start by clicking "Create now". This takes you to the actual Dreamina interface. The operation is similar to other image AIs: in the center of the page is a large input field where you write your image description. Take a moment to look at the interface, because from here you control all further steps.

Step 2: Enter the prompt and define the style
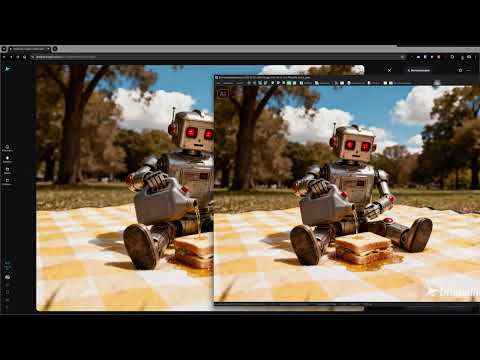
In the input field, you describe what should be seen in the image. The more specific you are, the closer the result will be to what you imagined. The example from the video is: A round, spherical robot from the 1950s sits on a checkered blanket in the park and desperately tries to pour oil from a can into a sandwich. Then you add the style, here for example "vintage photo, 35 mm film look, slight grain, humorous". This style addition is important, because it gives the AI the visual language, such as color palette, grain and atmosphere.

Step 3: Generate four variants
After you submit, Dreamina simultaneously creates four variants of your prompt. This is practical because you can directly compare which interpretation you like best. In the video, the process took only a short time until all the images were ready. Take your time looking at the results and choose the image that comes closest to your idea.
Step 4: Open an image and check the details
Clicking on one of the thumbnails opens the image in a larger view. Here you can see whether sharpness, composition and details are right. In the example, the Image 4.0 model was used, and the output was in 2K resolution at 2304 x 1728 pixels. With your own images, pay particular attention to hands, text and faces, because AI models still make mistakes more often here.

Step 5: Select a model for video creation
From the opened image, you can generate a video directly. To do so, you choose the AI video option and then select a model. Dreamina offers a fast model that is completely sufficient for first attempts. There are also more powerful models, such as from OpenAI (Sora) or Google (Veo 3.1). However, these can only be used for a fee. To get started, I recommend using the fast model first.

Step 6: Set the video duration and start generation
In the next step, you set the length of the video. In the tutorial, five seconds were chosen. Note that a quota of credits is used up for creation. With a click on the Generate button, you start the process. After a short wait, the finished video appears, which you can play directly. The motion in the example is not perfect, since the robot does not take the oil can away quite as described, but the basic idea is implemented well.
Step 7: Download an image and understand the watermark
To download, you click on "Download". You should know that in free mode a watermark is displayed. Dreamina offers a free trial period of seven days in which the watermark is removed and all features are available. If you don't want that, there is a simple alternative, which is described in the next step.

Step 8: Transferring the image via the clipboard
You can also take over the image without a watermark by copying an image section to the clipboard. On Windows, this works with the key combination Windows key, Shift and S. Make sure that your screen has a sufficiently high resolution. Otherwise, the image will be upscaled or not displayed completely. In the example, the result was very good despite the screenshot, and the image even looked slightly sharper than the original.
Step 9: Post-processing the video and generating a soundtrack
When you open the finished video, you will find further options. You can edit the prompt and regenerate, improve the image quality through interpolation, or increase the video resolution. Some of these functions are also only available in Pro mode. Particularly interesting is the function for generating a soundtrack, which is based on the first frame of the video. In the example, mostly sounds and less music were produced, which shows that you cannot yet fully control the output. For getting started, however, the result is impressive.

Summary – Dreamina for free: Creating images and videos with AI
Dreamina is a powerful yet easy-to-use tool with which you can create images and videos in a short time. You start with a clearly worded prompt, generate several variants, and choose the best one. Afterwards, you can turn it into a video and add a soundtrack. The free features are completely sufficient for first projects. If you want to dive deeper, it is worth taking a look at the trial phase and the paid plans. It is best to try out different prompts and observe how differently the results turn out.
FAQ
Is Dreamina really free to use?Yes, the basic functions for image and video creation are available for free, but certain models and functions require paid access.
Why does my downloaded image have a watermark?In free mode, a watermark is displayed on download, which you can avoid during the seven-day trial phase.
How do I remove the watermark without a subscription?You can take over the image via a screenshot or the clipboard, provided your screen has a sufficiently high resolution.
Which model should I use to get started?The fast model is well suited for first attempts, as it is inexpensive and delivers results quickly.
Can I create a video from an image?Yes, you can generate an AI video directly from a created image and set the desired length.
Can the soundtrack of a video be influenced?The function generates a soundtrack based on the first frame, whereby currently sounds rather than music are produced and control is limited.

