
Imagine you photographed a portrait in the studio, and the flash cast a huge spot of light into the image. The following tutorial solves exactly this problem. You will learn how to add the light source afterwards in Photoshop, enrich it with color, and keep full control at all times. The result looks like a film still with warm light reflections and strong color accents.
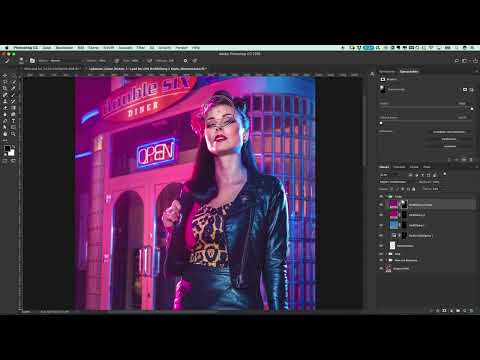
The video is only loaded from YouTube when you play it – data (including your IP address) is then transmitted to YouTube/Google. More in the privacy policy
Key Takeaways
Key Takeaways
- Light flares can be controlled much more precisely afterwards in Photoshop than when shooting, because you can adjust position, size, and intensity at any time.
- The blend mode Screen (Negativ multiplizieren) creates a radiant, bright light effect on a solid color fill layer, which works well for light sources.
- A layer mask with a soft brush prevents the color from covering the entire image and lets you selectively exclude areas such as the face and hair.
- A Hue/Saturation adjustment layer that affects only one color range helps you intensify individual colors without changing the rest of the image.
Step-by-Step Guide
Step 1: Creating the Color Layer as a Starting Point
Open your image and go to the folder where you have collected your color layers. Select the solid color fill layer you want to use for the light source. In this example, it is a strong magenta that is meant to hint at the color source. Duplicate the layer so that you always have the original at hand unchanged. You don't need the layer mask at this moment, so leave it untouched for now.

Step 2: Testing Different Blend Modes
First set the layer's blend mode to Normal to see the pure color. Then try the Color blend mode. You will quickly notice that the color lies flat across the image and disturbs the mood rather than supporting it. Blending the layers into each other (Overlay) doesn't produce a harmonious look in this case either. These tests are important because they show you what you don't want before you decide on the right method.

Step 3: Using the Film Method Screen
Set the blend mode to Screen. This setting is the method you will use particularly often for light flares. The image glows more intensely and looks brighter and fresher, exactly the way a real light source looks in a photo. I recommend that you always test this film method whenever you want to bring light into a subject.

Step 4: Adjusting the Opacity
After changing the blend mode, the color area can quickly become too dominant. Therefore, reduce the layer's opacity to about 50 percent. That way the effect remains visible without overwhelming the image. Pay particular attention to the area where the light source is supposed to sit, because the effect should be strongest there.

Step 5: Limiting the Color with a Layer Mask
So far the color covers the entire image. Therefore, create a layer mask and invert it so that the mask is initially completely black and nothing remains visible. Then choose a brush with 100 percent opacity and a very soft edge. The size doesn't matter much at the beginning. Switch the color to white and place a single dot in the image where the light source should be. This dot is your starting position, which you can move freely later.

Step 6: Transforming and Enlarging the Light Source
With Command plus T you activate the transformation. When scaling, hold down the Option key and the Shift key so that the proportions are preserved and the effect grows from the center. You can drag the light source very large and then move it to the desired spot. Cheating a little with the position is allowed, because it's about the mood, not a physically exact simulation. Then confirm the transformation with the Enter key.

Step 7: Mask Out Distracting Areas in the Face
Take a close look at the result. It is quite possible that the color also spills onto the forehead or into the face, which is usually undesirable. To fix this, pick a brush again and paint over the affected areas on the mask with black. This brings back the original skin tone, and the hair also stays free of the color cast. The mood in the rest of the image is preserved.

Step 8: Add a Blue Counter Accent
For more depth, you can add a blue accent from the opposite side. To do this, duplicate your reference color, move the copy to the top, and delete the existing mask. Set the blend mode to Screen again and initially reduce the opacity to about 40 percent. At 50 percent the blue quickly looks too strong, so it is worth keeping an eye on the value. Then add an inverted mask again, paint a dot, transform the layer, and enlarge it to fit the subject.

Step 9: Adjust the Saturation of Individual Hues Selectively
You may have noticed that the red in the upper area looks too pale. Instead of raising the saturation of the entire image, create a selection for the reds only. Then create a Hue/Saturation adjustment layer and select the Reds channel in the dropdown menu. Now increase the saturation subtly until the red looks stronger, but not unnatural. This targeted correction emphasizes the color mood without affecting other areas.

Step 10: Compare the Overall Result
Finally, hide all color corrections and show them again. This way you can immediately see how strongly the color mood changes the image. Often it is only in a direct comparison that you can tell whether the effect is coherent. If you like the result, you can leave it as it is. For the final fine-tuning, it is worth weighing the opacity of the individual layers against each other once more.

Summary – Creating Light Flares in Photoshop: Film Look Step by Step
With color fill layers, the Screen blend mode, and precise layer masks, you create light flares that can be controlled exactly afterwards. You have seen that a soft brush, a transformation while holding the Option and Shift keys, and a targeted saturation correction ensure a harmonious film look. The advantage over shooting it in-camera clearly lies in control: you decide at any time on intensity, position, and color, without losing the original photo.
FAQ
Question: Why shouldn't I create light flares directly when taking photos?Answer: When taking photos, the result is hard to predict. A flash placed too close can create spots that ruin the mood. In Photoshop, you can adjust the effect afterwards as often as you like.
Question: Which blend mode is best suited for light sources?Answer: The Screen blend mode looks especially natural on light sources because the image appears brighter and more radiant.
Question: Why should I use a layer mask?Answer: A mask limits the color to the desired area. This way the face, hair, and other important parts of the subject remain unchanged.
Question: What do I do if the color looks too strong?Answer: Reduce the opacity of the layer. Values between 40 and 50 percent are often a good starting point.
Question: How do I change only certain colors in the image?Answer: Create a selection of the desired color range and then create a Hue/Saturation adjustment layer. There you can edit the Reds channel or another color channel selectively.


