
ZBrush Tutorial for beginners

- Learn ZBrush with practical examples - including work files to join in
- All important tools are considered step by step and in a structured manner
- Get to know the sculpting software comprehensively, realize your own 3D models
- Beginner-friendly tutorial, practical, with tips for an efficient workflow
- This is how the ZBrush 4R7 version works in detail (many things can also be reproduced with ZBrush 3)
- From rendering artist Christian Gerth, who introduces you to the complexity of ZBrush in a structured way
Turn your ideas into virtual reality with a skillful ZBrush stroke. Get a detailed ZBrush tutorial to help you conquer the third dimension!
46 Videos, 807 minutes
Introduction
ZBrush for beginners: 0.1 Training overview
The ZBrush map serves as an orientation aid in this dense world of ZBrush. It also nicely shows the different parts of this training.
User Interface
ZBrush for beginners: 1.1 Menu structures
ZBrush is a little peculiar in many areas, including the menu structures. However, you will quickly come to appreciate this.
ZBrush for beginners: 1.2 Viewport and navigation
The viewport and navigation are central areas in the user interface. With a few tricks and tips, you will quickly find your way around.
ZBrush for beginners: 1.3 Customizing the user interface
The appearance of ZBrush is extremely variable. You can customize everything according to your wishes and also save the new look.
Quick-Start
ZBrush for beginners: 2.1 Quick-Start I
The following two videos are about basic terminology. Many of them come into play in various situations and are indispensable.
ZBrush for beginners: 2.2 Quick-Start II
Continue with the basics. This video also serves as a small reference book.
Starting
ZBrush for beginners: 3.1 Primitives
Parametric basic objects (primitives) help as a starting point in many situations. After initializing and deforming, the base mesh is often already defined.
ZBrush for beginners: 3.2 Dynamesh
The Dynamesh function is one of the best things ZBrush has to offer. With it, you always have a clean and even mesh.
ZBrush for beginners: 3.3 ZSphere
ZSpheres is ideal for constructing limbs that can be processed either as adaptive skins or as unified skins with the help of ZSketch.
ZBrush for beginners: 3.4 Shadowbox
Complex meshes can be created in an instant using the shadow box. (De)masking gives you a clean shape for further work.
ZBrush for beginners: 3.5 ZModeler
ZModeler brings low-poly modeling to ZBrush. Polygons, edges and points can be edited in many different ways.
ZBrush for beginners: 3.6 ArrayMesh
The ArrayMesh function allows any mesh to be duplicated and arranged in many ways.
Remeshing
ZBrush for beginners: 4.1 ZRemesher
The ZRemesher is an ingenious tool for reducing high-poly dynamic objects to a minimum. With the project function, however, it is possible to retrieve lost details.
Detailing
ZBrush for beginners: 5.1 Brushes - Settings
The brushes are the actual tools in ZBrush. They can be customized in a variety of ways to achieve the desired effects.
ZBrush for beginners: 5.2 Brushes - Overview
ZBrush comes with a variety of brushes. In this video, I would like to give you a brief overview of the most common ones.
ZBrush for beginners: 5.3 MatchMaker - Brush
The MatchMaker brush adapts the shape of one sub-tool to that of the other. Perfect for projecting details onto shaped surfaces.
ZBrush for beginners: 5.4 Curve Brushes
In curve mode, you can create a wide variety of meshes along a curve with various setting options.
ZBrush for beginners: 5.5 Insert (Multi) Mesh Brushes
With the "Insert (Multi) Mesh Brushes", many details can be inserted in no time at all. ZBrush also offers a large number of ready-made IMM brushes.
ZBrush for beginners: 5.6 Surface Noise
As the name suggests, you can use "Surface Noise" to cover the surface with noise. Of course, ZBrush also offers countless setting options here.
ZBrush for beginners: 5.7 Fibermesh
Fibermeshes are ideal for creating hair and plants. Many useful presets are already available in the Lightbox.
ZBrush for beginners: 5.8 Nanomesh
With the nanomesh function, it is possible to place a new mesh in each individual polygon and change it in many different ways.
ZBrush for beginners: 5.9 Layers/Morph Target
Layers make it possible to work non-destructively in ZBrush. Together with the Morph Target function, fine alpha structures can be cleanly controlled.
ZBrush for beginners: 5.10 Extract
The Extract command extracts masked areas of a mesh and places them in a separate subtool. The thickness can be freely selected.
Texturing
ZBrush for beginners: 6.1 Materials
Materials are what really give the meshes their shape. The surface properties and color can be selected in many different ways.
ZBrush for beginners: 6.2 Polypaint
The polypaint function in ZBrush is very versatile and extremely simple. It doesn't even need a UV map!
ZBrush for beginners: 6.3 Spotlight
Spotlight can be used to project fine textures onto the object and thus increase the level of detail.
Posing
ZBrush for beginners: 7.1 Transpose Master
Symmetrical objects often look a little boring. With the "Transpose Master", it is possible to transform various subtools at once.
Lightning
ZBrush for beginners: 8.1 Standard Light
The standard light is a simple way to illuminate your models. Several individual lights are available.
ZBrush for beginners: 8.2 Lightcaps
Lightcaps allow you to make the lighting setup a little more interesting. It is also possible to generate sets of lightcaps with panoramic images.
Rendering
ZBrush for beginners: 9.1 Rendering in ZBrush
The BPR function produces simple but solid renderings in ZBrush itself. You can also edit images directly using BPR filters.
ZBrush for beginners: 9.2 Rendering in Photoshop
The render passes created in ZBrush can be linked together as desired in Photoshop. It is possible to achieve great effects with special materials.
ZBrush for beginners: 9.3 Rendering in Keyshot
The external renderer Keyshot allows you to create realistic renderings. With the help of the "ZBrush to Keyshot Bridge", simple and smooth interaction is guaranteed.
ZBrush for beginners: 9.4 Rendering in Cinema 4D/GoZ
With the help of the "GoZ" plug-in, transport from and to ZBrush is very easy. This also makes it possible to render low-poly models in Cinema 4D in great detail using various maps.
Practice
ZBrush for beginners: 10.1.1 Workflow I - Dynamesh 128
The easiest way to start a head model is with a demo head from ZBrush. You can use a Dynamesh 128 to define the rough shape.
ZBrush for beginners: 10.1.2 Workflow I - Dynamesh 256
With the Dynamesh resolution of 256, it is already possible to shape details. However, there is still enough freedom for new ideas.
ZBrush for beginners: 10.1.3 Workflow I - ZRemesher
The remeshing process is very important for clean low-poly meshes. With the ZRemesher and the projection function, however, it is child's play.
ZBrush for beginners: 10.1.4 Workflow I - Detailing: Brushes
Next, the details are drawn in with various brushes. The standard brushes play an important role here.
ZBrush for beginners: 10.1.5 Workflow I - Detailing: Alphas
The next detailed step creates the various alphas. With the help of layers and the morph target, you can also work non-destructively in ZBrush.
ZBrush for beginners: 10.1.6 Workflow I - Texturing
Textures are used to give the mesh an interesting base color. Thanks to special masking methods, you also get a nice variance in the details.
ZBrush for beginners: 10.1.7 Workflow I - Lightning/Rendering
The lightning and rendering takes place directly in ZBrush. Thanks to various settings and materials, you have a wide variety of render passes for the final step in Photoshop.
ZBrush for beginners: 10.1.8 Workflow I - Compositing in PS
In Photoshop, it is now possible to merge the resulting render passes into one image. With the help of layer masks and adjustment layers, you can quickly achieve a great result.
ZBrush for beginners: 10.2.1 Workflow II - Modeling
The ZModeler makes it quick and easy to create a low-poly base model. Polygroups and group loops add that certain something to the details.
ZBrush for beginners: 10.2.2 Workflow II - Alpha Noise
With the help of Glenn Patterson's Greeble generator, it is very easy to create interesting alphas. These can be used to generate great surfaces in the Noise Maker in no time at all.
ZBrush for beginners: 10.2.3 Workflow II - Rendering
Without texturing and Lightning, you can go straight to Keyshot. As this can read the surface noise, it is very easy to create various render passes for compositing.
ZBrush for beginners: 10.2.4 Workflow II - Compositing
In Photoshop, it is now possible to merge the render passes received into one image. Thanks to NASA, a great background is also provided.
Further links
ZBrush for beginners: 11.1 List of links to various ZBrush topics
After this training, you will have laid the foundations for the huge world of ZBrush. The link list will give you further input for the next steps.
Examples of use
-
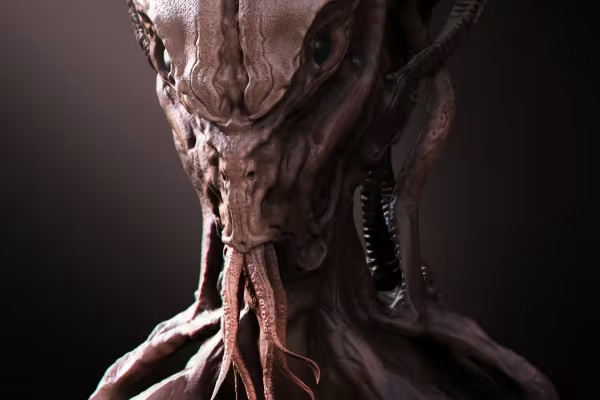 Learn by example: You will model this alien in the ZBrush tutorial.
You might also like

Full power, more inspirations, maximum WOW effect!

More style, more power, more templates!

Edit films, transitions, animations, and more

Save time with artificial intelligence
Comment now „ZBrush Tutorial for beginners“