Food-Photography is an art form in itself, and the right setup is crucial to achieving appetizing photos. In this chapter, we delve into the final setup for photography with available light and flash. You will learn what equipment you need and how to make the most of your environment to achieve impressive results.
Main insights
- It is possible to take great food photos with simple equipment and household items.
- The use of diffusers and reflectors plays a crucial role in light design.
- A short minimum focusing distance of the lens is advantageous for food photography.
- Gold and silver foil can be used to modify light and create interesting effects.
Step-by-Step Guide
1. Setting up the final setup
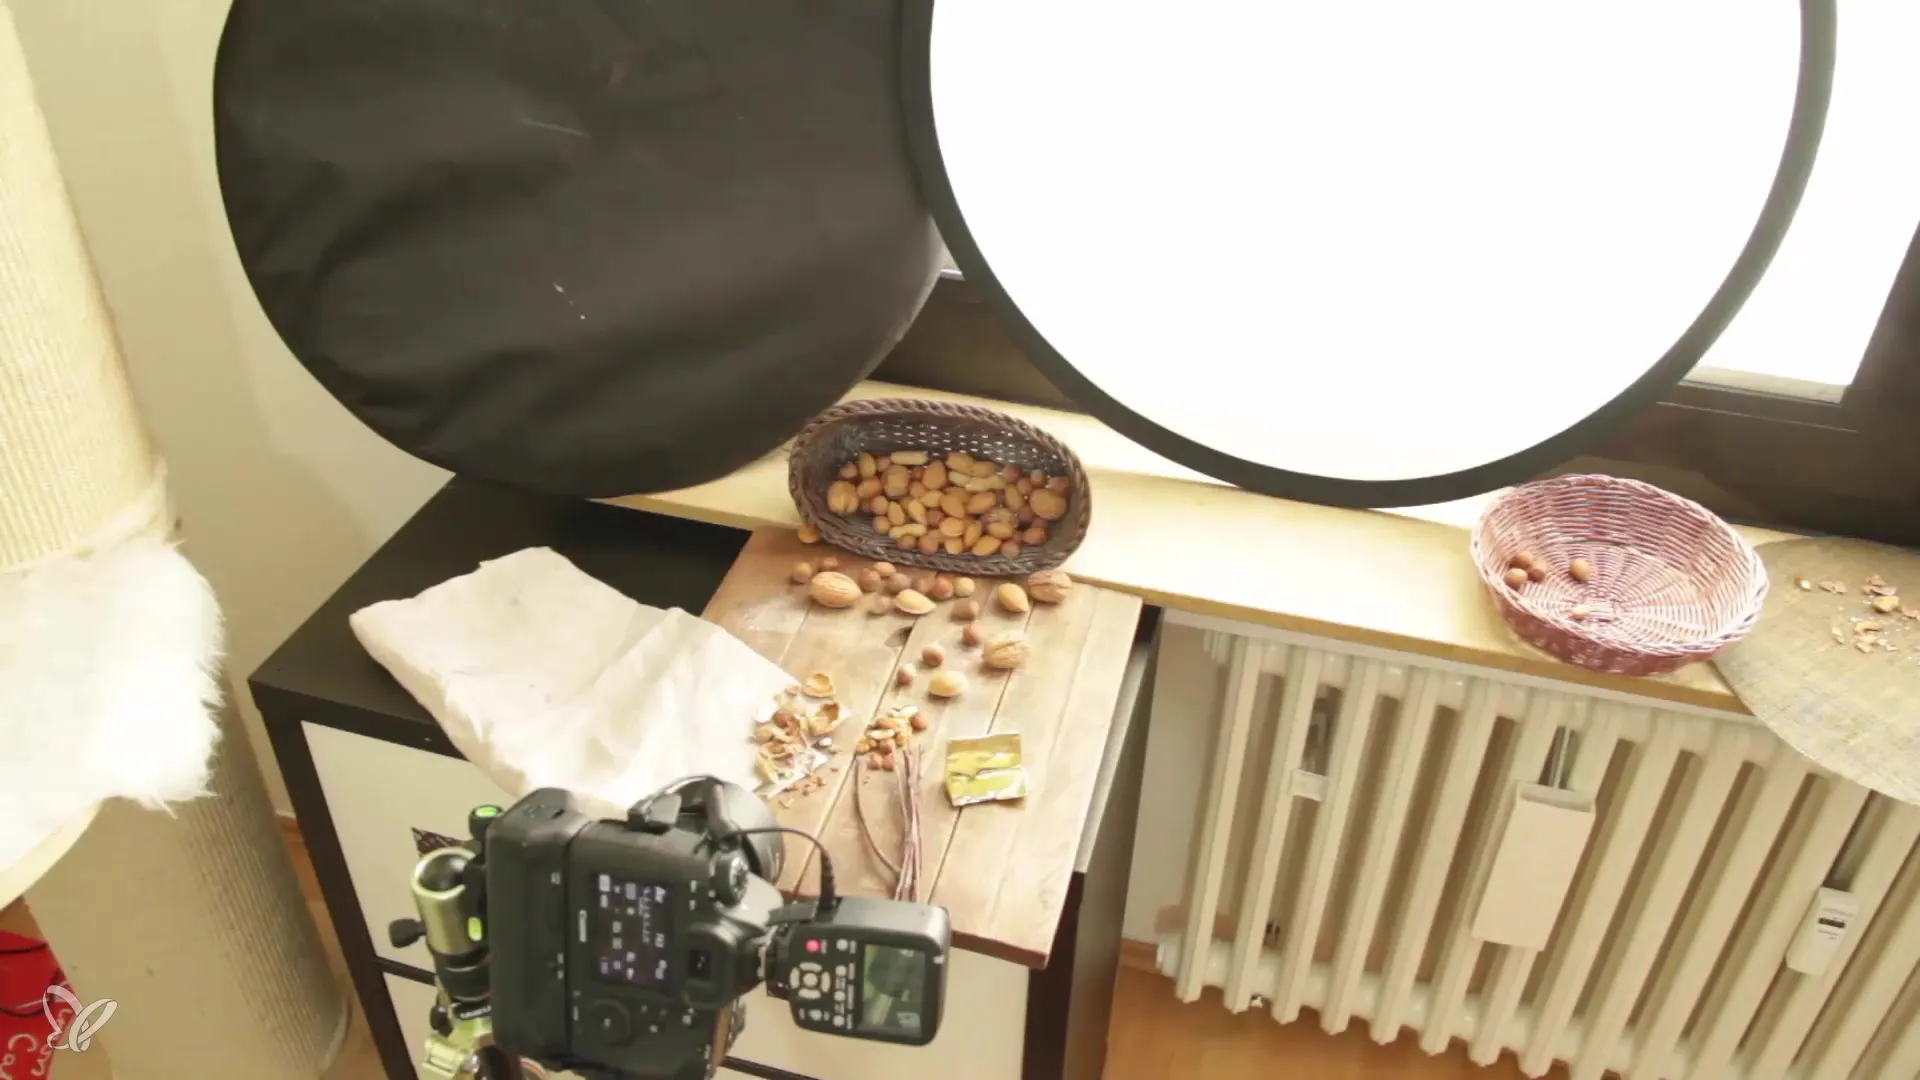
First, you will see the final setup as presented in the video. The diffuser is strategically placed to soften the light. The position of the diffuser plays an important role here. Pay attention to how the light falls on the subject and how much light the diffuser actually lets through.

2. Using the reflector
The reflector is another essential component of your setup. It affects the lighting conditions on the opposite side of the subject by holding back some light. This gives your image more depth and makes it appear more vibrant. Experiment with the position of the reflector to achieve the desired effect.
3. Positioning the reflector
The small reflector is another tool that bounces light back onto the subject. This helps to balance shadows and brighten the overall image. Your reflector should be positioned close to the setup to achieve maximum effect. Observe how the light changes as you move the reflector.
4. Checking the camera position
To achieve the best possible results, you need to pay attention to how close your camera is positioned to the setup. Especially in food photography, the minimum focusing distance of your lens is crucial. The closer you are to the subject, the more details you can capture. Be sure to experiment with different distances to find the best result.
5. Choosing the right light
The entire setup is simple and does not require much space. You can use a window as a light source in front of which you set up your scenes. Also consider how you want to use the light: natural light is often the best choice, but it can also be helpful to integrate additional light sources, such as flashes or artificial light.
6. Alternative materials for the diffuser
If you don't have a specific diffuser on hand, you can also use everyday items to scatter the light. A simple white curtain or a thin bedsheet often works well when it comes to softening light. Think about the materials you have at home to enhance the light in your setup.
7. Using foils for light manipulation
An interesting technique is the use of foils, such as black, silver, or gold foil. These can help you modify the light and create different moods. Gold foil warms up the light, while silver foil creates a cooler effect. Experiment with different foils to find the light mood that suits you.
8. Preparing for image editing
After setting up and taking your first shots, it’s time to further edit the images in Lightroom or Photoshop. Here, you decide on exposure, contrast, and colors to optimize the image. This post-processing is a crucial step to the final result and gives your image the finishing touch.
9. Checking the results on the screen
Finally, review the edited images on your computer. This is an important moment to see how the various elements of the setup come together and how you can further improve your technique for future shoots.
Summary – Food Photography: Final Setup for a Perfect Image
In this guide, you have learned about the final setup for food photography. With optimal light, equipment, and simple materials, you can create great images. Remember that both preparation and post-processing are essential to capturing an appealing photo.
Frequently Asked Questions
How far should I be from my subject?The ideal distance depends on your lens and minimum focusing distance. Experiment to achieve the best results.
Can I make a diffuser myself?Yes, you can use everyday items like a white curtain or a bedsheet.
How important is post-processing?Post-processing is crucial for optimizing color and exposure and making the image appealing.
Which foil is best for my setup?Gold foil warms up the light, while silver foil appears cooler. Try different foils to achieve the desired look.


