
A coffee cup is one of the most popular motifs for icons, especially when you are designing a coffee shop, a café blog, or a menu. You have already learned the basics of Affinity Vector, and now you are applying them to a real project. This icon is the central element of our coffee shop project, and you build it in just a few minutes using only basic shapes, ellipses, and the Pathfinder tools.
The video is only loaded from YouTube when you play it – data (including your IP address) is then transmitted to YouTube/Google. More in the privacy policy
You don't have to be a drawing pro. You work with simple geometric shapes and combine them so that in the end a clear, easily recognizable cup emerges. The result is a clean vector that you can scale as much as you like without losing sharpness.
Key Takeaways
- An icon is created from simple basic shapes that you combine, instead of drawing every outline freehand.
- By holding down the Shift key, you create an exact circle without distorting the proportions.
- The Pathfinder function "Subtract" removes overlapping areas and thus forms the basic shape of the cup.
- With "Divide" you break connected shapes into individual parts, which you can then delete selectively.
- Through the stroke width and the rotation of individual shapes, you control the style and fine details of the icon.
Step-by-Step Guide
Creating the Circle as a Basic Shape
Start in the shape tool and select the circle. For this icon you don't need a fill, because the cup should look like a pure outline. So remove the fill color and make sure a stroke is active. Set the stroke width to about four points so that the line stays clearly visible but doesn't look too heavy.

Dragging the Circle Perfectly Round
Hold down the Shift key while dragging. This keeps the aspect ratio at 1:1, and you get a perfect circle instead of a slightly squashed ellipse. Give the circle a size of about 90 pixels or a bit more, depending on how large your icon will eventually be. Then drag the shape to the center of the artboard so that you can get a good overview of it.
Placing the Rectangle for the Opening
Now choose a rectangle and place it over the upper half of the circle. The size of the rectangle is less important here; the only thing that matters is that it completely covers the upper curve and extends a bit beyond the edge of the circle. Make sure that the top edge of the rectangle lies above the circle, otherwise an unsightly remnant will remain later.

Subtracting the Shapes
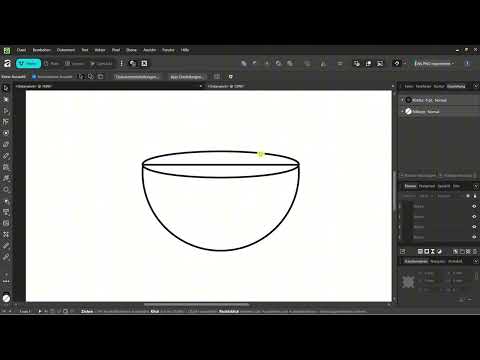
Now select both objects, that is, the circle and the rectangle. Then apply the Pathfinder function "Subtract". The rectangle is cut out of the circle, and the lower curve remains. You can already recognize the typical shape of a coffee mug. The advantage of this method: the result is a single, editable path and not a stack of individual objects.

Adding the Inner Ellipse for the Cup Opening
Now draw another ellipse that has exactly the width of the mug so far. It forms the opening of the cup. Make sure it sits centered at the top and doesn't extend beyond the edges. Using the width of the mug as a guide makes this easy, and the icon will look cleaner later.

Removing the Middle Part with "Divide"
Select the mug and the ellipse together. Open the Pathfinder functions and choose "Divide". The combination then breaks apart into several individual objects. You don't have to use all of them. Simply click on the middle area, that is, the area that corresponds to the ellipse, and delete it. This creates a cup with a real opening.

Adding the Base of the Cup
Place a smaller ellipse below the mug. It serves as a saucer or as a standing surface. You can position it exactly using the alignment tools, or simply move it freely if that is good enough for you. Then combine the lower ellipse with the cup again, apply "Divide" once more, and remove the superfluous part that lies inside the cup. This leaves only the visible saucer.

Adjusting the Stroke Width
If the lines seem too thick to you, select all parts of the icon and reduce the stroke width. Two points look significantly more elegant than four on many icons. Feel free to try out different values until the proportions between cup, saucer, and handle feel right to you. The icon already looks much more like a cup now than in the first version.

Placing the Handle
For the handle, you draw another ellipse on the side of the mug. It doesn't have to fit perfectly, because you will cut out the unnecessary part later. Position it so that it extends about halfway over the cup wall. This creates the basic framework for the grip, which you will adjust in the next step.

Slightly Rotating the Handle
So that the handle doesn't look rigid, you can rotate it slightly. In the Transform panel, you will find the rotation tool for this. A rotation of about five degrees is usually enough to get an angled, more natural handle. If you want more swing, you can adjust the angle until you like the shape.
Cutting the Handle to Size
Select the mug and handle together and apply "Divide" again. Then remove the part of the handle that lies inside the cup. Only the visible grip remains, and the cup is essentially finished. When deleting, pay close attention to which piece you select, because with so many individual objects it's easy to make a mistake.

Finishing the Icon
At the end, look at your result once more as a whole. The cup has an opening, a base, and a handle, and as a vector it is fully scalable. You can leave the icon at this point, use it as a basis for further variations, or additionally add a stream of steam rising above the cup. For a first mini project, the result is already very convincing.

Summary – Coffee Cup Icon in Affinity Vector: Step-by-Step Guide
With simple basic shapes, the circle, the rectangle, and a few ellipses, you build a clearly recognizable coffee cup in Affinity Vector. The Pathfinder functions "Subtract" and "Divide" are the most important tools here. With them, you shape the mug, the opening, the base, and the handle without having to draw every detail by hand. Once you have understood the steps, you can apply this principle to many other icons.
FAQ
How do I create a perfect circle without distortion?Hold down the Shift key while dragging, and the aspect ratio stays at 1:1.
Why do I subtract shapes instead of simply deleting parts?Subtracting produces a single, cleanly editable path, whereas deleting individual areas often leaves you with messy edges.
What exactly does the "Divide" function do?It breaks overlapping objects into individual sub-areas, which you can then select, move, or delete separately.
Can I change the stroke width afterwards?Yes, select the relevant objects and adjust the stroke width in the properties panel until you are happy with the icon.
How do I rotate the handle evenly?Use the rotation tool in the Transform panel and set a small angle, about five degrees, so the handle doesn't look rigid.

