
With the latest version, Affinity has changed fundamentally. The previously separate programs Designer, Photo, and Publisher are now combined in a single application that switches between Vector, Pixel, and Layout depending on the task. When you open the app for the first time, the interface may therefore seem a bit cluttered. Don't worry: the areas are clearly organized, and you will find your way around quickly once you know what each part is responsible for.
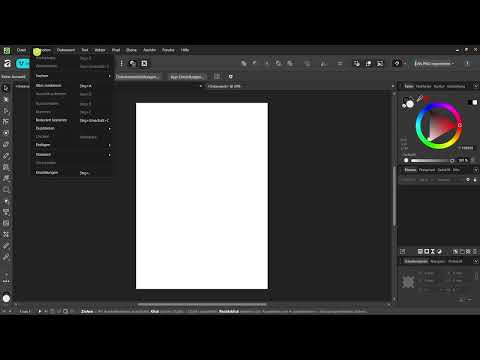
The video is only loaded from YouTube when you play it – data (including your IP address) is then transmitted to YouTube/Google. More in the privacy policy
This guide takes you step by step through the most important areas: from the free download through the toolbar and the menus to the panels and the workspace in the middle. All you need is the app itself and a little curiosity.
Key Takeaways
Affinity Studio combines Vector, Pixel, and Layout in one app, and you can switch between them at any time. The toolbar on the left contains all the drawing and design tools. The top menu bar offers the classic commands such as File, Edit, or Text. The context toolbar below the menu adapts to the currently selected tool. On the right-hand side you will find the panels with the properties of your document, which you can arrange according to your own preferences. The workspace in the middle, the so-called canvas, is the place where all your work takes shape.
Step-by-Step Guide
Step 1: Download the App for Free
The first step is the download. You can get the application for free via the official website affinity.studio. In the download area, you select the version for your operating system and install it like any other program. Make sure you really obtain the software from this site so that you always get the current version.

Step 2: Choose the Start Screen and Document Size
After the first launch, you are greeted by a selection of templates, for example A3, A4, A5, or flyer. However, you can also define your own sizes if your project requires different dimensions. For getting started, the size is initially secondary. Simply choose an A4 page that you can work with confidently, and confirm your selection.

Step 3: Get to Know the Toolbar on the Left Side
The toolbar is located on the left edge of the screen. Here you will find everything you need for designing: the selection tool, the pen tools, shapes, text, and much more. You don't have to master all the tools yet. What matters is that you know where they are, because over the course of your work you will get to know and use each one of them.

Step 4: Switch Between Vector, Pixel, and Layout
Since there is no longer a separate program, you switch between the working modes within the app. This works both via the buttons at the top and via the keyboard shortcuts F2, F3, and F4. The key assignments may differ depending on the operating system, i.e. Windows or Mac. Vector is responsible for vector graphics, Pixel for image editing, and Layout for page design. Incidentally, these modes still carry the names they previously had as individual programs: Designer, Photo, and Publisher. Also new is the integration of Canva. The AI-powered tool is built into several functions of the interface following Canva's acquisition of the company.

Step 5: Use the Top Menu Bar
At the top of the program window you will find the menu bar. It looks similar to that of most other programs and contains the menus File, Edit, Document, Text, Vector, and Pixel Layers. You probably already know many of these commands from other software. Here you can save files, undo changes, or adjust basic document settings.
Step 6: Understand the Context Toolbar
Directly below the menu bar is the context toolbar. It is called that because it changes constantly. It always shows only the options that fit your currently active tool. If you select a different tool, the toolbar changes as well. Get into the habit of keeping an eye on this area, because here you set many details directly without having to switch to deeper menus.
Step 7: Exploring the Panels on the Right Side
On the right side are the panels, similar to what you know from Photoshop. They are the most important thing you will work with. By default, you will find the general properties of your document, the colors and swatches, the strokes, and the appearance there. This basic setup is completely sufficient for getting started.
Step 8: Arranging the Panels to Your Liking
You are not limited to the default selection. Via the menu, you can add more panels, such as the library, help, hyperlinks, or tables of contents. Below these are additional tabs such as Path Brushes, Styles, and Quick Fix, and here too you can add categories. You can also move the panels around as you like. It is advisable to try this out yourself first and think about which arrangement suits your way of working best. Later on, you will see in a concrete example how to set up your interface optimally.
Step 9: Understanding the Workspace in the Middle
In the middle is the workspace, the so-called canvas. This is where everything essential happens. The document you see is an A4 page in our example. You do need the tools on the left side regularly, but the actual work takes place predominantly in this area. So always keep the middle in view while you work with tools and panels.
Step 10: Opening Multiple Documents at the Same Time
In Affinity, you can also open multiple documents at the same time. Each one then appears in its own tab. This is handy if you want to switch between different projects. Simply close documents you don't need so that you keep a clear overview.
Step 11: Setting Up the App Correctly for the Course
Finally, it is important that you have already installed the app and that it is set to Affinity Studio with the Vector mode. With this foundation, you are perfectly prepared for the following lessons, in which we will explore the individual tools in depth step by step.

Summary – Confidently Understanding the Affinity Studio Interface
Affinity Studio combines Vector, Pixel, and Layout in one application. You orient yourself around four areas: the toolbar on the left, the menu bar and context bar at the top, the panels on the right, and the canvas in the middle. If you understand how these areas work together and that they adapt depending on the task, you have laid the foundation for all further steps.
FAQ
Question: Do I have to pay for Affinity Studio?Answer: According to the instructions, the app can be downloaded for free from affinity.studio.
Question: What do I need the context bar for?Answer: It always shows the options of the currently active tool and changes as soon as you select a different tool.
Question: Can I move the panels and add my own panels?Answer: Yes, you can add additional panels such as Library, Help, or Hyperlinks and arrange the panels according to your preferences.
Question: How do I switch between Vector, Pixel, and Layout?Answer: You switch via the buttons at the top or with the keyboard shortcuts F2, F3, and F4, although the assignment may vary depending on the operating system.


