
A lettering that follows a wave, or a band of text wrapped around a seal, instantly looks lively. That is exactly what the Text on Paths feature in Affinity Vector is designed for. You don't need any prior knowledge of typography design, because the basic principle is quickly understood: You draw a line, and the text follows it. In this tutorial, I'll show you how to create artistic text, format the font, align text along a curve, and even place it in a speech bubble.
The video is only loaded from YouTube when you play it – data (including your IP address) is then transmitted to YouTube/Google. More in the privacy policy
Key Takeaways
- You can find the Artistic Text Tool with the shortcut T. If it is missing from your toolbar, you can bring it there with a right-click and "Customize".
- You change font size, typeface, bold, italic, underline, and color just like in familiar word processing programs.
- As soon as the mouse pointer turns into a T with a line beneath it on a curve, the text is written directly on the path.
- Paths remain editable afterwards. With the Move Tool, you can reshape the line and text at any time.
- Shapes such as speech bubbles are also suitable as a path. You move the start and end of the text using the green markers.
Step-by-Step Guide
Step 1: Find and activate Artistic Text
You can reach Artistic Text via the shortcut T in the toolbar. Click on it, and you can write directly on the canvas right away. So the text is not a special function, but a tool you need anyway as soon as it comes to lettering.

Step 2: Customize the toolbar
If the T is missing for you, right-click on the toolbar and select "Customize". There you will find all available tools, including the photo and image editing tools. Drag the desired tool into your toolbar, and it will be available to you from then on.

Step 3: Enter text
Select the Artistic Text Tool and click on the canvas. Then you can start typing right away. A short word is suitable for the beginning, for example "Coffee". That way you can quickly see how changes take effect.
Step 4: Adjust font size
You set the font size in points in the options bar at the top. If your text is too small or too large, change the value, for example to 100. Alternatively, you can use the plus and minus signs in the bar to increase or decrease the size step by step.
Step 5: Select typeface
So that a change applies only to your text, select it first. Then you open the font selection and try out different typefaces. The selection is large, so it is worth comparing a few variants before you settle on one.

Step 6: Set formatting
If the chosen font is versatile enough, you can set it to bold. In addition, italic and underline are available to you. Using the color selection, you give the text the desired color. You probably already know these basics from other programs.
Step 7: Draw a curve
Now it gets exciting. Select the Pen Tool and draw a curve along which your text will run later. The line alone still looks unspectacular, but it is the foundation for everything that follows. Make sure the curve runs where you want the lettering, for example as an arc above a logo.
Step 8: Attach the text to the path
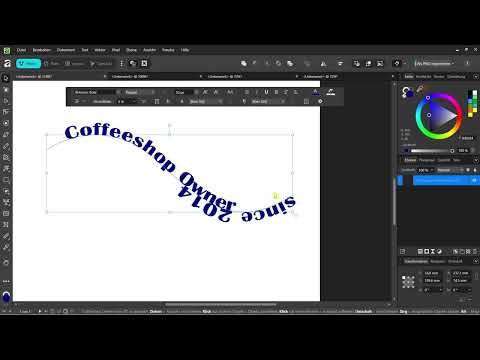
Select your artistic text and move the mouse pointer close to the curve. Zoom in if necessary so that you can see exactly where the path runs. As soon as the normal A turns into a T with a line beneath it, you know that the text will now be written on the curve. Click at this spot, and the text cursor sits directly on the path.

Step 9: Write on the curve
Now you type in your text, and it follows the line. The sentence "Coffee Shop Owner since 2014" is suitable as an example. If the text becomes too long for the path, it continues at another point on the curve. This looks unfamiliar at first glance, but can easily be corrected by adjusting the path and font size.

Step 10: Move the line afterwards
The advantage of this method is that you can still edit the path even after writing. To do this, select the Move tool and drag the line until the shape and size are right. This way, you can adjust the lettering at your leisure to your vision, even if everything else is already in place.

Step 11: Place text in a speech bubble
The technique also works with shapes. To do this, draw a speech bubble, for example without a fill and with just an outline. Hold the Artistic Text tool close to the edge of the shape until the cursor changes into the T with a line. Then you write the text directly into the speech bubble. This is especially handy for speech bubble graphics in social media posts.

Step 12: Adjust the start and end of the text
There are small markers at the beginning and end of the text line. Click the green marker at the start with the left mouse button and drag it back and forth to move the text. You adjust the end in a similar way so that the text ends exactly where you want it.

Summary – Text on Paths in Affinity Vector: Designing Badges and Lettering
With the Artistic Text tool in Affinity Vector, you don't just write straight lines, but text that follows any curve or shape. You start by activating the T tool, format the text to your liking, and then place it on a path you drew yourself. Because the line is only a vector, it remains invisible in the final result, and you can touch up the lettering at any time. This is how you create badges, logos, and speech bubbles that can hardly be achieved in this form in Canva or Word.
FAQ
Why is the Artistic Text tool missing for me?Right-click on the toolbar, select "Customize," and drag the Artistic Text tool into your toolbar.
Can I still change the text after writing it on the path?Yes, with the Move tool you can move and enlarge the line, and the text adjusts automatically.
Do I have to delete the line after writing?The line is just a vector that you use as a guide. In the finished result, you usually no longer see it.
Does the method also work with shapes?Yes, you can also place text on the edge of a shape such as a speech bubble that has only an outline.
Can I combine gradients with text?Yes, gradients can also be applied to text, which further enhances the design.


