Anyone who designs a brochure knows the problem: the text is longer than the space on the page. With linked text frames, you let long text flow automatically from one frame into the next without copying it by hand. In this tutorial, I'll show you how to use frame text correctly, detect overflows, and connect frames to each other.
The video is only loaded from YouTube when you play it – data (including your IP address) is then transmitted to YouTube/Google. More in the privacy policy
Introduction
Before you bring text into your layout, you should know that Affinity Layout offers two different text tools. The choice between them determines whether your text can be edited flexibly later or whether you constantly have to correct line breaks by hand. Using the example of a brochure for a coffee festival, I'll show you how to distribute running text across several frames that stay together even after being moved.
Key Takeaways
- Frame text is suitable for longer texts, artistic text for individual headings and logos.
- A frame shows red markings when there is more text than it can display.
- With a click on the link symbol on the frame, you create the next frame, and the text continues to flow automatically.
- Linked frames stay connected to each other even when moving, enlarging, or shrinking.
Step-by-Step Guide
Step 1: Distinguishing the Two Text Tools
In the Layout Studio, under the letter T, you'll find two tools that look similar at first glance. However, the difference is crucial. You can recognize the Frame Text Tool by the fact that it draws a frame. It is intended for running text, that is, for longer passages that belong together and should sit within a fixed area.

The Artistic Text Tool is located directly below it and has no frame element. It is suitable for individual headings or logos. If you write a long paragraph with it, you have to control line breaks and text width yourself. That is exactly what makes working on a brochure tedious.

Step 2: Drawing a Frame Text
Select the Frame Text Tool and draw a frame on the page. I recommend dragging the frame out to the page margins. It snaps to the guides as you do so, so you work with clean alignment. You'll notice a slight resistance, which shows you that the frame is being aligned to the guides.
Then copy a Lorem ipsum placeholder text into the frame. If it doesn't fit, that is completely normal at this stage. You can shrink the text as a test to see how it behaves.
Step 3: Detecting Overflows
As soon as there is more text in the frame than it can display, Affinity marks the frame in red. The red markings appear on the small triangles located at the top left and bottom right of the frame. As long as these triangles are not red, all of the text fits in the frame.

In addition, an eye symbol indicates that hidden text is present. This text is not visible in the current frame, but it still exists. Don't let this notice irritate you. It is exactly the text that you will distribute to a second frame in the next step.

Step 4: Linking the Frame
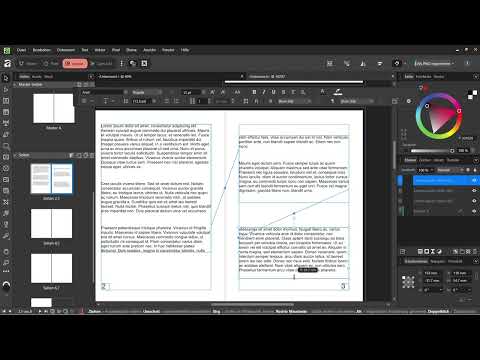
Click the small triangle at the bottom right of the frame. Then, holding the mouse button down, draw a new text frame on the page. As soon as you release, the link is established, and the excess text flows automatically into the new frame. You don't have to copy or paste anything.

Step 5: Distributing Text Across Multiple Frames
Now switch to the Move Tool and click on the frame to select it. You can now enlarge or shrink the frame so that the text is distributed appropriately. Pay attention to how the text slides from one frame into the next. If the first frame gets more space, more text moves into it, and the second frame contains correspondingly less.

If the text still doesn't fit completely, drag out another linked frame. This way, you can split a long text as many times as you like. The red markers only disappear once the last frame can hold all of the remaining text.

Step 6: Flexibly Adjusting Linked Frames
The great advantage of linked frames becomes apparent when you change the layout. If you enlarge a frame, text is pulled up from the frame below it. If you shrink it, the text is pushed further down. Your text flow remains intact at all times.
This is especially handy if you want to place an image between the text blocks. You don't have to set up the text again; you just adjust the frames. Moving a linked frame to another page also works without any problems. I simply dragged the frame to page 4, and the link remained intact. You always keep the connection in view, so you don't lose track of the text sections.

Step 7: Preparing Texts and Checking Layers
For the actual design work, you should already have your texts ready. Write them beforehand in a word processor such as Google Docs and then paste them into the frames. That way, you can focus on the design in the layout rather than on writing.
When you are satisfied with the result, simply click on an empty area outside the frame with the Move tool. The link is preserved, so you don't need to remove it separately.
A look at the Layers panel also shows you the structure of your document. There you will find your master and, above it, the individual text layers. Each text frame is its own layer that you can edit separately. This helps you keep an overview even with longer brochures.

Summary – Creating and Linking Text Frames in Affinity Layout
You have learned to distinguish between frame text and artistic text and to choose the right variant for your content. You now know how to recognize text overflow by the red markers and how to create a linked frame with a click on the triangle. You can also enlarge and shrink frames and move them to other pages without losing the text flow. This lays the foundation for a clean, flexible brochure.
FAQ
When do I use frame text and when artistic text?Frame text is suitable for longer texts that should flow within a fixed area, whereas artistic text is suited to individual headlines and logos.
How can I tell that my text doesn't fit completely into the frame?The small triangles at the top left and bottom right of the frame are marked in red, and an eye icon indicates hidden text.
How do I link two text frames together?Click on the triangle at the bottom right of the first frame and then drag a new text frame onto the page, and the text will flow on automatically.
Does the link remain intact when I move a frame?Yes, linked frames remain connected to each other even if you move them, enlarge them, shrink them, or drag them to another page.
Do I need to have my text finished before inserting it into the layout?That is not strictly necessary, but recommended. If you write texts beforehand in a word processor, you can focus entirely on the design in the layout.
How do I find linked text frames again in the Layers panel?Each text frame appears as its own layer above the master, so you can select and edit each section separately.


