
Anyone who opens a document with numerous objects in Affinity Designer and searches through unnamed layers for the right element knows how quickly you can lose track. This is exactly where this tutorial comes in. In the video, Marco Kolditz shows how you create different layer types, use them sensibly, name them, and structure them cleanly. The focus is on a non-destructive workflow: you change content without irrevocably destroying the originals. The following guide takes you step by step through the most important functions so that your document stays clear and organized from the start.
The video is only loaded from YouTube when you play it – data (including your IP address) is then transmitted to YouTube/Google. More in the privacy policy
Key Takeaways
- Clear names and locked backgrounds provide an overview and prevent accidental changes.
- Image layers can be replaced with a different image at any time, whereas pixel layers cannot.
- Shape layers remain editable afterwards, and paths can be deformed using the Node Tool.
- Groups and clipping masks structure objects, and the order of the layers determines what is visible.
- Adjustment layers affect all layers below them. Their position in the Layers panel therefore determines their area of effect.
Step-by-Step Guide
Step 1: Show the Layers Panel
If the Layers panel isn't visible for you, open the View menu, select the Studio section, and click Layers. Each row shows a preview of the content on the left, the name on the right, and the type of layer in parentheses. A checkmark means the layer is visible. An entry highlighted in blue indicates the current selection.

Step 2: Give Layers Meaningful Names
Click on a layer's name, enter a clear label, and confirm with Enter. I recommend always doing this immediately. A rectangle is then no longer called Rectangle, but for example Foreground. After a few hours of work, you'll always know what function a layer serves. The layer type remains visible on the right in parentheses, so you keep track of both.

Step 3: Understand Visibility and Selection
The checkmark to the right of each layer controls visibility. As soon as you click a layer, it is highlighted in blue and marked on the canvas with a transformation frame. You can then move it with the Move Tool. If you don't like a move, simply undo it with Ctrl+Z. Make sure you have selected the correct layer before you work with the tool.
Step 4: Lock Background Layers
As a rule, a background shouldn't accidentally shift. So select the layer and click the small lock icon at the top of the Layers panel. The layer is then locked, which you can recognize by the lock in the row. The transformation frame also changes: instead of circles, small crosses appear. If you now try to move it, nothing moves anymore.
Step 5: Distinguish Between Image Layers and Pixel Layers
If you drag a photo directly from outside into Affinity Designer or place it via File and Place, an image layer is created. If you select it, the context toolbar at the top shows the dimensions of the image as well as the Replace Image button. A pixel layer created from the same photo, on the other hand, offers you hardly any information in the context toolbar. This very difference is decisive for your workflow later on.

Step 6: Swap Images Using Replace Image
With an active image layer, click Replace Image, select a different file, and confirm with Open. The motif is swapped out while the position, size, and all settings of the layer are retained. This is practical if a client delivers a retouched version or you need a photo in a different resolution later. With a pixel layer, this step would not be possible.

Step 7: Use Rasterizing Deliberately
By right-clicking an image layer and selecting the Rasterize option, you convert it into a pixel layer. However, this causes you to lose the ability to swap the image later using Replace Image. If you rasterize accidentally, undo the step with Ctrl+Z. I advise you to keep image layers for as long as possible and only rasterize when you need to edit pixels directly.
Step 8: Creating shape layers and modifying them afterwards
Ellipses, rectangles, and other shapes created with the shape tools produce shape layers. Their big advantage: you can still change them significantly after drawing them via the context toolbar. With the Convert to Donut option, a circle becomes a ring, and through the settings you can adjust, for example, the hole radius. With Ctrl+Z you return to the original circle without having to redraw it.
Step 9: Duplicating and aligning layers
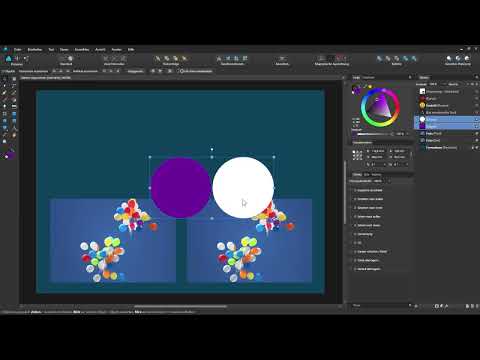
To copy a layer, select it and press Ctrl+J. The copy initially lies exactly on top of the original, so at first you see no change. If you move the new layer to the right while holding down the Shift key, it stays at the same height. Afterwards you can fill it with a different color, for example white. Both circles now lie independently of each other on two layers.

Step 10: Grouping layers and ungrouping the group
To group, select the desired layers. Holding down the Ctrl key, you click them individually; holding down the Shift key, you select a range from the topmost to the bottommost entry. Pressing Ctrl+G creates the group. Using the small arrow you open it and see the layers it contains. If you click an object outside the group, the entire group is selected automatically. With Ctrl-click on the object, you select a single element specifically. To ungroup, use the Ungroup option in the Layer menu or press Ctrl+Shift+G.
Step 11: Changing the order of layers
The Layers panel is read from top to bottom. Everything that is higher up lies in front of the layers below. To move a layer, click it, hold down the left mouse button, and drag it to the desired position. While dragging, pay close attention to the continuous blue bar. When it appears, the layer will be inserted at that position. If it appears only as a partial segment, you may end up in a group or at a wrong position.
Step 12: Creating a clipping mask
If you drag a layer into the panel so that the blue bar is indented to the right, it becomes a child layer of the layer above it. This procedure is called a clipping mask. The white circle then appears only within the purple circle, and a small arrow indicates that the layer is expanded. You can still move the inner circle freely, but it always remains visible within the bounds of the circle above.
Step 13: Deleting layers
To remove a layer that is no longer needed, select it and press the Delete key. Alternatively, drag the layer onto the trash can icon at the bottom right of the Layers panel. Both methods lead to the same result. Check briefly beforehand whether you might only want to hide the layer. Hiding it via the checkmark is a good alternative if you still need the element later.
Step 14: Creating and editing text layers
You recognize a text layer in the Layers panel by the entered text in parentheses. Like any other layer, you can rename it, for example to Text example. The label Artistic Text then appears in the panel. The advantage: with the Text tool you can click into the text at any time and change it. With the Move tool you move it, and via the context toolbar you choose the font and size.
Step 15: Adjusting paths with the Node tool
An object that you have assembled from several circles and a line can be combined into a path. A path remains editable until the end. If you select the Node tool, the anchor points become visible. If you drag a node to a new position, the shape changes accordingly. A path that you have drawn freehand with the Pen tool can be readjusted in the same way. Use the Fill instead of Stroke option for this if you want to fill a closed shape with color.
Step 16: Using adjustment layers
Adjustment layers change colors and tonal values without altering the layers beneath them. You find them via the corresponding icon at the bottom of the Layers panel. The adjustment layer affects all layers below its position. With a double-click on the preview icon you reopen the settings and can adjust them at any time. If you move the adjustment layer below the smiley, it only affects the paths underneath, and the face remains untouched.

Step 17: Controlling the opacity of a layer
Select the layer and open the menu next to Opacity in the Layers panel. With the slider you make the object partially transparent or fully transparent. Alternatively, enter a value such as 50 percent directly. If you drag left or right in the Opacity field with the mouse button held down, you also get fine control. To the right of it is the menu of layer blend modes, with which you determine how a layer blends with the layers beneath it. Masks, layer effects, and blend modes are covered by Marco Kolditz in separate videos that follow on well from these basics.
Step 18: Adding New Layers
Using the new layer icon in the palette, you create an empty layer. You can choose between a path layer for vector objects and a pixel layer. The pixel layer is mainly important in the Pixel Persona when you want to paint directly on pixels. If you place a vector shape on a newly created layer, it sits inside it as a sublayer, similar to a group. You remove empty layers you no longer need in the familiar way using the trash can icon.

Summary ??? Organizing Layers in Affinity Designer: Step-by-Step Guide
A clean layer structure determines how flexibly you can work in Affinity Designer later on. You have seen how to display the Layers panel, name layers, lock backgrounds, and distinguish between image, pixel, shape, text, and path layers. Image layers can be replaced with other photos, and shapes and paths remain editable afterwards. With groups, clipping masks, and a deliberately chosen order, you keep even complex documents under control. Adjustment layers, opacity, and blend modes give you additional creative freedom. If you consistently apply the basics, a confusing document becomes a project that you can understand and adjust at any time.
FAQ
How do I display the Layers panel in Affinity Designer?In the View menu, select the Studio area and click Layers. The panel will then appear in the Studio.
Why can my background be moved accidentally?The layer is not locked. Select it and click the lock icon at the top of the Layers palette, and it can no longer be moved.
What is the difference between an image layer and a pixel layer?An image layer retains the embedded photo and can be swapped using Replace Image. A pixel layer is rasterized and no longer offers this option.
How do I delete a layer?Select the layer and press the Delete key. Alternatively, drag it onto the trash can icon at the bottom right.
How do adjustment layers affect other layers?They affect all layers below their position in the palette. If you move them down, you limit their area of effect.


