
Whether a rectangle should get a plain color or a soft color gradient should create depth, the fill decides. In this tutorial, you will learn how to edit colors, gradients, and outlines with the Fill tool in Affinity Designer and how to control the opacity of individual areas with the Transparency tool. I will guide you step by step through the functions as they are shown in the video, and supplement the most important steps with practical tips.
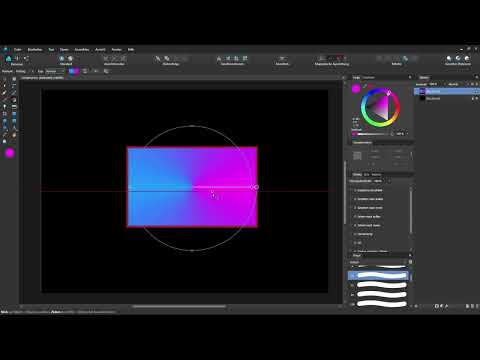
The video is only loaded from YouTube when you play it – data (including your IP address) is then transmitted to YouTube/Google. More in the privacy policy
Key Takeaways
- The Fill tool (keyboard shortcut G) edits either the fill or the outline of an object. Which area is currently being addressed is determined in the context toolbar.
- Gradients can be controlled directly on the object: Using handles and anchor points, you change colors, position, direction, and extent.
- Depending on the gradient type (linear, elliptical, radial, conical, or bitmap), different color transitions are created.
- The Transparency tool (keyboard shortcut Y) changes only the opacity, not the color.
Step-by-Step Guide
Finding the Two Tools
The Fill tool sits in the toolbar behind its own icon and can be accessed fastest with the keyboard shortcut G. You can also reach the Transparency tool via the toolbar or with the shortcut Y. Get used to these shortcuts early, because you will switch between the two tools very often when designing.

Preparing a Test Object
First, create an empty document and place a black rectangle as the background in the Layers panel. Then use the Rectangle tool to draw a second rectangle. By default, this is filled with white and has no outline, which you can see from the color display at the top. You will work with this rectangle in the following steps.

Distinguishing Fill and Outline
Now select the Fill tool. In the context toolbar at the top, you will find a menu that is set to Fill by default. If you click it, you can choose Outline instead. This is exactly where you decide whether your changes affect the inner area or the edge of the object. Make sure to check this setting before every edit, otherwise you will accidentally change the wrong area.
Setting Outline Color and Outline Width
Set the menu to Outline and choose a strong red as the outline color. Then set the width, in the example 6.2 pt. The rectangle now has a white fill and a red border. If you then switch back to Fill, you are again editing only the inner area and leaving the outline unchanged.

Changing a Solid Fill
Under the Type setting, the fill is initially set to Uniform. Click on the area and choose a different color, for example a shade of blue. Alternatively, you can achieve the same change via the color wheel, which you can use at any time while a layer is active. There, too, you select the desired fill color directly.
Assigning Color via the Color Wheel
The color wheel is especially handy when you want to quickly fine-tune a color from a gradient or a hue. Open it via the color panel as soon as the object is selected, and adjust the hue. The change takes effect immediately on the active fill.

Creating a Linear Gradient
Open the Type menu in the fill area. There you will find three options: remove the fill color completely, keep a uniform fill, or create a gradient. Choose Linear so that the rectangle transitions from white to a light gray. Afterwards, you can further adjust the colors of the gradient points.
Editing the Gradient Directly on the Object
The big advantage of the Fill tool is that you see the gradient directly on the object. Handles appear on the left and right, showing the start and end colors of the gradient. The midpoint lies in the center. If you drag these elements, you change the gradient immediately and without detours through menus. A detailed look at gradient editing can be found in my video on area outlines and gradients.

Adjusting Anchor Points and Colors
Click on the first anchor point. It is displayed larger, and you can assign a new color via the color wheel, such as the selected shade of blue. Then you select the second anchor point and give it a different color, for example a pink. Each anchor point determines the color at its location, and the gradient is created exclusively between these points. Outside the anchor points, the nearest color continues.
Moving the Midpoint
The midpoint shows exactly where the transition between the two colors lies. If you hover the mouse over it, a double-arrow icon appears. By clicking and dragging, you move it freely across the surface. This way you can let one color tone dominate earlier or later without changing the colors themselves.
Rotating Start and End Points
The handles can also be moved. Hold down the left mouse button on the end point and drag it to the desired position. If you place the end point at the top right and the start point at the bottom left, a diagonal gradient is created. In this way you rotate the entire gradient without rebuilding it.
Setting a New Start Point
You don't have to limit the gradient to the existing handles. Click anywhere on the surface, hold down the left mouse button, and drag the start point to the place where the gradient should begin. If an anchor point is located in the middle of the surface, the color of that point appears outside of it all the way to the edge.

Moving the Entire Gradient
If you want to move not just a single anchor point but the complete gradient, hold down the control key (Ctrl on Windows) and click on an anchor point. All anchor points in between move along, and the color distribution is preserved.
Rotating the Gradient in 90-Degree Steps
In the context toolbar there is a button for rotating the gradient. Each click rotates the gradient by 90 degrees. In the video, the gradient is first set from left to right and the start point is placed in the center. Then the gradient rotates upward, and with further clicks it continues accordingly. This method is suitable when you need an exact direction without having to work precisely with the mouse.
Reversing Gradient Colors
If a gradient should run exactly the other way around, for example from pink to blue instead of from blue to pink, click the Reverse Gradient button in the context toolbar. The colors are swapped, while position and shape are preserved.
Creating Elliptical Gradients
If you switch to Elliptical in the Type menu, a gradient with an oval shape is created. Here too there is a midpoint that you can move to the right or left. The end points can be dragged to the edge, which stretches or compresses the ellipse. If you overdo it, a very narrow ellipse is created, which can be an interesting design element.

Radial Gradients and Conical Variants
For a circular gradient, select the Radial option in the Type menu. The shape cannot be freely distorted, only enlarged or reduced. You move the midpoint by grabbing the small vertical line in the middle. With a click on Reverse Gradient, you swap the colors here as well. According to the instructor, you will use the Conical type rather rarely, but it is worth a look to know the possibilities.

Using a Bitmap Fill
In the Type menu you will also find the Bitmap mode. It allows you to use an image file from your hard drive as a fill. Select the image, confirm with Open, and the surface is filled with the image. Afterwards you can shrink or compress it to adjust the display.

Setting Edge Behavior for Bitmap Fills
With reduced images, edge areas arise that must be filled differently. For this, the Extend section offers the options Wrap, Mirror, Repeat, and Null. Wrap and Repeat continue the image at the edges, Mirror creates a mirrored pattern, and with Null the edges remain empty. For an even fill, the default color white proved to be the cleanest solution in the video.

Preparing an Image for the Transparency Tool
Now you switch to the Transparency Tool. To do this, drag an image into Affinity Designer via drag and drop and shrink it until it fills the background well. Then move the image layer beneath the rectangle so that the image lies behind the shape.

Creating a Transparency Gradient
Select the Transparency Tool using the keyboard shortcut Y and select the rectangle. Click on the object and drag the mouse in the desired direction. This creates a gradient from opaque to transparent, through which the image behind becomes visible.

Understanding the Difference from the Fill Tool
The distinction is important: The Transparency Tool does not define a color gradient, but only controls the opacity. In the context toolbar, you see an opacity of 100 percent on the left and an opacity of 0 percent on the right. You cannot select a color here. If in doubt, these values help you set the gradient precisely.

Adjusting the Handles and Midpoint of the Transparency Gradient
The transparency gradient also has handles and a midpoint. You can move them directly on the object or influence them via the menu. The principle is similar to editing with the Fill Tool, so you will find your way around quickly.
Creating a Radial Transparency Gradient
In the Type menu, besides Linear you can also choose Radial. This creates a circular transition from opaque white to transparency. By the way, you do not define the color here, but via the color fill of the rectangle itself. If you activate the Move Tool for this, click on Fill and choose a different color, the transparency gradient changes accordingly.
Checking the Effects on the Stroke
The Transparency Tool does not only affect the fill, but can also influence the stroke of the object. Therefore, make sure that the stroke opacity suits your design, and check the result on the object.

Summary ??? Affinity Designer Fill Tool and Transparency: Using Gradients Purposefully
You have now seen how to control colors, strokes, and gradients directly on the object with the Fill Tool. Handles, anchor points, and midpoints give you intuitive control, while the context toolbar provides rotating, reversing, and the gradient types. With the Transparency Tool, you purposefully change the opacity and thus place images or shapes subtly beneath other elements. Practice the shortcuts G and Y so that you can switch quickly between the tools and implement your designs swiftly.
FAQ
With which keyboard shortcut do you open the Fill Tool?You open it with the keyboard shortcut G; you reach the Transparency Tool with Y.
How do you change the stroke color of an object?Select the Fill Tool, switch the menu in the context toolbar from Fill to Stroke, and set the color and width.
What is the difference between the Fill Tool and the Transparency Tool?The Fill Tool determines colors and gradients, while the Transparency Tool only changes the opacity.
How do you rotate a gradient precisely?Use the button in the context toolbar, because each click rotates the gradient by 90 degrees.
How do you move the entire gradient including anchor points?Hold down the Control key (Ctrl on Windows), click on an anchor point, and drag the gradient to the desired position.


