
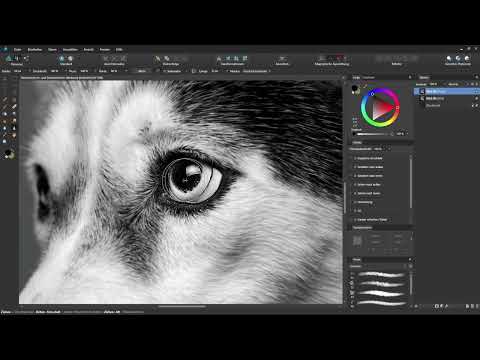
Imagine you've designed a layout with several photos, and of all things, your dog's eye looks dull, while the rest of the image looks right. That's exactly what the Pixel Persona in Affinity Designer offers two tools for: the Sharpen Tool and the Blur Tool. With them, you edit only the areas of a photo that really need it, and thereby guide the viewer's gaze in a targeted way. In this tutorial, I'll walk you through both tools step by step, show you the most important settings, and explain what you should pay attention to so that the result looks natural.
The video is only loaded from YouTube when you play it – data (including your IP address) is then transmitted to YouTube/Google. More in the privacy policy
Key Takeaways
- The Sharpen and Blur Tools only work on pixel layers. You therefore have to rasterize the layer first.
- Don't work directly on the original. A duplicated layer preserves your source image.
- The "Unsharp Mask" mode usually delivers the most natural results when sharpening.
- Flow, hardness, and brush size determine how strong and how soft the effect is. It's better to apply corrections in several thin layers rather than overdoing it with a single stroke.
- With the Blur Tool, you guide the eye by blurring edge areas and making the main subject appear sharper.
Step-by-Step Guide
Step 1: Open the Pixel Persona
Before you get started, switch to the Pixel Persona. The tools for sharpening and blurring are available there. In the video, the image is already in this persona, and the photo is present in the Layers panel as an image layer.

Step 2: Duplicate and Rasterize the Layer
Work non-destructively, meaning don't change the original directly. Select the image layer and press Ctrl + J. This creates a copy that you work on. Then right-click the copy and choose the option to rasterize. Only after that is the layer a pixel layer on which the sharpen and blur tools take effect.
Step 3: Zoom In and Find the Tools
Now zoom into the image so you can cleanly edit details like your dog's eye. You'll find the two tools in the toolbar. The Blur Tool and the Sharpen Tool are stored in a shared group. Hold down the icon or click on it to switch between them.

Step 4: Activate the Sharpen Tool
First, select the Sharpen Tool. The context toolbar above the document then changes and shows you all the settings for the tool. Here you determine how the brush works.
Step 5: Set the Brush Settings
In the context toolbar, you can adjust several parameters. The width determines the size of your brush. The opacity controls how transparent the effect is. The flow determines how much effect is produced with each stroke. The hardness determines how sharply the edge of the brush tip is defined. The lower the hardness, the more softly the effect blends into the image area.
Step 6: Select the Sharpening Mode
In the dropdown menu of the context toolbar, you'll find various modes for sharpening, including Clarity, Unsharp Mask, and Harsh. Try them out yourself and decide which result you like best. For this example, I'm using "Unsharp Mask" because this mode pleasantly emphasizes the contours of the eye without making them look artificial.
Step 7: Edit the Area with the Brush
Now paint over the desired area, in this case the eye. The sharpness builds up gradually. If the effect isn't sufficient after one pass, place the brush again and paint over the same spot once more. You'll notice that the edge areas become increasingly sharper in the process.

Step 8: Avoid Overdoing It
Be careful not to overdo it. If you paint over the same spot too often, the result quickly looks unnatural, and unsightly artifacts appear, meaning distracting image errors. If that happens, simply undo the last step with Ctrl + Z and then proceed more carefully.
Step 9: Fine-Tune with Flow and Brush Size
To work more carefully, reduce the flow in the context toolbar. This makes each stroke weaker, and you can build up the sharpness bit by bit. You can also make the brush tip smaller to selectively sharpen small details such as the eyelashes or the iris. This way you achieve precise editing without changing the rest of the photo.
Step 10: Improve the sharpness gradient with a softer tip
A hardness of 80 percent is often too hard for sharpening, because the transition between the edited and unedited area then becomes visible. Therefore, set the hardness lower so that you get a softer brush tip. The edge of the brush tip will then produce a nicer sharpness gradient. Then paint over the area again. Feel free to take your time with this, as that is how the editing turns out best.

Step 11: Use the Blur tool
The Blur tool works similarly to the Sharpen tool, but has the opposite effect. You select it in the toolbar and set the width, hardness, and flow in the context toolbar. With blurring, you can soften the edge areas of a subject so that the eye stays on the sharp main subject.
Step 12: Control the flow when blurring
Flow also plays a crucial role when blurring. At 100 percent, the area becomes very blurry after just a few strokes. If you reduce the flow, for example to 15 percent, each stroke has a much weaker effect. You can then paint over the same areas more often and build up the blur very carefully. This approach is especially helpful when you want to subtly tone down certain parts of a photo.
Summary – Affinity Designer: Selectively Sharpen and Blur Areas
With the Sharpen tool and the Blur tool in the Pixel Persona of Affinity Designer, you control which areas of a photo get the attention. Always work on a rasterized copy, choose suitable settings for flow, hardness, and brush size, and apply your changes gradually. This keeps the result natural, and your design looks balanced and professional.
FAQ
Why do I need to rasterize the layer before sharpening?The tools work directly on pixel data, and only rasterized pixel layers provide these pixels for editing.
Why should I create a copy of the layer?The copy protects the original image, so you can return to the unchanged source material at any time.
Which sharpening mode is best suited for photos?The "Unsharp Mask" mode works well for many photos because it emphasizes contours without making them look artificial. However, try all modes, as which one fits best depends on the subject.
What should I do if unattractive artifacts appear after sharpening?Undo the last steps with Ctrl + Z, reduce the flow, and work with several careful strokes instead of a few strong ones.
Why is the hardness of the brush tip important?A lower hardness creates a softer transition at the edge of the brush, so the effect blends more harmoniously into the image.
How do I achieve a subtle blur with the Blur tool?Reduce the flow, for example to 15 percent, and carefully paint over the area several times until the desired effect is achieved.


