
A flat square quickly looks boring. With layer effects, you give it depth, light, and structure without drawing every detail by hand. In this tutorial, you will get to know the most important layer effects in Affinity Designer and learn how to use them effectively, from blur and drop shadows to three-dimensional objects.
The video is only loaded from YouTube when you play it – data (including your IP address) is then transmitted to YouTube/Google. More in the privacy policy
Key Takeaways
- Layer effects are applied via the FX button in the Layers panel and can be edited at any time afterward.
- The most important effects include Gaussian Blur, Outer Shadow and Inner Shadow, Outline, Color Overlay, and 3D.
- The "Scale with object" option determines whether effects grow along when you enlarge the object.
- With fill opacity, you can make the shape itself transparent while shadows and highlights are preserved.
- You can save frequently used effects as a style and apply them later with one click.
Step 1: Create and duplicate a shape layer
Start with a new shape layer. Select the Rectangle tool and drag out a rectangle. If you also hold down the Shift key, a perfect square is created.

In the next step, you need several squares. Select the layer in the Layers panel and press Ctrl + J three times. This creates three copies, which initially lie exactly on top of each other. If you drag one of them to the right while holding down the Shift key, it stays in a straight line.
Step 2: Distribute the squares evenly
To make sure the spacing between the squares is identical, first select the top layer. Hold down the Shift key and click the bottom layer. All layers in between are automatically selected as well.
Then open the "Arrange" menu in the toolbar and choose the "Distribute horizontally" option. The squares now align evenly.

Step 3: Open the Layer Effects dialog
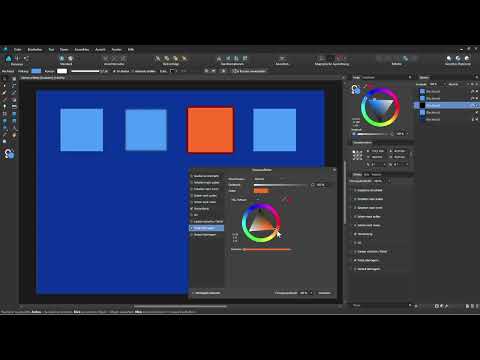
Select the first square. In the Layers panel, you will see the layer highlighted as well. Click the small FX button at the bottom. The Layer Effects dialog box then opens.
On the left side, you will find all available effects. On the right side, the settings for the currently selected effect appear. You can switch between effects at any time and watch the preview effect directly on the object.

Step 4: Create soft edges with Gaussian Blur
Activate Gaussian Blur on the left side. On the right, move the Radius slider to the right. The square gradually becomes softer, and the edges blend gently into the background. This effect is particularly suitable for glows, fog, or soft transitions. You can deactivate it at any time by removing the checkmark.

Step 5: Create an outer drop shadow
For a square with a drop shadow, choose the "Outer Shadow" effect. At first the shadow is invisible because the radius is at zero pixels. If you increase the radius, the shadow becomes visible at the edge.
With the "Opacity" slider, you determine the darkness. At 0%, the shadow disappears completely; at 100%, it is jet black. A medium value looks most natural in most cases.
With the offset, you move the shadow out of its position behind the object. With the angle, you set the direction. The blue line in the preview shows you in which direction the shadow moves. If you want the shadow directly behind the square again, reset the offset to zero. With the size, you can additionally enlarge the shadow, which makes it look darker and more present. You can also adjust the color, but black usually works best here.
Step 6: Use an inner shadow for depth
For the second square, you can use the "Inner Shadow" effect. Here too, you adjust radius and opacity. The impression is created as if a hole had been punched into the background. In this case, you usually leave the offset at zero so that the shadow lies evenly along the inner edge.
Step 7: Applying Outlines and Color Overlays
The third square gives you the option of creating an outline directly using the "Outline" layer effect. By the way, this also works with photos. Choose a radius and a color, for example a strong red, and specify where the outline should sit. With "Outside," it grows outward from the edge, with "Center" it is distributed on both sides, and with "Inside" it lies within the object.
The advantage of this method becomes apparent when you already have an outline via the fill and the normal stroke. This way you can combine two outlines, such as a white one on the inside and a red one on the outside. You set the normal stroke at the top via the shape properties, and the additional outline via the layer effects.

In addition, you can replace the fill color with the "Color Overlay" effect. Choose an orange tone, and the light blue is replaced. With the opacity, you blend the new color with the original. Alternatively, you can choose a different blend mode, similar to the layer blend modes. This is especially useful with photos. If you set the mode to "Soft Light," the image looks warmer.
Step 8: Creating a Three-Dimensional Relief
In the last square, you activate the "3D" effect. With the width, you determine how wide the three-dimensional edge should be. Highlights appear at the top right and shadows at the bottom left, provided the light comes from the top right.
You move the light source using the white circle in the preview. If it is at the top left, the highlights appear at the top left and the shadows at the bottom right. If you place the light source in the center, the object looks particularly bright. In addition, you can adjust the radius, the opacity, and even the color of the highlights.
Step 9: Combining 3D with the Vector Brush
The 3D effect also works with freely drawn shapes. To do this, select the Vector Brush in the toolbar, set white as the fill color, and simply paint into the image. A new curve layer is created. Then, with the layer active, open the layer effects and activate 3D. Adjust light, radius, and shadow until you like the result.

Step 10: Using Fill Opacity for Plastic Effects
Via the layer effects, you can also control the fill opacity. If you set it from 100% to 0%, the white disappears, but highlights and shadows are retained. The background shines through. This creates the impression of a thick, transparent substance, such as jelly or glass. Then change the background color, and the object adapts to its surroundings.
Step 11: Understanding the "Scale with Object" Option
At the bottom of the layer effects, you will find the "Scale with Object" option. It is disabled by default. Without this option, an outline stays the same thickness when you enlarge the object. If you activate the option, the outline or shadow grows along with it. Which variant makes sense depends on your project. For shadows, activating it is usually helpful, as it preserves the proportions.

Step 12: Saving Effects as a Style
If you have invested a lot of time in an effect, it is worth saving it as a style. To do this, select the object. Open the Styles panel via View, Studio, and Styles if it is not visible. Click the small menu icon at the top and choose "Add Style from Selection." The new style appears with a preview and a name. With a right-click, you can rename it, for example to "Outline."

To apply the style to a new object, simply draw another square and click the saved style in the Styles panel. The square takes on the fill and outline. To delete a style, right-click it and choose "Delete Style." As a precaution, you will be asked once more whether you really want to remove the style.
Summary ??? Mastering Layer Effects in Affinity Designer: Shadows, Outlines, and 3D Look
Layer effects are a versatile tool with which you can enhance shapes and photos with little effort. You have learned to duplicate and evenly distribute objects, apply blurs and shadows, use outlines and color overlays, and create depth with 3D effects. Remember to keep an eye on the "Scale with Object" option and to save frequently used combinations as a style. The more often you experiment with the sliders, the faster you will find the right effect for your project.
FAQ
Can I change a layer effect afterwards?Yes, you click on the small effect icon of the layer in the Layers panel and thus reopen the settings.
How do I remove a layer effect again?Deactivate the effect in the Layer Effects dialog box by removing the checkmark, or delete it there using the corresponding option.
Why is my shadow not visible?Check whether the radius is greater than zero and the opacity is not set to 0%. Without a radius, the shadow remains invisible.
What does the "Scale with object" option do?It ensures that effects such as strokes or shadows grow proportionally when the object is enlarged.
Can I also apply layer effects to photos?Yes, effects such as stroke, color overlay, or shadow also work on pixel layers with photos.
How do I save an effect for later?Select the object, open the Styles panel, and click on the menu icon. There you choose "Add style from selection".


