
Do you know this? The image is perfect, except the subject is stuck on a background that just doesn't fit at all. In the past, that meant hours of cutting out with the brush or magic wand. Today, an AI does it in a few seconds. You just need to know where the functions are. In this guide, I'll show you three ways: you remove the background directly when creating an image in Adobe Firefly, you edit an existing image with the Quick Action in Firefly, or you use Adobe Express for additional design options.
The video is only loaded from YouTube when you play it – data (including your IP address) is then transmitted to YouTube/Google. More in the privacy policy
Key Takeaways
- Firefly can generate images using AI, but often does not deliver a transparent background.
- Via "Edit" and the "Remove background" option, you can cut out a freshly generated image directly in Firefly.
- For existing images, the "Remove background" Quick Action in Firefly is suitable, which accesses Adobe Express in the background.
- Adobe Express also offers options such as replacing the background with new scenes, for example a forest.
Step-by-step guide
Step 1: Open Firefly and generate an image
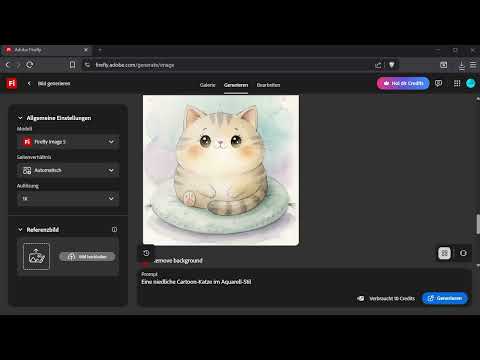
Open the website firefly.com in your browser. You can get started right there and create an image via text input. In the example, you enter a cute cartoon cat in watercolor style. You can adjust various settings here, but the prompt is enough for this run-through. Then click "Generate". After a short time, a variant of your image appears.


Step 2: Recognize the problem with the background
If you look at the generated image more closely, you'll quickly notice something. The background is not transparent, but white with a slight watercolor effect. So the AI doesn't deliver a cut-out subject, and that's exactly what you need for further design work. You therefore have to remove the background afterwards. But that's not a problem, because Firefly offers its own function for this.

Step 3: Remove the background of a freshly generated image
Click "Edit" on your generated image. At the bottom of the editing area, you'll find the "Remove background" option. Click on it. The image is then automatically cut out, without you having to work with any tools. The cat is then left without the white background, and you can use it right away.


Step 4: Cut out an existing image in Firefly
You don't always have to generate something new. Often you already have an image that just has a distracting background. For this, you go back to Firefly. There you select the Quick Action and find the "Remove background" item. After the click, the function takes over the work; the technology behind it comes from Adobe Express.

Step 5: Upload your own image
In the next step, you upload your image. In our example, it's the cat again. The interface switches to the Express area, where you see your image. Once it's uploaded, the background is automatically removed. You can recognize the result by the so-called grid pattern, which makes transparent areas visible.


Step 6: Use Adobe Express directly
If you want more options, go directly to express.com. There, too, you'll find the "Remove background" function at the bottom. Upload your image as usual. Afterwards, the right side shows you additional options that are not available in Firefly. You can download the cut-out image or place it on a new background.


Step 7: Insert a New Background
The real appeal lies in swapping the background. After you have cut out the subject, you choose a new background from the library. In the video, a forest is shown, for example, though the selection is practically unlimited. The cat suddenly appears in a completely different environment. If you like, you can then keep refining it in the editor, for example with text or adjustments.


Summary – Removing the Background with Adobe Firefly and Express
You have now learned three ways to remove the background of an image without tedious masking. First, in Firefly you can cut out a newly generated image via "Edit" and "Remove background". Second, the quick action in Firefly works for existing images. Third, Adobe Express offers you the widest range of design options, such as inserting a new background. Which way you choose depends on whether you are generating new images or editing existing ones.
FAQ
Do I have to generate an image in Firefly to remove the background?No. With the quick action in Firefly, you can also upload an existing image and have the background removed.
Why isn't the generated image transparent after the AI creates it?By default, the AI delivers an image with a background, in the example a white watercolor background. A transparent output is not provided, so you have to remove the background afterwards.
Where do I find the "Remove background" option for a generated image?Click on "Edit". At the bottom of the editing area, you will find the "Remove background" option.
What is the difference between Firefly and Adobe Express?Firefly is well suited for quick generating and cutting out. Adobe Express additionally offers features such as inserting new backgrounds and further design options.
How can I tell that the background has really been removed?A transparent area is displayed with a checkered pattern. If the background looks like this, it has been cut out.
Can I continue editing the cut-out image afterwards?Yes. In Adobe Express, you can download the image, place it on a new background, or keep editing it in the editor.

