A flash unit that mounts on the camera's hot shoe looks at first glance like a small device with lots of buttons. Once you understand its basic functions, you can control the light deliberately instead of leaving it to chance. In this guide, I go step by step through the most important settings directly on the flash unit: power, operating mode, flash sync speed, second-curtain sync, zoom reflector, and the indicator displays. The basic knowledge of these is the prerequisite for any controlled lighting.
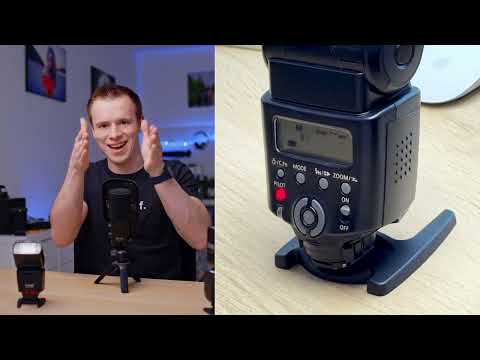
The video is only loaded from YouTube when you play it – data (including your IP address) is then transmitted to YouTube/Google. More in the privacy policy
Before you get started, take a look at your flash's manual. The operation is similar on most models, but buttons and menus differ in the details.
Key Takeaways
In manual mode, power is given as a fraction, such as 1/1 for full power or 1/16 for one sixteenth. The lower the fraction, the weaker the flash, the faster it recharges, and the shorter it fires.
In TTL mode, the flash takes over exposure metering automatically, while in manual mode you determine the power yourself. The HSS function enables shutter speeds that are shorter than your camera's flash sync speed.
Second-curtain sync ensures that the flash fires at the end of an exposure, which creates interesting effects, especially with moving subjects. The zoom reflector focuses the light depending on the focal length and thereby changes the range.
Step 1: Check the initial state and turn on the flash
Turn on the flash and look at the display. There you can see which mode it is currently working in. If it says "Manual", you have to set the power yourself. By the way, the camera can also control flash settings via its own menu, provided your flash supports this. This is handy if you can't reach the flash or want to change settings quickly.

Step 2: Read and set the power correctly
You can recognize the power by the fraction displayed. Full power corresponds to 1/1, while at 1/16 the flash emits only a tiny fraction of its strength. Use the buttons on the device to set the desired value. Hold down the button in the middle to switch between values more quickly. This way you quickly reach the desired brightness without searching for long.

Step 3: Understand the guide number as a point of reference
The guide number describes the performance of a flash. It is specified at full power, about 43 in the example of this flash. The higher the guide number, the more light the flash produces and the farther it reaches. For practical purposes, this rough idea is enough. If you use several flashes with different power levels, keep in mind that identical settings on different models do not produce the same brightness.

Step 4: Switch between manual and TTL
Use the mode button to switch between manual mode and TTL. With TTL, the flash measures the light through the lens and adjusts the power automatically, partly in coordination with the camera. In manual mode, the power stays as you set it. For getting started, it is recommended to use manual mode first, because then you can understand how each change affects the image.

Step 5: Activate HSS for short shutter speeds
When you work with very short shutter speeds, for example to keep the aperture open in sunlight, you run into the flash sync speed. This is the shortest shutter speed at which the camera still fully exposes the sensor for the flash. The reason lies in the focal-plane shutter: it travels across the sensor, and at very short times the entire surface is no longer open at the same time.
With the HSS function, which some manufacturers also call High-Speed Sync, the flash emits a series of short pulses that last as long as the exposure time. This illuminates the entire image evenly. The price for this is a significantly higher power requirement, which is why the range decreases and the flash uses up energy faster.

Step 6: Avoid black bars in the image
If black bars appear in your image, the exposure time has fallen below the flash sync speed. You have two options: either set a longer exposure time, such as 1/200 or 1/250 of a second, or activate HSS mode on the flash. Which solution is right depends on your subject and the lighting conditions.

Step 7: Activate the Second Shutter Curtain
The second shutter curtain causes the flash to fire just before the end of the exposure rather than right at the beginning. With long exposure times, this creates an appealing effect: moving subjects look blurred, but are briefly frozen sharp at the end. Set this function on the flash if you want to combine a motion trail with a sharp finish.

Step 8: Use the Zoom Reflector Correctly
The zoom reflector is located in the head of the flash and changes how far the light spreads. With a wide zoom setting, the flash scatters light broadly, which is suitable for wide-angle shots. With a narrow setting, it concentrates the light more and reaches distant subjects better. The setting can concentrate the output, but it is not magic: the light cone does not simply become dark just because you zoom in more.
Some flashes automatically set the zoom to match the lens when they communicate with the camera. With others, you have to set the focal length manually. One example would be the range from 24 to 105 millimeters, which you can select on your flash.

Step 9: Check Function with the Test Button
The test button triggers a short test flash without you having to take a photo. This is handy for quickly checking whether the flash is switched on, whether the battery has enough energy, and whether everything is working. You can also operate the button blindly, without looking at the display. For flashes triggered by photocell or radio, the test is also helpful.

Step 10: Understand the Indicator Lights
A green light on the flash lights up when TTL is active and the exposure worked correctly. If it blinks or does not light up, the flash may have had too little power. In manual mode, it stays dark. The red light shows you that the flash is fully charged. The more power the flash emits, the longer recharging takes. These two indicators help you assess the state of the flash at a glance.

Step 11: Reduce Power for Fast Image Series
Here lies a major advantage of manual power control. When you lower the power, the flash recharges much faster and can therefore fire at shorter intervals. With a setting of 1/16, you can easily take several shots in a row while the flash is already recharging in the background. At the same time, the flash duration becomes shorter, which can help freeze fast movements. However, you must be prepared to give up range and brightness for this.

Step 12: Operate the Second Flash
When you work with multiple flashes, the controls often differ only slightly. With a second model as well, you will usually find the power control, the zoom, the test button, the indicators, and the mode switch. Some flashes additionally offer an internal radio receiver, with which they can work as a slave or master. If your model has no TTL function, this mode logically cannot be activated either. If anything is unclear, consult your device's manual.

Summary ??? Setting Up a Speedlight: Mastering Power, Modes, HSS, and Zoom
You have now learned about the most important basic functions of your speedlight. You control the power via the fraction setting, where smaller values make the flash weaker but ready for use more quickly. With the mode switch, you change between manual and TTL. For short exposure times, you activate HSS; for long exposures, the second shutter curtain can provide creative effects. The zoom reflector adapts the light distribution to your focal length, and the test button as well as the indicator lights give you quick feedback on the state of the flash. With this knowledge, you can direct the light deliberately instead of simply accepting it.
FAQ
How can I tell if my flash is working in manual mode?The display usually shows "Manual" or "M". Then you determine the power yourself.
What does the fraction 1/16 mean for the power?The flash only emits one sixteenth of its maximum power. As a result, it recharges faster and fires for a shorter duration.
Why are there black bars visible in my photo?The exposure time is shorter than your camera's flash sync speed. Lengthen the exposure time or activate the HSS mode on the flash.
When should I use HSS?HSS is suitable for short exposure times, such as in bright daylight or with a wide-open aperture. Note that the flash requires more power in this case and has a shorter range.
What does the second curtain sync do?The flash fires at the end of the exposure. Moving subjects thus get a motion trail, and the flash freezes the final moment sharply.
Do I have to set the zoom on the flash manually?That depends on the model. Some flashes detect the lens via the camera, while with others you have to set the appropriate focal length yourself.
What is the test button for?It triggers a short test flash. This way you check whether the flash works and has enough energy, without taking a photo.
What do the green and red lights mean?With TTL, the green light indicates that the exposure worked. The red light comes on as soon as the flash is fully charged.


