
An off-road vehicle in a dusty desert landscape looks credible only if perspective, light and edges fit together. That is exactly where many composites fail. In this tutorial I'll show you how to separate a Land Rover from its background, change the paint color, match the tonal values to the surroundings and place it on a road so that it actually seems to sink into it.
The video is only loaded from YouTube when you play it – data (including your IP address) is then transmitted to YouTube/Google. More in the privacy policy
This tutorial is aimed at anyone who wants to deepen their image editing skills in Photoshop. You need basic knowledge of working with layers, masks and selections. All steps can be followed along with the original course material.
Key Takeaways
A good composite starts with the shot. The viewing angle of the photo must match the later perspective in the background, otherwise the result can hardly be saved.
Curves replace color corrections when you only want to make things brighter. You brighten the paint without recoloring it, and you keep the reflections under control.
Smart objects allow later changes. Size, color and curves remain editable as long as you don't destroy the object.
The curve of the road guides the eye. The vehicle should be placed so that the viewer notices the curve and then lingers on the vehicle.
Masks are your most important tool for sinking it in. With a soft or hard brush on the layer mask, you determine how deeply the car disappears into the sand.
Step-by-Step Guide
Step 1: Choose the Right Shot
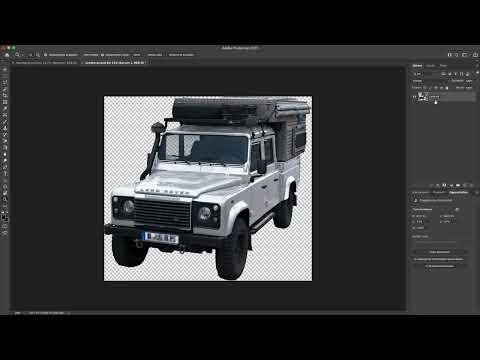
Before you even start working in Photoshop, it's worth taking a look at the source material. The Land Rover was photographed from a height of about 2.70 meters, with a distinct top-down view. This perspective is no coincidence: the vehicle is later supposed to sink in more at the front than at the back, and for that you need a sufficiently steep view of the hood. The side view additionally shows the shape of the car, so that it remains recognizable as a car and doesn't just look like a flat silhouette.
With your own shot, make sure that the viewing angle and height roughly match your background perspective. A camera at eye level and a car seen from a bird's-eye view would otherwise be a contradiction.

Step 2: Cut Out the Land Rover
Cutting out is the most laborious part, but it can be sped up with a trick. In the video, the contours of the vehicle are already prepared as an outline. Hold down the Command key (Mac) or the Control key (Windows) and click into the outline. The selection is created immediately. Then switch back to the layer view and create a layer mask from the selection. The car is thus separated from the background with one click.
If you want to practice cutting out yourself, you can of course do that manually as well. For this tutorial, however, the prepared outline is the faster and cleaner option.

Step 3: Determine the Paint Color
The choice of color is a creative decision. The tutorial author recommends white, because it blends neutrally into the warm desert color scheme and doesn't overpower the landscape. But you could just as well choose olive green or a bold red. Gray paint surfaces are easy to recolor. It becomes harder to turn dark gray into a bright white, and exactly this case is covered in the next step.

Step 4: Isolate the Paint Parts
To brighten only the paint and not the windows, rubber parts or chrome, you must first deliberately select the painted surfaces. To do this, open the Channels panel and click on the channel containing the paint parts. Hold down the Command or Control key again and click the channel so that the painted surfaces are loaded as a selection. Then switch back to the RGB channel to continue working with the selection. The selection remains active, and you can apply the next correction directly.

Step 5: Brighten with Curves
If you don't want to recolor the paint but only make it brighter, you don't need a color balance. Instead, add a Curves adjustment layer. In the upper quarter of the curve, pull the highlights upward. The paint becomes visibly brighter, but the reflections also increase disproportionately, and that quickly looks fake.
Therefore, you also pull the lower area of the curve, i.e. the shadows, up a bit. The rule of thumb: pulling on the lower part makes the paint whiter and less reflective, while pulling on the middle part makes it whiter and more reflective. Find a compromise where the car looks white without shining like chrome.

Step 6: Refine panel gaps (optional)
Brightening the curves can make the gaps between body parts stand out too much. This is a typical side effect. If you want to work cleanly, use a small brush with black paint on the mask of the curves layer to take these lines back. For small deviations, however, it's not dramatic, and you can also skip this step.

Step 7: Place the car in the landscape as a smart object
Before you move the car into the landscape, convert it into a smart object. This has a big advantage: you can adjust the curves, the color and the size at any time afterwards by opening or transforming the smart object. Name the layer sensibly, for example "Land Rover".
Then drag the smart object into your landscape image with the Move tool. First place it over the horizon, because the car is supposed to stand on the road and not in the background. Light and size don't match at this point yet; this will be corrected in the next steps.

Step 8: Match size and position
You determine the size with Command plus T, i.e. Transform. At the center point you can see the cross of the smart object, with which you can shrink and enlarge it as desired. A width of a little over 2000 pixels serves as a rough guide. If the car looks too small, it is often only because its position is too far back. In that case, move it further forward.
Also make sure to place the car at an angle. It is supposed to sink into the road, so the perspective must be right. Position and size involve a compromise that can only be found by trial and error.

Step 9: Create the perspective without the Vanishing Point filter
Many tutorials work with the Vanishing Point filter here. In this landscape, however, there are not enough reference points for it to work reliably. Instead, rely on the lane width of the road and the distance between the two road boundaries. Use these as a guide when scaling down, rotating and moving.
An important point: the car must remain clearly recognizable in the image. It is the point of reference, and the road curve on the right side leads the eye exactly there. If the viewer understands the curve, they see the car as the destination. Therefore, rather shrink the car a bit so it doesn't become too dominant, and leave it in its position.

Step 10: Control the sinking with a layer mask
Now it's about the sinking. Add a layer mask to the smart object and take a hard brush, since it doesn't need to be soft. Black on the mask hides the car, white keeps it visible. The goal is for the front headlight to just barely peek out above the asphalt, while the other one may sit a bit lower.
If the front part has sunk in more, the side up to the running board should disappear in the sand and part of the rear wheel should also be stuck in the asphalt. This decision is up to you. You can correct the mask at any time until the result is convincing.

Step 11: Fine-tune the final position
Toward the end, you check the overall effect. A vehicle being pressed into the asphalt needs enough space on the road so that the headlights remain clearly visible later. Move the car down with the Move tool until this space is created, and place it at a spot that fits the curve.
The question of left-hand traffic is secondary here. The car is a left-hand-drive vehicle, so it could drive on the right side, but the image thrives on atmosphere. Decide by feel.

Summary ??? Cutting out a Land Rover and placing it into the desert road with Photoshop
You have learned how to cut out a Land Rover using an outline, brighten its paint using tone curves, and place it as a smart object into a desert road. You match the perspective through size, tilt, and position, while the curve of the road guides the eye to the car. With a layer mask, you control the sinking in. When you combine these steps, the result is a composite that convincingly blends light, shape, and environment.
FAQ
Do I have to use the outline selection?No, you can also cut out the car manually. However, the prepared outline saves a lot of time.
Why should I use smart objects?Smart objects remain flexible. You can change size, color, and curves at any time later without losing quality.
Can I also change the paint to a different color?Yes, gray is easy to recolor. White is somewhat more complicated, because you have to raise tonal values with tone curves.
What do I do if the car is too reflective?In the lower area of the tone curve, pull the shadows upward. This makes the paint whiter, but less reflective.
Why doesn't the course use a vanishing point filter?The landscape offers too few reference points for the perspective. The track width and the road boundaries are more reliable orientation aids.
How do I achieve the sinking in of the vehicle?With a layer mask and a hard brush, you hide parts of the car. At the front, it sinks in deeper than at the back.

