
A wide landscape often gains depth simply through its perspective. With a targeted accent of light on the horizon, however, this effect can be enhanced even further. In this tutorial, you will learn how to brighten a narrow strip on the horizon so that the viewer's gaze seems to wander further into the distance. To do this, you combine masking with the brush, a merged layer, the Camera Raw filter, and layer masks. The effort is manageable, but the effect on the overall image is significant.
The video is only loaded from YouTube when you play it – data (including your IP address) is then transmitted to YouTube/Google. More in the privacy policy
Key Takeaways
- A brightened horizon strip enhances the spatial effect of a landscape.
- You work on a merged copy in a smart object, so you can return to the Camera Raw filter at any time.
- Layer masks control precisely where the effect applies. A black mask hides everything, while white brush strokes reveal the effect again.
- You edit distracting elements such as vehicles or poles specifically so that they are not unnaturally affected by the haze.
Step-by-Step Guide
Preparation: Masking out the vehicle on the horizon
Before you edit the horizon, you should cleanly mask out the vehicle in the background. To do this, select a soft brush using the brush function and reduce its size significantly. With black color and 100% opacity, you then remove everything that is not needed in the image. The road in the background can safely disappear. It gets lost in the landscape anyway, and the focus should be on the car and the horizon. Feel free to go over it with several brush strokes until the edges are clean.

Once the vehicle is masked out, you can later insert it into an emergency vehicle at the top. This is an intermediate step that makes later corrections easier for you.
Creating the horizon strip as its own layer
Next, you need a strip that you can make brighter. To do this, you merge all visible layers into a new layer without losing the original layers. On a Mac, press Shift, Alt, Command, and E simultaneously. On Windows, the key combination is Shift, Ctrl, Alt, and E. It is best to name the new layer right away with a fitting name like "Horizon" so that you keep track later.

Creating a smart object and opening the Camera Raw filter
So that you can readjust the effect at any time, first convert the new layer into a smart object. Then open the Camera Raw filter via the Filter menu. There you edit the layer with the sliders until the mood is right. Be careful not to overdo it. You can reopen and adjust the settings at any time later.


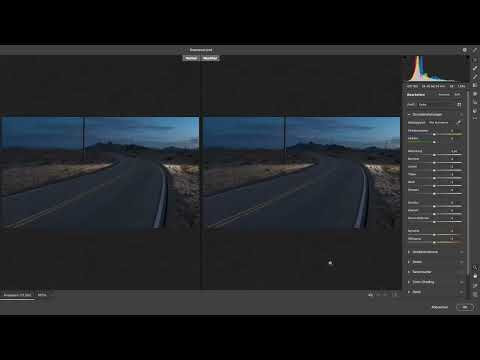
Using the before-and-after comparison for tonality
When working in the Camera Raw filter, it is easy to lose touch with the original. A helpful trick is the before-and-after comparison, which you can find at the bottom of the window. With it, you can immediately see how far you have moved away from the original tonality. At first, both images look almost like two different photos. This is due to the strong contrast between light and dark areas. In fact, however, it is the same image.

Using haze selectively
You probably know the "Dehaze" slider as a tool for removing haze from photos. Here you use it in exactly the opposite way, to add haze. This fits the idea of softening the horizon and creating depth. Do not set the value too high. As a guideline, a value of around 30 is enough. You can readjust at any time later if the effect seems too weak or too strong.

Creating a black layer mask
Now you make sure that the effect does not apply to the entire image. To do this, hold down the Alt key and click on "Add layer mask". The mask is then completely black and hides the effect entirely. Next, choose a soft white brush with an opacity of about 30 percent. With this brush, you paint the desired brightness only where the horizon should run.

Painting brightness into the horizon area
At first, you will hardly see any difference while painting. That is normal. Toggle the layer on and off to check your progress. You will notice that the area in the background has become brighter. The brighter the strip becomes toward the back, the stronger the sense of depth in the image. Make sure the transition stays soft and doesn't look like an artificial bar of light.

Strengthening the effect in the Camera Raw filter
If the effect is still not strong enough for you, open the Camera Raw filter again and increase the settings. In the example, the Dehaze slider was raised to a value between about 40 and 44. The result already looks much better. Still, it is worth refining it once more in a targeted way afterwards, because the view in the landscape reaches especially far into the distance.

Fine-tuning the horizon with a small brush
Select the layer mask again and make the brush smaller. This way, the brightening mainly affects the horizon. Even if individual corrections seem insignificant at first glance, together they make the difference. An image looks more thoughtfully crafted when many small details work together harmoniously. After this fine-tuning, the depth of the image becomes clearly visible.

Excluding the pole from the haze
There is one detail you should not overlook. The pole in the foreground has also received haze, even though it is very close to the viewer. That looks unnatural. Therefore, mask it out again. Use black paint at 100 percent opacity and a small brush for this. Go over the pole several times until it is completely free of the effect.

Clean edges and finishing
Finally, refine the edges of the pole with a somewhat harder, smaller brush. Go up and down several times until the transition looks clean. Once the pole is evenly isolated, you can consider the editing of the landscape largely complete. At the end, check the result once more in a before-and-after comparison.

Summary – Brightening the horizon for more depth in landscape photos
With a purposefully brightened horizon strip, every landscape gains a stronger spatial effect. To do this, you create a merged layer, convert it into a Smart Object, and edit it in the Camera Raw filter. With a black layer mask and white brush strokes, you control the brightening precisely. Don't forget to edit distracting elements such as vehicles or poles separately. This keeps the image coherent and natural.
FAQ
Why should I only brighten a narrow strip at the horizon?A narrow strip draws the eye into the distance and enhances depth without making the whole image look unnatural.
Why do I work with a Smart Object?A Smart Object allows you to reopen the Camera Raw filter at any time and adjust the settings afterwards.
What does the before-and-after comparison offer?It shows you how far you have moved away from the original tonality and helps you not lose the connection to the original image.
Why do I use the Dehaze slider to add haze?Haze strengthens the impression of distance. This makes the horizon look farther away, and the image gains depth.
Why does the layer mask start out black?A black mask completely hides the effect. With white brush strokes, you can selectively reveal it where it is needed.
Why should I exclude foreground objects from the haze?A pole or another nearby object must not receive haze, as it would otherwise look unnaturally blurry.

