

If you bring back many individual photos with a horizon and landscape from a vacation, a panorama is often worthwhile. With Adobe Camera Raw and Photoshop, you can turn them into a wide overall image that shows the situation on site much better than any single shot.
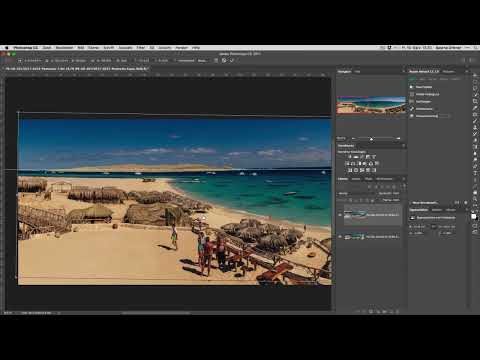
The video is only loaded from YouTube when you play it – data (including your IP address) is then transmitted to YouTube/Google. More in the privacy policy
Introduction
In this tutorial, I will guide you through the complete workflow: from selecting the individual images, through merging them in Camera Raw, to post-processing in Photoshop. You will learn how to straighten the horizon, edit areas with the Clone Stamp, and fill in missing edges using Content-Aware Fill. In the end, you will know what to look out for when checking a panorama before you have it exposed or print it.
Key Takeaways
Select all individual images and open them together in Camera Raw before you merge them into a panorama.
Remove disruptive effects such as vignetting from the presets before you calculate the panorama.
Check the results when choosing the projection. Cylindrical works reliably for many landscapes, perspective not always.
Straighten the horizon in Photoshop with the Transform tool and a guide.
Use the Clone Stamp for fine work and Content-Aware Fill for larger, uniform areas such as sky or sand.
Step-by-Step Guide
Select individual images and open them in Camera Raw
The first step is quickly done. In Bridge or in the file folder, select the first image, hold down the Shift key, and click the last image of the series. Then open the selection in Adobe Camera Raw. Make sure that really all shots of the panorama are included, otherwise image areas will be missing later.

Apply preset and remove vignetting
Now apply your preset to all selected images. To do this, select all images with Ctrl+A or Command+A and click the preset. Be sure to check the settings, because my preset contained vignetting. This is counterproductive for a panorama because it creates dark transitions at the image edges. Therefore, remove it in the lens corrections before you continue. Camera Raw and Photoshop could often calculate it out themselves, but clean preparation makes the program's work easier.

Match exposure
Next, check the exposure of the individual shots. In my example, I reduced the exposure by about -0.3. This makes the transitions between the images look more even. As a rule, you don't need to change more on the individual images, because the panorama calculation often compensates for small differences by itself.

Create the panorama and check the preview
Select all images again and choose the function "Merge to Panorama" in the menu. Camera Raw loads the shots and calculates the preview. With a very large number of images, this takes a moment. The preview already shows you whether the result basically works.

Auto crop and choose projection
Activate the "Auto Crop" option so that Camera Raw cuts away the irregular edges. You can still adjust the result later in Photoshop. For the projection, various options are available. With a landscape like in this example, cylindrical and spherical usually hardly differ. The perspective projection can look very good or bad depending on the subject and often takes significantly longer. If it is not valid for the image group, as happened here, simply choose the cylindrical projection.

Merge the panorama and save as DNG
If you like the result, click "Merge". Camera Raw asks you for a save location. The panorama is created as a DNG file that you can continue to edit. Then open it in Photoshop to do the fine work.

Straighten the horizon with the Transform tool
In Photoshop, you will often notice first that the horizon is crooked or that the image has a slight curvature. To fix this, draw a guide line along the horizon, preferably at a spot that must clearly be straight. If the line runs differently on the left and right, you know that the image needs to be rotated. Now select the Transform tool, rotate the image carefully, and repeatedly compare the line with the horizon. For larger rotations, it can be useful to shrink the image a bit beforehand so that you can keep the edges better in view.

Correct the curvature with the Rectangular Marquee and the Clone Stamp
After rotating, areas that do not fit together cleanly often appear. A typical example is a slight bulge in the middle of the image. To fix it, select the Rectangular Marquee, drag it out at the spot you want to correct, and follow the guide line as you do so. Then take the Clone Stamp, set it to a size that suits the areas, and choose a source while holding the Alt key. Then copy the area specifically over the problem spot. Work in small steps, because the colors and structures of clouds or sand can be matched well with a bit of patience.

Fine-tuning with the Clone Stamp
The Clone Stamp is very well suited for smaller irregularities. Make sure that you connect the edges of the selection cleanly. In sky and water, a transition line is quickly noticeable, so you should compare the source and the target again and again. With Command+D or Ctrl+D, you deselect the selection again as soon as the area is finished.

Crop the edges
If the rotation makes the edges irregular, you crop the image. To do this, take the Crop tool and set the frame so that no empty or crooked spots are visible. You can also leave the rest for now and fill it in later if the image section gives you more freedom.

Fill in missing areas with Content-Aware Fill
For larger empty areas at the edge, Content-Aware Fill is ideal. Mark the area generously with the Lasso tool and open the dialog via Edit, Fill. There, choose "Content-Aware" and enable Color Adaptation. Photoshop calculates the fill, which takes a moment for large areas. Simple structures such as sand or sky often turn out excellently. Repeat the process for the other edges and then deselect the selection again.

Remove distracting people
In the foreground, people sometimes get in the way and dominate the image. You can remove them with the Clone Stamp and the Patch tool. First copy areas from the surroundings, continue lines such as rock edges or horizons, and pay attention to shadows. This work is time-consuming, but worthwhile if the result looks coherent afterwards. Small mistakes that arise while copying are best fixed again with Content-Aware Fill.

Check the entire image
Before you save or print the panorama, you should go through the image in the maximum view. Move systematically through all areas, because transitions and shadows in particular are often only noticed on close inspection. A before-and-after comparison using the eye icon or the visibility of a layer helps you assess your progress.

Compare the result
Finally, you show the original layer again or compare the result with the source image. This way you immediately see how much you have improved the panorama.

Summary ??? Stitching a panorama in Adobe Camera Raw and post-processing it in Photoshop
A panorama is created in three phases: The individual images are prepared in Camera Raw, merged, and saved as a DNG. Afterwards, in Photoshop you straighten the horizon, correct distortions and edges, and fill in missing areas. With the Clone Stamp and content-aware fill, you achieve a coherent overall image. A final check protects you from errors before you print the panorama.
FAQ
Why should I remove the vignetting before merging?Vignetting creates dark image edges that can cause distracting transitions when the individual images are stitched together.
Which projection should I choose?For landscapes, cylindrical projection often delivers a reliable result, while perspective projection doesn't always work and takes longer.
What do I do if the perspective projection is not valid?Choose the cylindrical or spherical projection, which delivers similarly good results for many subjects.
What is the guide line for when straightening?With the guide line, you can quickly see whether the horizon runs straight and can check the rotation precisely.
When do I use the Clone Stamp and when the content-aware fill?The Clone Stamp is suited to small, detailed corrections, while content-aware fill is suited to larger, uniform areas such as sky or sand.
Why is cropping often needed after rotating?Rotation creates irregular edges, which are most cleanly removed by cropping or by subsequently filling them in.

