
A print-on-demand business thrives on orders, payments, and files working together smoothly. That is exactly why you need a well-configured Printify account. In this tutorial, the instructor shows you where to find the most important areas: from managing your stores and your uploaded files to payments, payouts, and tax information. If you understand what is behind each menu item, you will avoid unnecessary detours and billing errors later on.
The video is only loaded from YouTube when you play it – data (including your IP address) is then transmitted to YouTube/Google. More in the privacy policy
Key Takeaways
- Via the store menu at the top left, you manage all connected sales channels and can add new stores.
- The profile menu at the top right takes you to your account, your files, payments, taxes, stores, settings, and connections.
- Under "My Files" you will find all the image files you have uploaded so far.
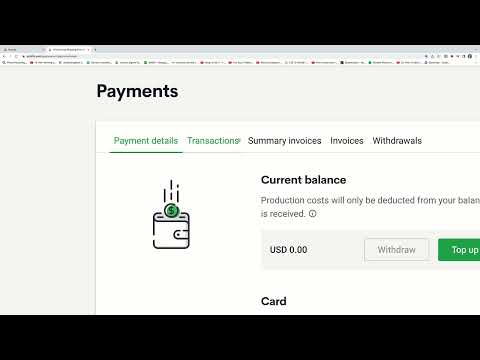
- Under "Payments" you add payment methods such as PayPal, view transactions and invoices, and trigger payouts.
- The VAT identification number belongs under "Taxes", especially if you sell within the European Union.
- Under "Connections" you set up API connections to other tools.
Step-by-Step Guide
Step 1: Keeping an Eye on Your Stores
You start at the top of the interface. There you will see the three dots with which you open your current store menu. In the instructor's example, one Etsy store and two Shopify stores are already connected. Via the "Manage my Stores" entry, you open the overview of all connected shops and can edit or check them there at any time.

Step 2: Adding New Stores
If you want to connect another sales channel, click "Add new store" in the store overview. Then you select the platform you want to work with. Available options include Shopify, Etsy, Squarespace, eBay, Wix, WooCommerce, and BigCommerce. The instructor points out that you can search the list by e-commerce platforms or marketplaces, depending on your needs. So choose specifically the channel where your customers actually shop.

Step 3: Opening the Profile Menu
Back to the main navigation: you reach all other settings via the menu at the top right. A click on your profile opens a list of all areas of your account. This list is the central starting point for the following steps and is worth using as an initial orientation before you delve into individual details.

Step 4: Checking Your Account Details Under "My Account"
In the "My Account" area, you will find the relevant information about your account. This includes the address you provided during registration. The instructor emphasizes that you must enter your own address and other data here. Check this information carefully, because it is the basis for invoices and the correct assignment of your business.

Step 5: Finding Uploaded Files Again via "My Files"
Under "My Files," all the files you have uploaded so far are stored. In the tutorial, these are image files that will later be printed onto designs for your products. If you are wondering where these files end up or how to find them again later, you are in the right place. You can access your file library at any time to reuse motifs without having to upload them again.

Step 6: Setting Up Payment Methods Under "Payments"
The "Payments" area is responsible for your finances. Here you can establish a connection to a payment service, such as PayPal, at any time. This determines how you receive money. The instructor also shows that this area contains further subitems with which you can follow payment transactions in detail.
Step 7: Evaluating Transactions, Summary Invoices, and Invoices
Within Payments, you can view your transactions. You can also create a Summary Invoice. It summarizes all sales you generated within a certain period. In addition, there is the Invoices area, where you can view invoices, for example when you pay money to Printify. This overview is a valuable foundation for your bookkeeping, because you can track revenues and costs separately.

Step 8: Initiate payouts via "Withdrawals"
If you want to withdraw your earned money, you use the "Withdrawals" section. Here you can have your earnings paid out. Make sure that your payment method is connected correctly beforehand so that the payout arrives smoothly.
Step 9: Enter tax information under "Taxes"
One point that the instructor explicitly emphasizes is the "Taxes" section. There you can enter your VAT identification number. If you sell within the European Union or to other countries as well, you should definitely provide this number. Without this information, the tax treatment of your orders may turn out incorrect. Therefore, check whether your number has been entered completely and without errors.

Step 10: Manage the stores in the profile menu
In the profile menu there is also the "Stores" item. It corresponds to the store overview that you already know from Steps 1 and 2. Here you manage all connected shops in one central place, which is especially practical if you operate several sales channels in parallel.

Step 11: Know the settings, but use them with care
The "Settings" section contains personal data. The instructor therefore deliberately does not open it in the video. You too should proceed carefully in this section and only change information that you actually need. Above all, it is important that you know where it is located.
Step 12: Establish connections to other tools under "Connections"
The last section is "Connections". Here you establish connections to other tools. The instructor talks about a so-called API connection, that is, an interface through which Printify and external applications exchange data. This can be useful for automations or for connecting specialized software. Only set up such connections if you really use the corresponding tool.

Summary – Printify Account Settings: Stores, Payments, and Taxes
The Printify account bundles everything that keeps your print-on-demand business running in the background. You manage stores via the store menu and can connect new platforms such as Shopify, Etsy, or WooCommerce. Under "My Account" you enter your data, and in "My Files" you find your designs again. In the "Payments" section you set up payment methods, check transactions and invoices, and initiate payouts via "Withdrawals". Under "Taxes" you don't forget your VAT identification number, and via "Connections" you connect additional tools via API. Once you have gone through these sections systematically, you keep an overview of your entire business.
FAQ
How do I add a new store to Printify?In the store overview, click "Add new store" and then select the desired platform, for example Shopify, Etsy, or eBay.
Where do I find my uploaded image files?You can find the files in the "My Files" section, which is accessible via the profile menu at the top right.
How do I have my money paid out?Open the "Payments" section and select the "Withdrawals" item there. There you can initiate your payout, provided your payment method is connected.
Where do I enter my VAT identification number?You enter the number in the "Taxes" section. This is particularly important if you sell within the European Union.
What is a Summary Invoice?A Summary Invoice is a summary of your sales that you can create in the "Payments" section for a specific period.
What does the "Connections" section mean?Under "Connections" you establish connections to other tools, for example via an API interface.


